Back to index
My KAP Rig #1
October 2001
Revised Nov-7-2001
 I began my research into KAP by reading all the back issues of
The Aerial Eye.
This was an amazing experience as the torential flow of creative ideas and solutions
is somewhat overwhelming. By the end of my reading, however, some key design guidelines
had formed in my mind.
I began my research into KAP by reading all the back issues of
The Aerial Eye.
This was an amazing experience as the torential flow of creative ideas and solutions
is somewhat overwhelming. By the end of my reading, however, some key design guidelines
had formed in my mind.
First, I would use a Picavet suspension. This seemed to emerge as the clear winner
after all was said and done. Even some vociferous pendulum fans had been won over by
Issue 5.2 of The Aerial Eye. In addition the Picavet looks highly portable, and
I knew that would be important to my long term usage.
Secondly, I determined that I would not use R/C controls on my first project. I am still
not convinced that guessing the aim with radio control from the ground is much of an
improvement over guessing your aim before launch, but regardless of that it's clear
that R/C brings much complexity and cost to the rig. My first rig would be manual.
Of course, I would use a digital camera. I hate film cameras anyhow, but how you could
ever hone your flying skills if you had to wait until an entire roll of film was finished
to see your results? Plus I expected to trigger my digital camera with
an electronic timer. That way each flight would bring me enough photos to improve
my chances of getting at least one good image.
The other two traits I desired in my rig were low wind resistance, so it wouldn't bounce
around in the air; and low weight, so I could fly more often and with a smaller kite.
My digital camera was a lot lighter than the SLR's the other people were flying, plus
I thought using a wire frame rather than aluminum bar would make it lighter and less
likely to catch the wind.
Construction
Having decided on goals that I thought were within my reach, I then began design the
rig so I could successgully build it. I had plenty of light steel rods (about like
a coat hanger) and I had brazed steel like this before, so I determined on a brazed
wire frame design.
The first step was to braze (or solder) up seven lengths of wire and 2 washers, as shown
below.
Based on Harald Prinzler's web pages I decided that a 12" square rig would be adequate,
yet still portable. Harald's point is that rigs much smaller than that are tricky
to balance with a camera mounted.
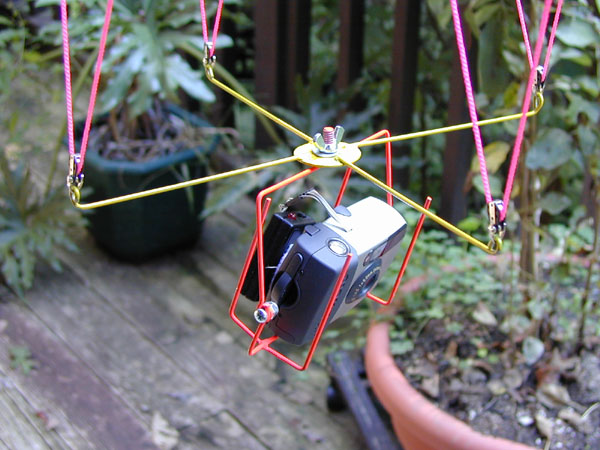
Once the two major components were brazed up, I bent them using a pair of pliers.
The "X" part merely needs loops bent at each end to recieve the pulleys. Note that for
Picavet, the pulleys will all be parallel on one axis of the rig. So at the end of
the four legs, two bends are in-line with their legs, two are perpendicular. (Note:
a variation on Picavet called the Rendsburg requires a different pulley orientation.
If you wish to use Rendsburg you have to decide at this point, not later. See The Aerial
Eye Vol. 1, No. 4)
The two straight pieces are bent to form a frame around the camera. Notice that the
placement of the washer in the lower element depends will vary depending upon the
center of gravity of the camera. The camera's CG must be in the middle of the "U".
Lastly some scrap metal pieces are bent and attached to the lower "U" to provide
protection for the camera (shown in green) and a bolt is attached to the top "U".
All that remains is painting and inserting two small bolts to join the upper and
lower "U" elements.
|
(Click to enlarge.) |
Electronics
To prepare the camera it is necessary to disassemble it and solder fine wires
to the shutter button connection, and optionally the battery terminals. Although it's
somewhat scary to open up the case of such a tiny device, it turned out to be relatively
straightforward to find where to connect. Be forwarned however, these cameras are made
up of very tiny "surface mount" components and you'll be hard-pressed to do much more
than find the shutter button and battery!
After lengthy trial and error I was able to construct a timer circuit that would fire
the camera at 30 second intervals and draw power from the camera's batteries. The timer
design can be found in Forrest Mims' basic electronic books at Radio Shack (such as
Timer, Op Amp & Optoelectronic Circuits, RS# 62-5032) or in
The Aerial Eye (Vol. 5, No. 1, "Camera Conversion" by Scott McCann). Everyone has
the same basic 555 timer design, but some use two 555's to give greater control over the
timing. With a single 555 it took me quite a while to get "5 second ON / 25 second OFF" timing.
 |
V+ is 3 volts (2 x AA batteries)
K1: 5V, 250 ohm relay, RS #275-232
D1: 2mA LED, RS #276-044
D1 glows in "Ready" mode, winks off when shutter fires
I used "Project Box" RS #270-288 to hold everything.
NOTE: I use a TLC555 (CMOS) because it will operate at low voltages. With the more
common 555 chip as the batteries run down the timer will quit before the camera.
|
All of the components are available from Radio Shack. The last step is to velcro it to
the back of camera. That way it can be removed and the camera returned to normal usage
when desired. Note that one useful side effect of this approach is that the camera's
desire to turn itself off after a period of inactivity is defeated by the steady clicks
of the shutter every 30 seconds!
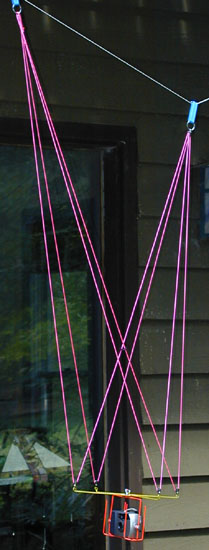
Suspension
After all this, the attaching of pulleys and the suspension is anti-climactic. Again I
took Harald Prinzler's advice about the length of string to use in the Picavet. His
excellent observation is that if it hangs much longer than four feet long you'll always
be walking around with your arms above your head when setting the rig up!
Picavet |
Rendsburg |
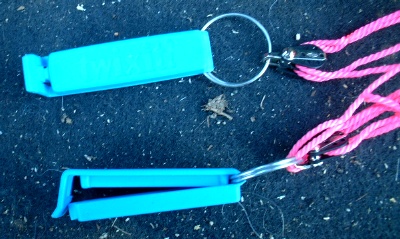
 The last decision is how to attach to the kite line. The Aerial Eye has a wide
variety of complex gadgets for this purpose. Most of them seemed impossible to attach
one-handed and heavy as well. The best option I saw came from Christian Becot. He
designed a U-shaped wire thing you could wind the line into. But none of these seemed
simple enough to me.
The last decision is how to attach to the kite line. The Aerial Eye has a wide
variety of complex gadgets for this purpose. Most of them seemed impossible to attach
one-handed and heavy as well. The best option I saw came from Christian Becot. He
designed a U-shaped wire thing you could wind the line into. But none of these seemed
simple enough to me.
I searched hardware stores and fishing rod dealers for solutions. I was tending toward
alligator clips or spring loaded clips based on fishing floats when I discovered the
solution in my own kitchen. One type of potato chip bag clip had sufficient flex to grab
a kite line, but a secure enough latch not to let go. It's light, can be handled with
one hand, and attaches with a satisfying "click".
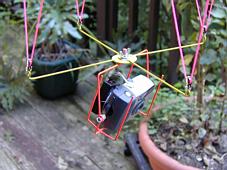
For the suspension itself, I ordered six "jewel-like" Pekabe pulleys and used pink "Mason's
Twine" to rig it. This turned out to be a fortuitous choice since the bright pink string
makes it easy to find the rig laying on the ground or in the bushes. It's much more visible
than the camera rig itself, even though I painted it bright colors too.
Conclusion
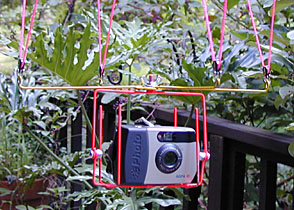
I've now been using the rig for several months and I'm quite pleased with it. It flies
well, the wire guards have protected the camera in several hard landings, and it's easy
to adjust.