FOR AMATEURS
By
H.H. Waters
With preface by F.W. Longbottom, F.R.A.S. Director
of the Photographic Section of the British
Astronomical Association
London:
GALL & INGLIS, 31 Henrietta Street, Strand, W.C.2
AND EDINBURGH
|
The subject matter at this Handbook originally appeared in serial form in the "English Mechanic and World of Science." The Author is much indebted to Mr J. Gall Inglis for his help in the re-arrangement of the matter for publication, and for additional Notes and Tables.
|
| H.H.W. |
The romance of Celestial Photography in still with us, and although the problems of the oldest of the sciences are daily yielding to the attacks of one of the youngest, as one barrier falls, others lie across the track, and the joy of strenuous endeavour is ever the reward of the earnest investigator.
Who shall say that even photographing stars in broad daylight is the limiting miracle of the modern physicist? May he not one day record those countless blind suns of our universe -- the 'dark stars'? Dare we venture to foretell the possible applications of a power so new?
The difficulties which might have faced the beginner in this most fascinating pursuit, are met before they reach him in this modest guide, and the best service a 'Foreword' can render, is to promise those who entrust themselves to its care the delight of being able to contemplate their results in a form at once more accurate than those of the most conscientious observer using the older methods, and more beautiful than the consummate artist can hope to portray.
F.W. LONGBOTTOM,
(Director of the Photographic Section of the
British Astronomical Association).Chester, 1921.
| PAGE | |
| Author's Note | ii |
| Preface | iii |
| Index | vi |
| Introduction | 1 |
| CHAP. | PAGE |
| I. General Conditions | 3 |
| II. Apparatus, and Methods of Working | 8 |
| III. Adjusting the Stand and Samera | 28 |
| IV. 'Telescopic' Photography | 34 |
| V. The Sun, and Planets | 39 |
| VI. The Moon | 43 |
| VII. Stellar Photography: Star Clusters and Nebulae | 54 |
| VIII. Comets and Meteors | 66 |
| IX. Developing, Printing and Enlarging | 72 |
| Appendix: -- Notes on the Construction of Apparatus, Fittings, &c., and Reference Tables | 80 |
| Celestial Photographs and Illustrations. | |
| PLATE | PAGE |
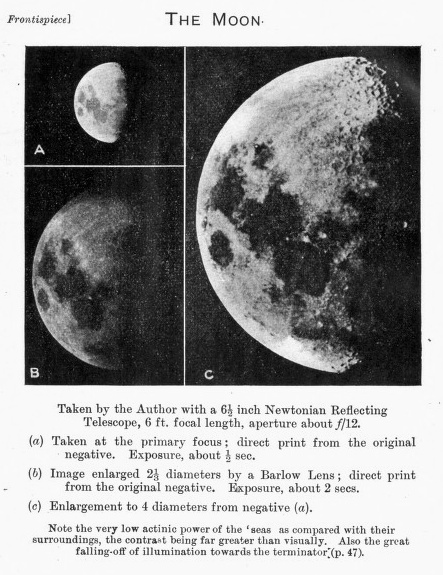
| I. The Moon ... (3 Photos) | Frontispiece |
| II. The Milky Way, in Cygnus ... (2 Photos) | face p.55 |
| III. A Star Cluster and a Nebula ... (2 Photos) | " 56 |
| IV. How not to do it! Result of Averaging the Focus, and of Unbacked Plates ... (2 Photos) | " 60 |
| V. A Comet, and the Milky Way ... (3 Photos) | " 67 |
| FIG. | PAGE |
| 1. Field Camera mounted on Telescope | 12 |
| 2. Three Cameras mounted on Equatorial Stand | 13 |
| 3. Dark Slide Carrier | 14 |
| 4. Stretcher Bars | 16 |
| 5. Home-made Equatorial Head and non-portable Stand | 18 |
| 6. 6½ inch Photographic Reflector, with Box Camera | 19 |
| 7. Huyghenian Eyepiece | 21 |
| 8. Tube Camera Mounted on Telescope | 22 |
| 9. Adjusting Ring, for Guide Telescope | 23 |
| 10. Simple Flap Shutter | 29 |
| 11. Polar Axis Adjuster | 30 |
| 12. Star Trails, for Focussing | 59 |
| 13. Appearance of Star under Cross-wires | 60 |
| 14. Battery of Instruments for Meteor Photography | 70 |
| 15. Clamps | 83 |
| 16. Photographic Reflecting Telescope | 85 |
| 17. 'Run-off' Roof and Telescope House | 88 |
INTRODUCTION.
The average amateur photographer doubtless takes a passing interest in the beauties of the night sky, and nearly every amateur astronomer of my acquaintance is a dabbler in photography. Many seem to be deterred from combining the two hobbies by the impression that nothing can be done without very elaborate and costly apparatus, an impression which the perusal of the average astronomical textbook does little to remove. Yet photographs of comets, the Milky Way, etc., from which valuable scientific results have been deduced, have been secured with simple and inexpensive apparatus of a portable character. One of our greatest living astronomers, Professor G. E. Hale, states, 'The results of amateur observations may not only be useful -- they may equal, or even surpass, the best products of the largest institutions.'
A wealth of information is scattered amongst the publications issued by the various observatories, the Royal Astronomical Society, and the British Astronomical Association, but there papers are generally of an advanced nature, and, so far as I am aware, no elementary handbook on the subject exists. Several letters received asking for information and hints have induced me to write this handbook in the hope that is may encourage amateurs to take up a branch which offers many possibilities to the determined worker, and if it assists in smoothing out some of the many difficulties encountered by the beginner its mission will be well accomplished.
It is probable that many who peruse this book will merely want to know to what extent it will be practicable for them to 'take a shot' now and again of celestial bodies, as they have not the time and, perhaps hardly the inclination as yet -- to go in for serious work. These have not been forgotten in preparing this book, but it is more especially written to encourage amateurs to undertake a regular and steady course of observation, which is not only its own reward but is also of the highest value scientifically.
The reader who is already an expert photographer but not yet an amateur astronomer, will find a new and vast field on which to try his skill. To the amateur astronomer I would suggest that in solving the many outstanding problems, the photographic plate is likely to play an increasingly important part.
Bearing in mind that this handbook is written for beginners, I have confined myself entirely to practical instructions which should enable the amateur to make the best use of the apparatus at his disposal. I shall assume, however, that the reader is already familiar with the ordinary photographic processes.
No reference has been made to the use of the prismatic camera or grating spectrograph, as these are beyond the limits of an elementary treatise.
Celestial Objects always moving.-- Owing to the Earth's rotation, all astronomical photography deals with objects which are in ceaseless motion with regard to the camera, and the amount of movement on the plate, even in a short period, is a good deal more than might be expected.
If, for instance, we take an ordinary view lens of 7½ inches focal length, which on a quarter plate includes an angle of about 30°, and focus at one end of the plate the bright equatorial star δ Orionis, the star will take 2 hours (1-12th day) to travel across the plate, 30" being 1-12th of 360°. The length of a quarter plate being about 4 inches, in five minutes (1-12th hour) the star will travel 1-24th of 4 inches, or 1-6th inch, so that the star image will appear on the plate as a short line, even in that small interval.
If a lens of 15 inches focal length is used, which will include an angle of 15° only on a quarter plate, the star will travel across the plate in half the time, and the trail will be 1-3rd inch long in five minutes. Thus the longer the focal length of the lens, the faster is the motion across the plate, and as magnifying the image is equivalent to lengthening the focal length of the object glass, it is evident that the greater the magnification, the greater is the speed of the object across the field of view. Objects on the celestial equator move fastest, and the further they are away from that equator, the slower does the speed across the plate become, until, at the Celestial Poles, there is no motion at all.
If, therefore, we are to procure sharp photographs, some means of counteracting the effects of the Earth's rotation mast be found, as instantaneous exposures are out of the question, except in the case of the Sun -- and the Moon, when on a small scale.
The problem is solved in the case of fixed stars, comets, nebulae, and planets, by mounting the camera or photo-telescope on an equatorial stand, and causing it to follow exactly any object on which it is set by means of (a) a driving; clock, or (b) a hand slow motion, suitably connected to the polar axis. In each case the rate of travel of the photographic instrument must be continuously under the control of the observer; this is attained by watching either the object itself, or in the case of a nebula, a suitable star near it, through a separate or guiding telescope mounted alongside, and travelling with the photographic instrument.
Atmospheric Factors. -- On the other hand difficulty arises in another direction. Our atmosphere extends some 100 miles or so above the Earth's surface, and is composed of innumerable everchanging strata in different physical conditions. Sometimes when it is calm on the surface there are strong air currents a few thousand feet up, as we often see by the clouds. Ordinarily, temperature decreases with the height, but sometimes it is warmer high up than at the surface, and different strata may bear different proportions of water vapour, so that they have different refractivities. And as the atmosphere is in a state of perpetual agitation, and strata are constantly mingling, the physical condition of the air through which the light-rays from the star pass, may undergo considerable alteration during an exposure, as, for instance, when haze gathers. Every observer, also, knows how frequently it is impossible to get proper definition even with low powers, and how the Sun's and Moon's limbs 'boil.'
Thus, even in clock-driven instruments, for the best pictures the observer is incessantly adjusting his telescope to suit small displacements in the position of the guide star caused by atmospheric changes. And this impossibility of obtaining perfectly steady atmospheric conditions, especially for many seconds in succession, may help the reader to understand why high-power photographs of the Moon and planets, in general, seem out of focus, and have less detail than can be made out by the eye, which takes in the view in an instant. Mountain observatories have the best conditions in this respect, as the light received has had a lesser depth of atmosphere to traverse.
Instruments. &c.-- As we have to deal with objects ranging from the Sun, with its intense light and heat, to stars so faint that they are invisible even in the most powerful telescopes, it will be quite obvious that no single instrument in suitable for all classes of astrophotography.
For the Sun, Moon, and planets, we require a long focal length, with its small field and correspondingly large image, for which a telescope is well suited, but to make a map of a constellation, extending over many degrees, we need an instrument covering a large field, and also of a high angular aperture, owing to the faintness of the objects -- in short, an ordinary camera lens.
Our subject, therefore, resolves itself into two branches: -- (1) Telescopic photography, and (2) Camera photography, which does not require a telescope at all, except for guiding.
Good photographs of the Sun and Moon can be taken with telescopes of the dimensions usually found in the hands of amateurs, but the planets, dense stellar clusters, and the smaller nebulae, require longer focal length, to get them of sufficient size, with its attendant difficulties of mounting, guiding, and, it may be, longer exposure.
Star maps, large and diffused nebulæ. comets, and meteors, do not require a telescope, and are within the range of equatorially-mounted ordinary photographic lenses, from one inch and upwards in aperture, and with focal lengths corresponding to an angular aperture of ƒ/3 to ƒ/5.
In all astrophotographic apparatus, the stand and mounting are of supreme importance. Accurate adjustments, freedom from vibration, and -- if anything but snapshots are attempted -- smoothness of working, freedom from 'spring' due to imperfect bearings, also quick control of the guiding mechanism, whether hand slow motion, or clock, are essential if successful results are to be obtained. One has only to look at the beautiful photographs of the Milky Way taken by professor Barnard, some of them with a lens of only 1.6 inches aperture, to appreciate what can be accomplished with a small lens well mounted and skilfully controlled.
In many localities the climate seldom permits of very long exposures owing to the prevalence of fog, &c., during the winter months, and it will frequently happen that an excellent photographic night is followed by a week of cloud. Under these conditions, if serious work is attempted, we must make use of every opportunity, and endeavour by the use of fast lenses and the most rapid plates to cut down the exposure time as much as possible.
Many nights which look bright and clear will often be found very poor for photography, and only by experience will the worker find the most suitable ones. An east wind is generally fatal to good definition. The writer finds that generally speaking the best months are January, February, and September, but good nights occur in every month.
If you get a calm steady evening, when Moon and wind are absent, make the most of it, for they are all too few.
Telescopes.-- The ordinary achromatic refracting telescope is not altogether suitable for photography. as the visual and chemical foci are not coincident, as they are in ordinary photographic lenses. The chemical focus of the object-glass, however, may be found by making a number of exposures and carefully marking the position at which the sharpest definition is obtained.
For simple crown-glass lenses, this focus is nearer the lens than the visual one by as much as 1/30 of its focal length; [Traill Taylor's 'Optics of Photography,' p.28.] in most achromatic refractors, however -- which have object-glasses composed of more than one lens -- it is slightly further away (p.35). Once this position is found, it may be accepted as correct for all celestial objects photographed at the 'primary focus' (see p.34). The results thus obtained, though fairly satisfactory, are not so sharp as those given by object glasses specially designed for celestial photography, or by reflectors, which have the actinic and visual foci coincident.
The Newtonian form of reflecting telescope is a far more efficient photographic instrument for the amateur. The single optical surface brings the visual and chemical rays to the same focus. It is very much cheaper than an achromatic of anything approaching the same size, and the ratio of focal aperture, and consequent rapidity, is much greater.
To adapt either refractor or reflector for photographic purposes, the following accessories are required: --
Nos. 1 to 4 are easily and inexpensively constructed, and do not interfere with the ordinary use of the telescope. Instructions for making them are given later.
Ordinary Photographic Lenses are suitable for astronomical work -- but with limitations as to linear aperture and ƒ/ratio, except for solar and lunar eclipses.
For stars (in which linear aperture, not ƒ/ratio, is the governing factor, see p.56), the clear aperture of the lens should not be less than 1 to 1½ inches in diameter. A lens with 1½ ins. aperture will record stars down to the 10th mag. in 30 minutes, using extra rapid plates. (Faintest naked-eye star= mag. 6½).
For comets, nebulae, and meteors, the ƒ/ratio of the lens should not he less than ƒ/6.
Lenses of smaller diameter or ƒ/ratio could be used, but require too prolonged exposures to he serviceable.
Portrait lenses, especially the large old-fashioned type, having large diameter and ƒ/ratio, suit both stars and comets, nebulae, meteors, open clusters, &c., &c. They can often be picked up very cheaply nowadays. The writer obtained a 4½-inch lens by Grubb, of 18½ inches focal length for £5 10s. ($27). Numbers of old-fashioned portrait lenses by makers of world-wide reputation are offered for sale by second-hand dealers, and a little judicious selection will soon supply a useful battery. It is well to avoid lenses by unknown makers, and those which have an arrangement for producing, diffusion of focus.
The disadvantages of the old-fashioned portrait lens are its bulk and weight, and very few tripod equatorial stands are steady enough to carry one of more than 8 or 9 ins. focus. The area of plate covered by them is generally small, compared with an anastigmat of the same focal aperture. Some that have been tried by the writer were useless, each star being represented by an arrow or dagger-shaped image.
But a good 3 or 4-inch diameter lens working at ƒ/3 or ƒ/4 is a very valuable addition to one's kit. Small lenses are generally found to be more rapid than larger ones of the same focal aperture, as a considerable amount of light is absorbed by the extra thickness of the glass in the larger instruments.
The area of critical definition of all lenses when used on the stars will be found to be exceedingly small when compared with their performance on terrestrial objects. The 18½-inch focus Grubb portrait lens in the possession of the writer will cover a 5 x 4 ins. plate quite sharply up to the edges when carefully focussed, but quarter-plates are always used, and for general work within reach of amateur equipment, the quarter-plate is the best size to use. (See also note on p.58).
Dew-cap.-- A good long dew-cap of cardboard or tin, blackened inside, should be fitted to the lens, unless it has a very deep hood. Besides preventing any deposit of moisture forming on the glass, it is useful inasmuch as it will cut off stray light from neighbouring house windows. A dew-cap is shown in position on the lens in Fig. 1 (p.12). Care must be taken that it does not sag, or it will cut off the field of view.
Cameras for magnified telescopic photographs:-- When an enlarging lens or eyepiece is used to magnify the primary image, a small, light, box or tube camera (see Appendix) may be made to fit on to the eyepiece tube, with grooves for the dark slide at the back. The best method of attachment, in the case of ordinary eyepieces, is to have a small flange of stout brass (S.W.G. 17 or 18) fixed to the camera front, and screwed to fit the thread provided on the eyepiece for the dark sun-glass.
Another method is to have a wooden or brass sleeve, 1½ inches or so in length, fixed on the camera front, and fitting tightly over the eyepiece tube, which is slipped into the sleeve from the inside of the camera. The whole apparatus is then inserted in the main telescope tube. Some kind of screw clamp is desirable, after the fashion of a bicycle steering-post head, to keep every thing firm in its place. A leather washer, glued inside the camera front, will bed against the collar holding the eyepiece, and prevent any light from entering.
The size of the image depends on the distance of the plate from the eyepiece, as explained on p.37; the length of the camera should therefore be adjusted by experiment to give the required size.
Cameras for Doublet-Lens Photography.-- As we are photographing a class of objects whose distances from the lens can all be considered infinite, once the correct focus of a lens is obtained, no further movement of the camera extension is required. By far the best plan, therefore, is to have a separate camera for each lens, and when the focus is accurately determined, lock the whole firmly together, so that no further accidental movement is possible when the camera is being attached to or removed from the mounting.
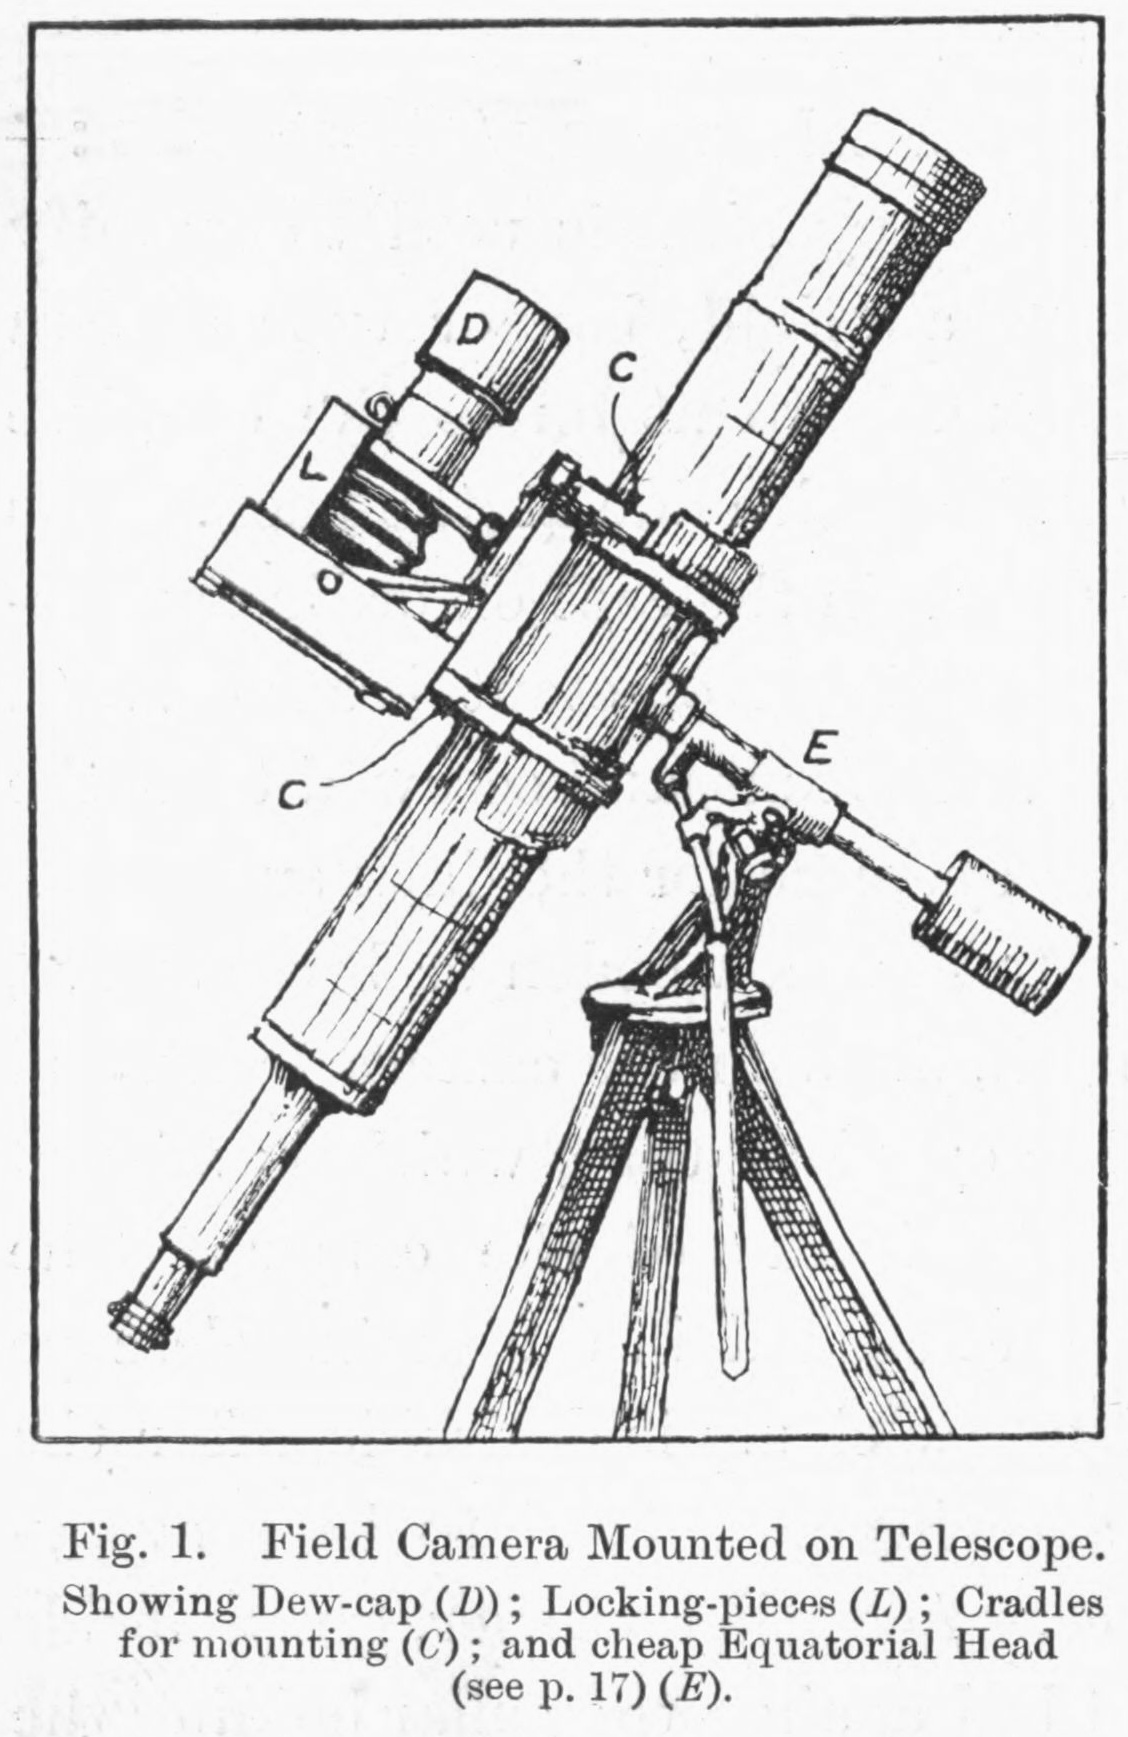
Small light lenses can be fitted to quarter-plate field cameras, preferably of the square bellows type, but in all cases such cameras should be strengthened with locking-pieces, as shown in Fig 1, which should be firmly secured after the correct focus is obtained. The object of these locking-pieces is to prevent the tendency of the front to 'sag,' owing to the weight of the large lens, for an astro-camera is used at many different angles to the horizon, and nothing must be allowed to disturb the register of the lens and plate in any position they are likely to assume. Rising fronts and other refinements so dear to the heart of the architectural worker are unnecessary.
Heavy lenses, and those fitted with rackwork for focussing, should be mounted on box-form cameras of thin, light, well-seasoned wood, or on tube-form cameras of tin or pasteboard. These are easily made with a little care (see Appendix). In constructing those to be used with the heavier class of portrait lenses, it is advisable to extend the bottom board of the box-camera as far as, or a little further than, the hood of the lens. A piece of ¼-in. wood screwed on to it, with a semi-circular edge fitting closely under the lens tube, and a cord or strap round the tube will keep everything secure and perfectly steady. A flap shutter can also be added on the extended baseboard, as explained on p.23, opened and closed by cords.
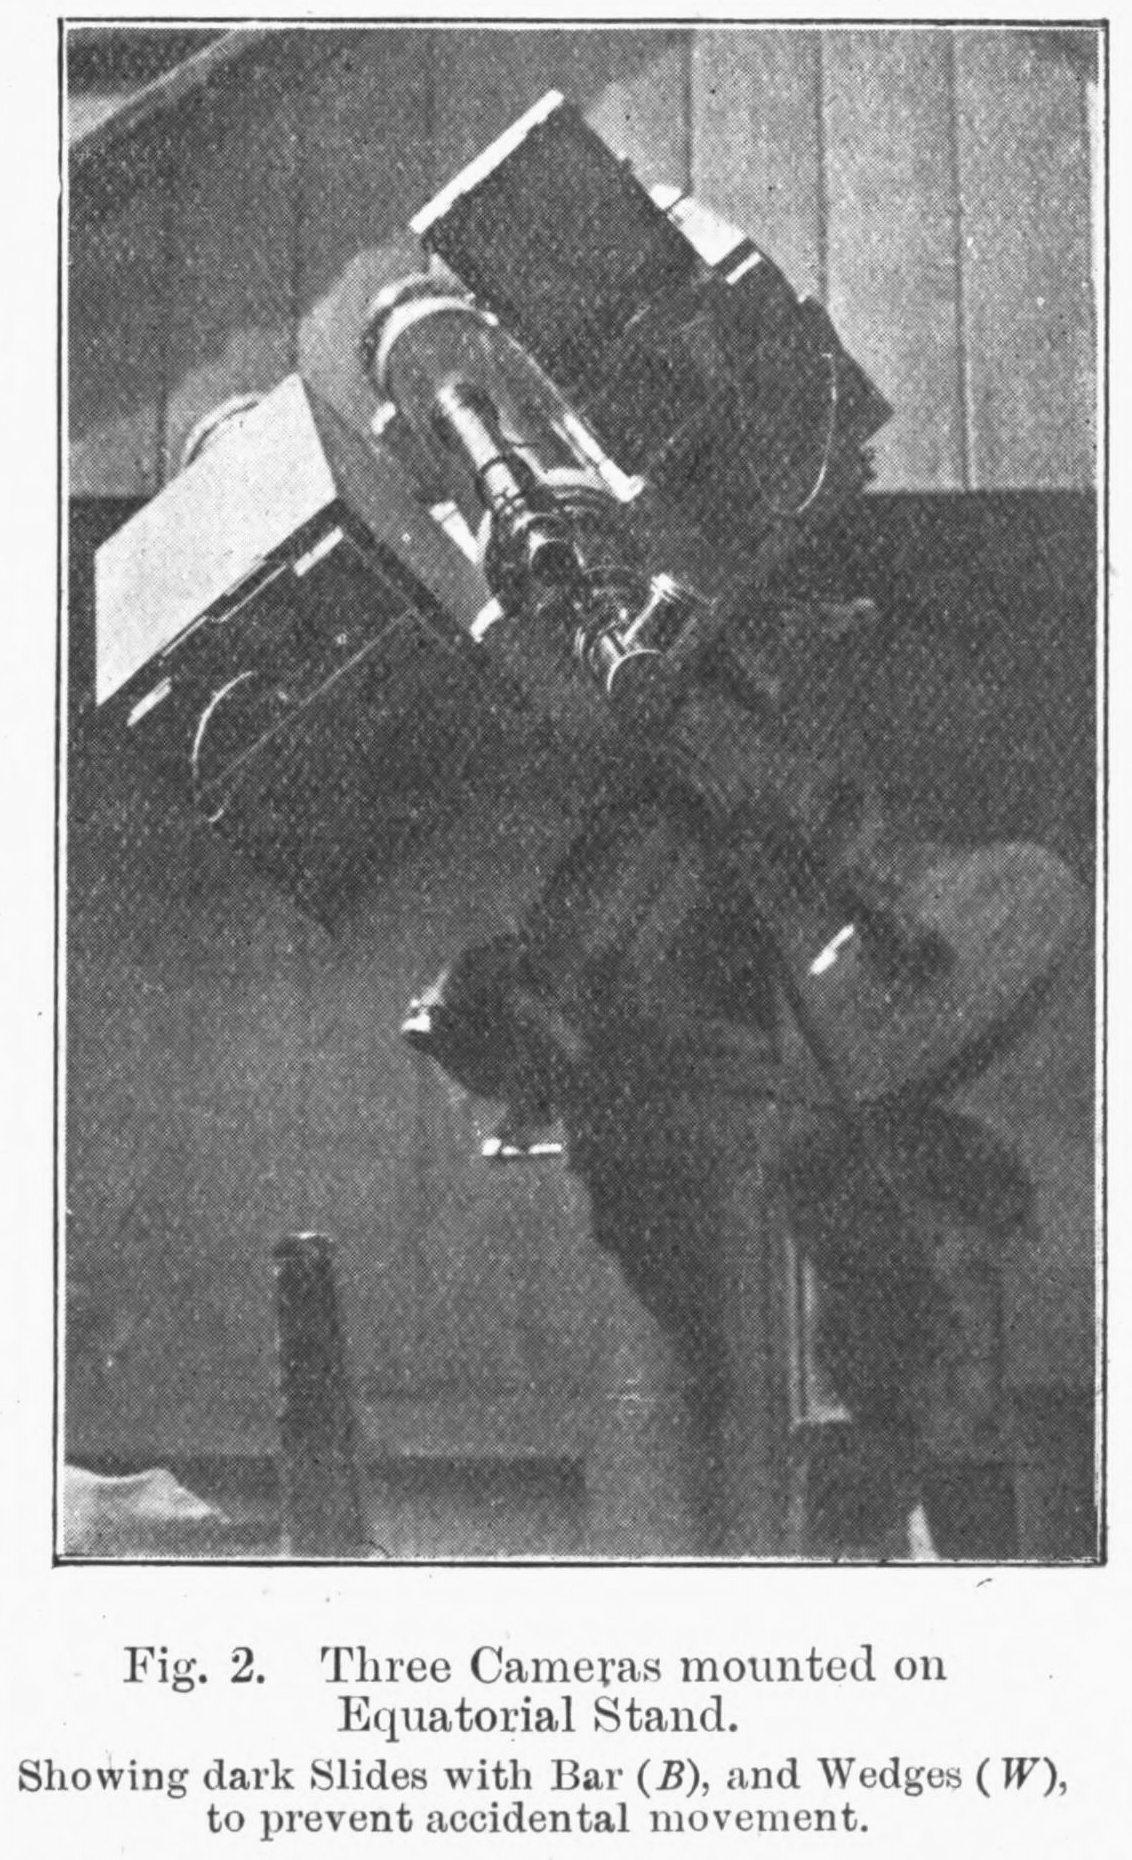
Fig. 2 shows a good form of back for a box camera; a wooden bar is screwed across the back, at such a distance as to leave say ¼ inch space behind the slide; the wedge inserted between the wooden bar and the dark slide renders any accidental movement impossible.
For rough preliminary adjustment of the back, use a focussing screen, inserted in the (double) dark slide itself, and wedged against the rebate in the position the plate will occupy, drawing out both shutters.
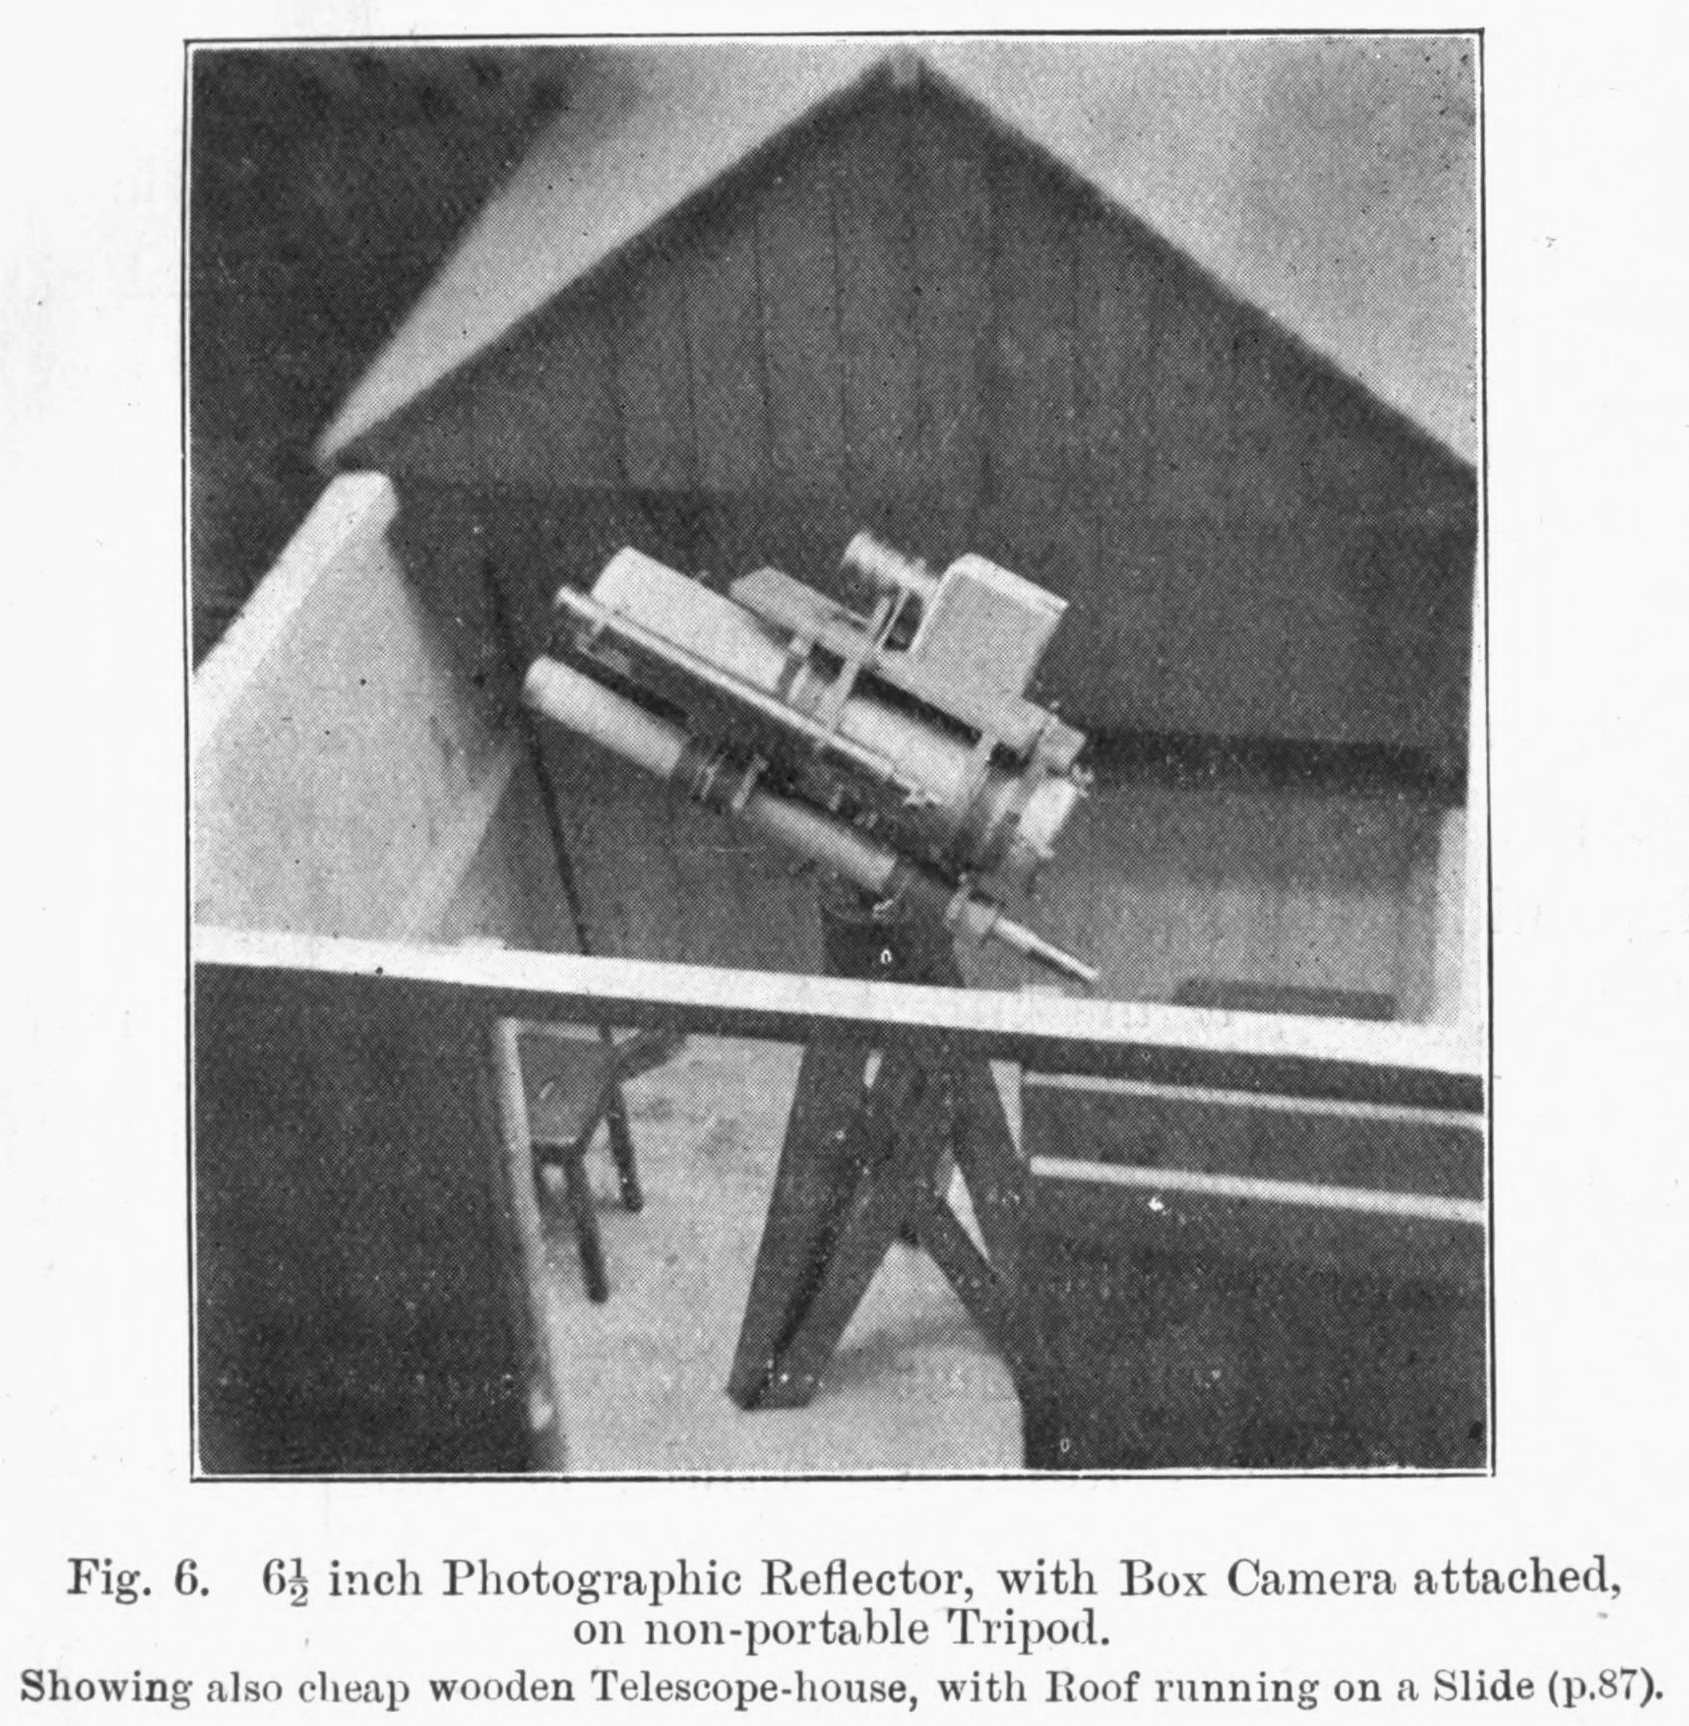
Photographic Reflecting Telescopes.-- These are usually made with mirrors working at an aperture of ƒ/6 or higher. The tube of the telescope forms the camera, and the plate-holder is either placed inside the tube in the position the 'flat' or diagonal plane mirror would occupy, or if a 'flat' is used, at the position which would be occupied by the eyepiece in a visual instrument. In the first case the field is reversed as regards left and right as in a looking glass, there being only one reflection. For successful work a photographic reflecting mirror demands the highest optical and mechanical skill, and is very costly. Both equatorial and guide telescope must be of ample size, and the adjustment and driving necessitate a degree of accuracy seldom obtainable in amateur observatories. Figs. 6 and 16 show the author's telescope.
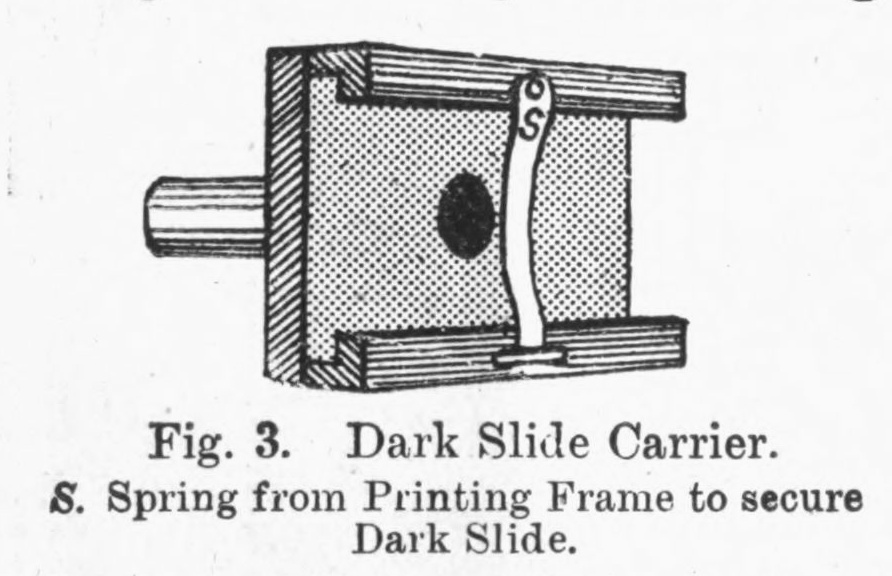
Dark Slide Carrier.-- As already mentioned, this is required for objects photographed at the principal focus, and Fig. 3 indicates its general features. It is quite easily made by following the instructions in the Appendix, and is inserted in the telescope tube in place of the eyepiece tube; focussing is effected by the rackwork on the telescope in the ordinary way. The carrier should be made about twice as long as the dark slide itself, so that by moving the latter along the grooves, several successive exposures may be made on one plate.
Dark Slides.-- These are often a source of trouble. If the old-fashioned book pattern are used, it will generally be found on shaking them when loaded, that the plates have a tendency to rattle. As the plates might shift slightly during exposure, and thus blur the image, this should he prevented by an extra thickness of black cardboard or thick black paper between the plates, and a small slip of cork inserted between the edge of the plate and the frame of the slide. Care must be used, however, for if too much packing is inserted the plates may be broken on closing the slide, and this may not be discovered until after the exposure has been made. Solid dark slides may need to be dealt with in the same manner.
Stands.-- The most important part of an equipment for astronomical purposes is the stand. This may sound strange, but it is true nevertheless. For however perfect your object glass or mirror, if it is not properly supported so that the object can be held steadily, definition is impossible. These remarks apply with even greater importance to instruments intended for astro-photography, for in most cases the results depend upon the cumulative action of light upon a number of infinitely small points on the grain of the plate, and any wander of the light rays from the exact position in which they first commence their action upon the plate, not only distorts the correctness of the image so formed, but also greatly increases the exposure required to register any given amount of detail.
Hence when erecting a stand, and especially a portable tripod stand, for celestial photography, it is essential to select very carefully the ground on which it is placed, and to make sure that each leg is standing on perfectly firm ground, and has not the slightest tendency to slip, or sink into the ground, under either vertical or twisting pressure on the top of the stand. Long narrow-pointed legs require special attention in this respect, as they penetrate readily on softish ground.
The pillar of an alt-azimuth stand sometimes tends to unscrew if the azimuth axis is stiff, and before exposing care should be taken that it is quite firm. Sometimes, also, the same axis is none too well locked on the pillar, and 'gives' slightly under the strain of turning.
The usual 'tall tripod stand' of the optician's catalogue is usually a delusion and snare as far as real steadiness is concerned; the home-made 'pyramid' form shown in Fig. 5, although not portable, is very much more suitable for telescopes over 3½ inches aperture with cameras attached. A pair of strong household steps makes a good foundation on which to mount a small equatorial head.
Permanently-fixed stands are, of course, much to be preferred to tripods, however good the latter may be; for details of these see page l8.
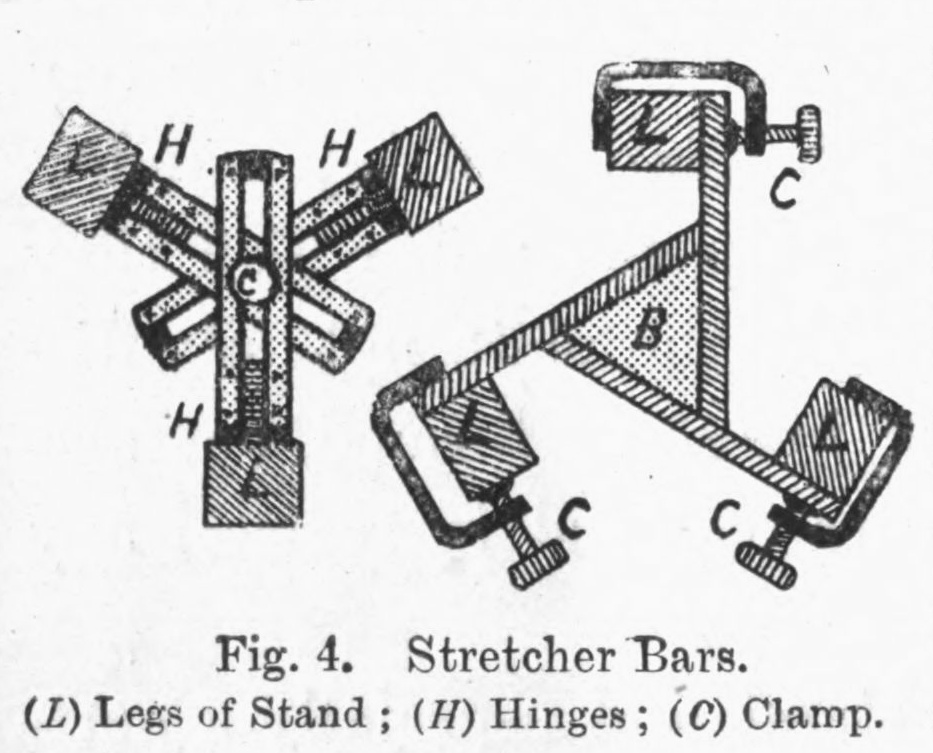
Stretcher Bars between the legs, on hinges (which must be quite free from 'shake'), slotted, and clamped by a screw in the centre after the tripod stand is firmly set, are of great assistance in promoting steadiness and preventing slipping; they also facilitate 'adjusting' (Chap. III.), as the whole stand can be moved without fear of altering the relative position of the legs. They are best fixed about 3 feet above the ground, and may be made of wood, or parallel metal strips riveted together as in Fig. 4: a simpler but less convenient form is also indicated.
Equatorial Mounting.-- Possessors of telescopes, either reflectors or refractors, mounted on the usual forms of altitude and azimuth stands, can obtain excellent photographs of the Sun and Moon, as will be shown in a succeeding chapter, the exposures being very short; but for all exposures longer than a snapshot of say ½ second. some form of equatorial mounting with slow motions is an absolute necessity.
The principle of the equatorial and its adjustments are described in almost every astronomical text book. Briefly, it consists of a main axis, accurately directed on the Pole of the heavens, known as the Polar axis; at right angles to it is another axis, known as the Declination axis, one end of which carries the telescope, the other a suitable counterpoise. As, owing to the diurnal rotation of the Earth, the stars appear to move uniformly in circles parallel to the celestial Equator, a star will be kept continuously in the Field of view if the instrument, once directed to it, be made to revolve uniformly and at a proper rate around the main or Polar axis.
There are many patterns of small equatorial mountings obtainable, most of which, with a little adapting and improvement, can be used successfully for small-scale photographic work. A very cheap form is shown in Fig. 1,carrying a 3-inch telescope and a portrait lens of 5 ins. focus. The legs of this stand, which are 5 ft. long, have had stretcher bars fitted about 3 ft. from the ground in order to give additional rigidity. Slow motion is provided by means of a screw working in a brass nut. A piece of spiral spring, which makes a very good universal joint, connects the end of the screw with the long handle. The cost of this stand was about 50s. ($12½)
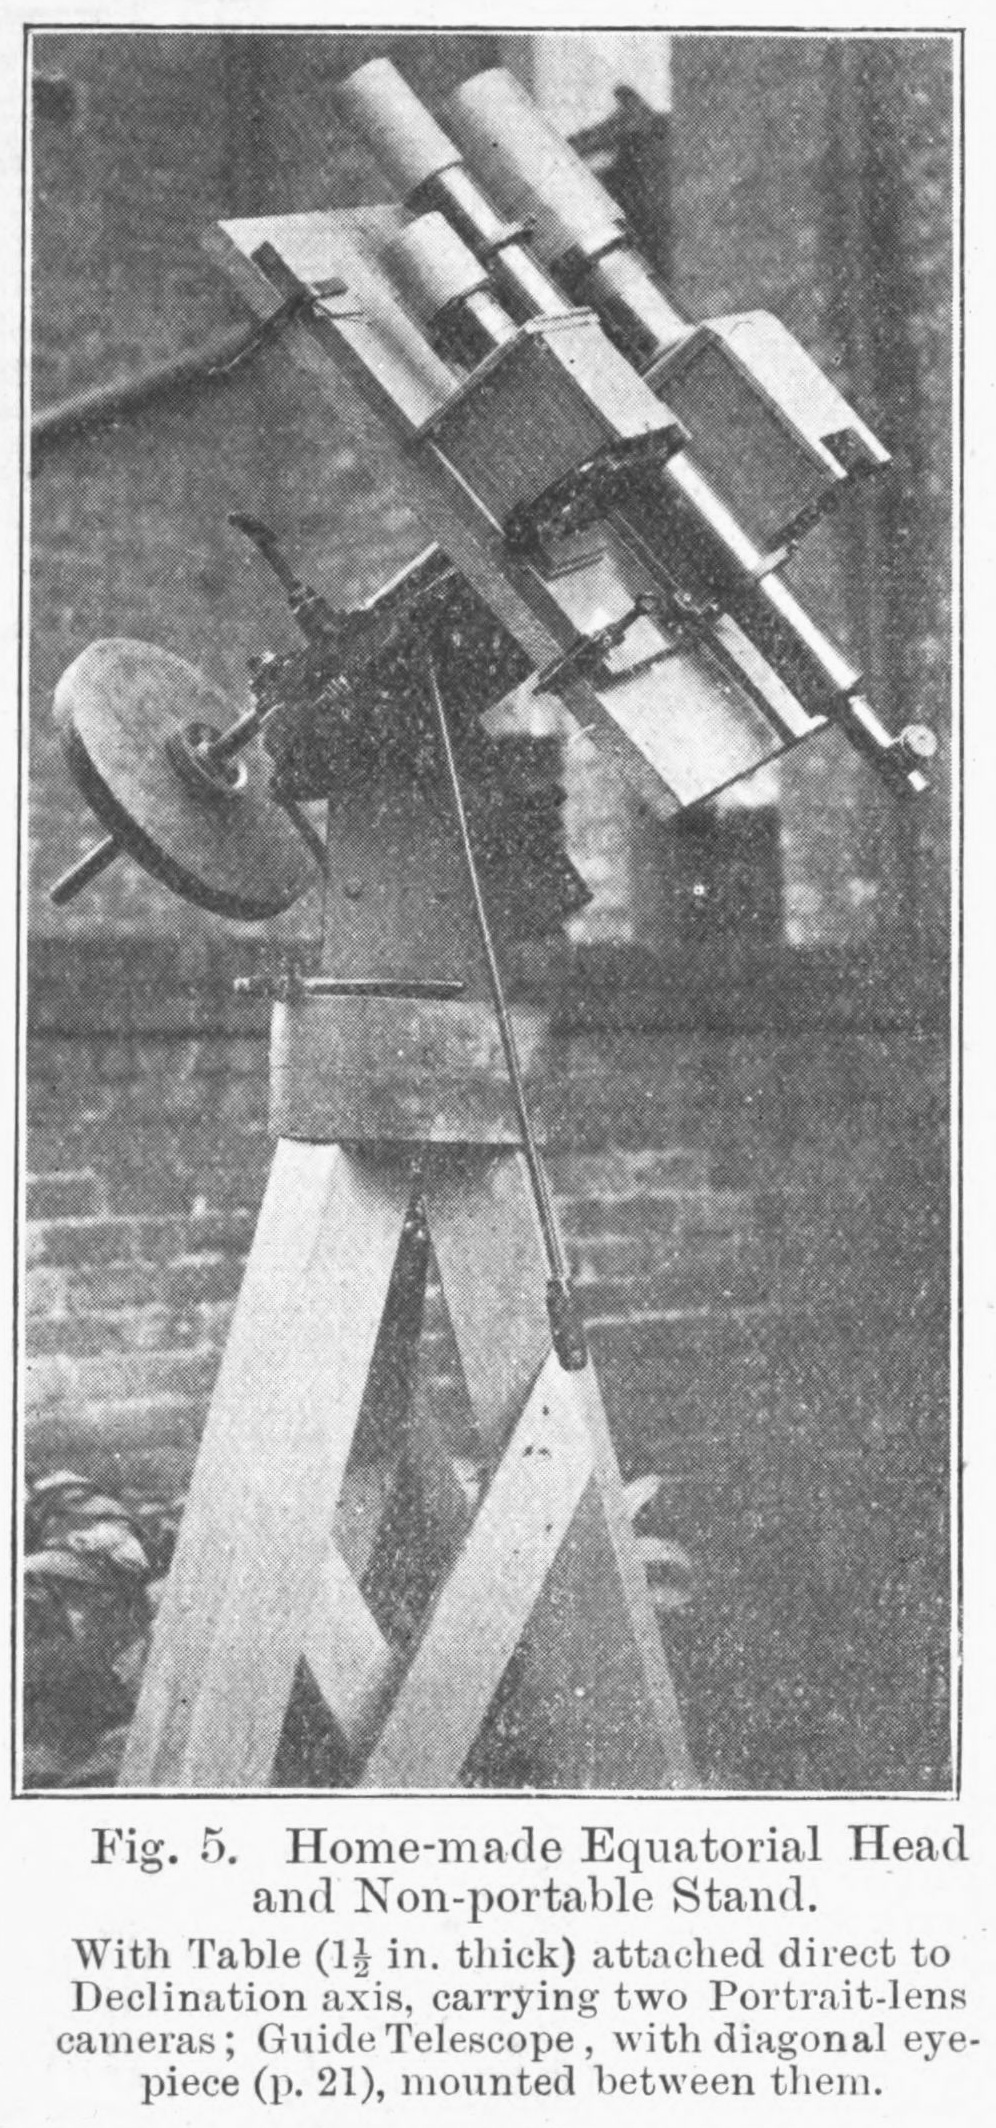 The stand illustrated in Fig. 5, which was used for
years by the writer, was home made, the tripod being
the work of a local carpenter. An ordinary cast-iron
cogwheel, about 12 inches in diameter, and having 180
teeth of about 3/16 circular or 15 diametral pitch, forms
the driving circle, and the whole thing is well within the
capabilities of the ordinary amateur to construct. This
stand was exceedingly steady and rigid, and
the worm screw meshing into the cogs worked
with great smoothness, and the stand was only
supplanted by a good equatorial with ballbearings
and driving clock.
The stand illustrated in Fig. 5, which was used for
years by the writer, was home made, the tripod being
the work of a local carpenter. An ordinary cast-iron
cogwheel, about 12 inches in diameter, and having 180
teeth of about 3/16 circular or 15 diametral pitch, forms
the driving circle, and the whole thing is well within the
capabilities of the ordinary amateur to construct. This
stand was exceedingly steady and rigid, and
the worm screw meshing into the cogs worked
with great smoothness, and the stand was only
supplanted by a good equatorial with ballbearings
and driving clock.
If a permanent site, with good sky room, is available, it is by far the best plan to sink a stout post, or better still a cast-iron pipe, into the ground; carefully level the top, and fix your equatorial head permanently upon it. It can be covered when not in use, with a casing of wood or tin, or if, later on, more advanced work is taken up, a small wooden house, with run-off roof (Figs. 6 and 17, and p.86), can be built around it.
Get the best equatorial head you can afford or construct, with good hand slow motions, and leave driving clocks alone, even if you can afford them, till you have thoroughly mastered hand control. Then if you are still as keen as ever (and astro-photography is most fascinating work and grows upon one after the initial difficulties are overcome, even though no definite scientific work is undertaken) put down a clock-driven stand, and try your hand at driving either a lens or a telescope of more than 2 ft. focal length.
Discussing the question of stands with a friend, a very enthusiastic and successful worker; his advice was 'Sacrifice everything to accurate guiding.' A little experience will soon show the wisdom of this advice.
When fixing an equatorial head to a portable tripod stand, to simplify adjusting, point the Polar axis as nearly as possible in the same direction as one of the legs. Adjusting the axis to the Pole is explained on page 28.
Guide Telescopes.-- The usual type of 3-inch to 4-inch telescope, mounted on a tripod, or semi-portable equatorial, has a fairly thick and heavy tube, and it will often be found that after a camera is mounted, together with the additional counterpoise necessary, the extra weight puts too great a strain upon the slow motions, causing unsteadiness. In this case it is advisable to dismount the telescope from the equatorial head, and in its place fit up a cheap object-glass in a light tube, as a guide telescope. This should be of considerably longer focal length than the photographic instrument, as any irregularity in guiding is more easily seen, and the amount of deviation thereby produced on the plate, being considerably magnified in the field of the guide telescope, can be quickly corrected. When photographing a magnified image, exposures of more than about ½ sec. should not be attempted without a good driving clock, and guide telescope of sufficient focal length. The longer focal length of the reflector, as compared with that of the small refractors usually found in amateur hands, is thus a distinct advantage.
The writer used for some years an object-glass 2-7/8 ins. in diameter, taken from an old coastguard telescope, mounted in a tube of very thin zinc. Although not quite achromatic, it had excellent light-grasp, which, for guiding, is far mote important than critical definition.
Always use the largest guide telescope possible, for it may often happen that no bright star can be found sufficiently near the centre of the field it is desired to photograph. Many small comets are faint visually, and the object must be always clearly seen against the cross wires of the eyepiece, otherwise the eye soon becomes fatigued, and the driving suffers in consequence.
The possessor of an equatorially-mounted reflecting telescope is in a fortunate position, for this can be used as a guide, and the cameras attached to its tube. Care should be taken, when working in some positions, that the head of the observer whilst looking into the eye-tube, does not come in front of the camera lens.
Eyepieces.-- Almost any form of two-lens eyepiece can
be used for guiding by the addition of cross wires at the
focus of the eye lens, but the ordinary Huyghenian type is
easiest adapted. On unscrewing the eye lens E, a small
diaphragm D will be found between the lenses. This
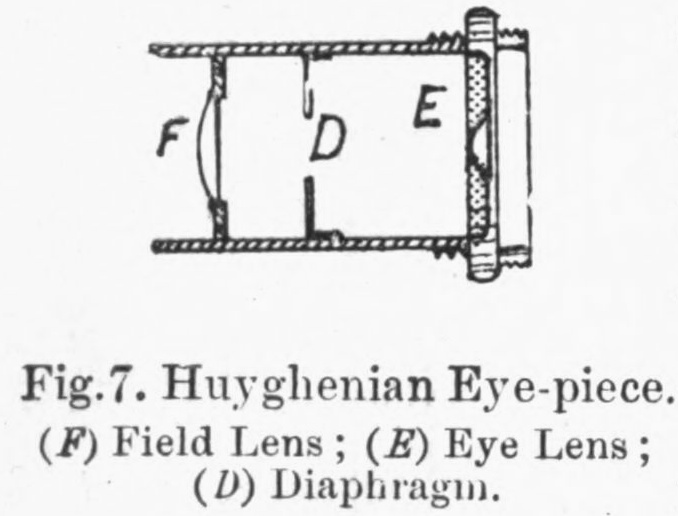 should be drilled with four very small holes, great care being taken
to have them exactly 90° apart, so that the intersection of wires
threaded through them will, as nearly as possible correspond to
the centre of the diaphragm. The wire is threaded
through in one piece to form a +, and is secured
either by twisting the ends, or by a small screw. The
writer uses fine black iron wire such as is employed
by florists. Experiments with human hairs showed
that these were unsatisfactory, owing to expansion and
contraction due to variations of temperature. Very fine
wires are inadvisable unless some method of illumination
is available, for the wires must always be distinctly
seen or accurate guiding is impossible.
should be drilled with four very small holes, great care being taken
to have them exactly 90° apart, so that the intersection of wires
threaded through them will, as nearly as possible correspond to
the centre of the diaphragm. The wire is threaded
through in one piece to form a +, and is secured
either by twisting the ends, or by a small screw. The
writer uses fine black iron wire such as is employed
by florists. Experiments with human hairs showed
that these were unsatisfactory, owing to expansion and
contraction due to variations of temperature. Very fine
wires are inadvisable unless some method of illumination
is available, for the wires must always be distinctly
seen or accurate guiding is impossible.
A fairly low-power eyepiece is best for a guide telescope; the writer seldom uses more than 70 diameters on a 4-in. refractor, or about 50 on a 3-in. instrument. A diagonal eye-piece (see Fig. 5), unless your telescope is a reflector, is a very great convenience, as it ensures a comfortable position of the head, at whatever altitude the telescope is pointed.
Attaching Cameras to Telescopes or Mountings.-- While it is essential to have a perfectly steady stand, it is equally essential that the camera be firmly fixed to the guide telescope. This is accomplished by means of clamps of wood or metal, which should preferably be designed for rapid detachment or removal. (See Appendix.)
The illustrations, Figs. 1, 2, and 5, show simple and efficient methods of mounting cameras, the first on the telescope itself, the second on a table holding two or more cameras, screwed direct on the equatorial head.
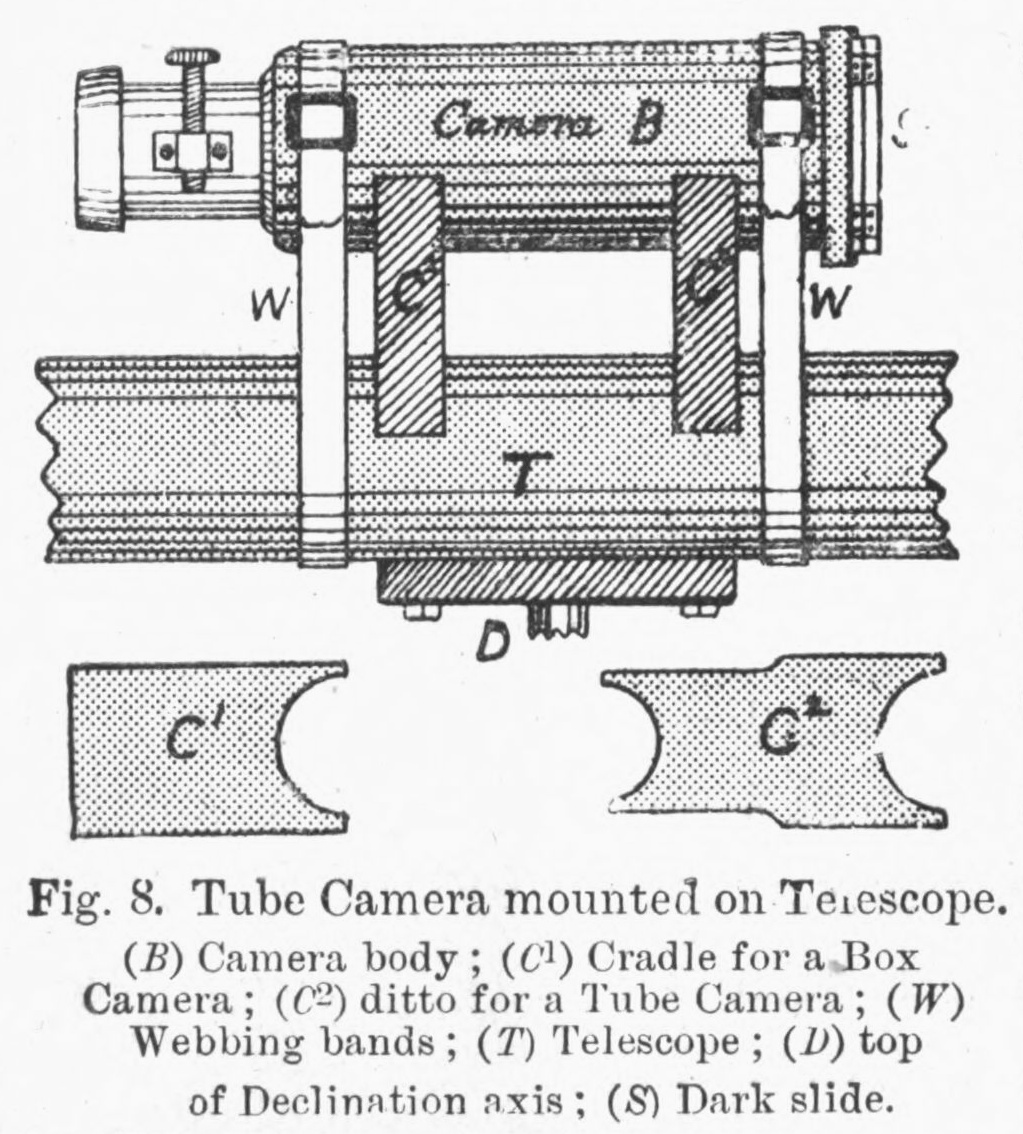 Lenses mounted on tubes, and also box cameras, can
be fastened directly to the telescope tube by means of
wooden distance-pieces or cradles, and secured with
bands of stout webbing. In using lenses of short focus
and wide angle of view mounted in this manner,
care should be taken that the optical axis of
lens and telescope are not too close together,
otherwise, if the guide telescope is of long focus,
and sticks out far beyond the lens, the lens
will photograph the end of the telescope!
Lenses mounted on tubes, and also box cameras, can
be fastened directly to the telescope tube by means of
wooden distance-pieces or cradles, and secured with
bands of stout webbing. In using lenses of short focus
and wide angle of view mounted in this manner,
care should be taken that the optical axis of
lens and telescope are not too close together,
otherwise, if the guide telescope is of long focus,
and sticks out far beyond the lens, the lens
will photograph the end of the telescope!
Whatever form of camera is used, it is very important that the plate be accurately 'squared on' to the lens. Any lack of parallelism will result in distortion of the star images. Use the focussing magnifier carefully at the opposite edges of the field to try to get the star images, where the covering power falls off and the images are distorted, of the same shape.
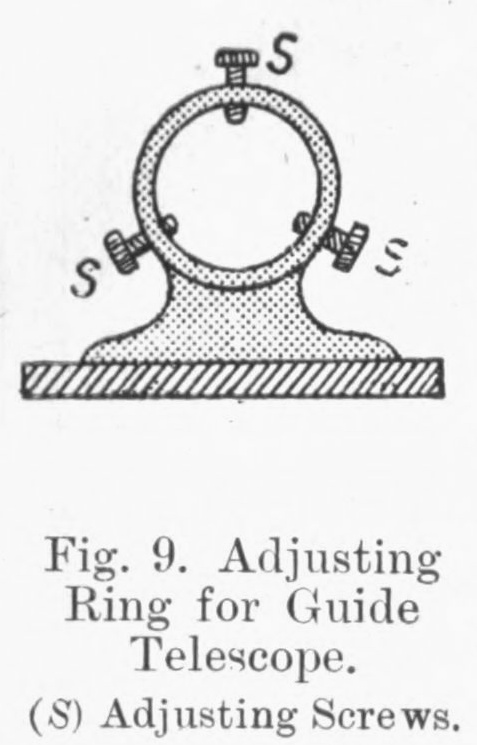 For attaching cameras to an equatorial without
telescope, make a base-board of well-seasoned wood, say
1-1¼ inch thick; the length and width will, of course,
depend upon the size of the stand, and
the instruments to be mounted. This
base-board, if securely bolted on to the
plate or cradle forming the end of the
declination axis, will form a flat table on
which the cameras can be screwed down.
The guide telescope will go in the middle
and can be supported either on a wooden
cradle, or in rings with three adjusting
screws like a finder, which much facilitate adjustment.
See Fig. 9.
For attaching cameras to an equatorial without
telescope, make a base-board of well-seasoned wood, say
1-1¼ inch thick; the length and width will, of course,
depend upon the size of the stand, and
the instruments to be mounted. This
base-board, if securely bolted on to the
plate or cradle forming the end of the
declination axis, will form a flat table on
which the cameras can be screwed down.
The guide telescope will go in the middle
and can be supported either on a wooden
cradle, or in rings with three adjusting
screws like a finder, which much facilitate adjustment.
See Fig. 9.
Shutters and Caps.-- After experimenting with
various forms of flap-shutters I have come to the
conclusion that the ordinary round caps supplied with
lenses are handier to use. With portrait lenses of large
size, say up to 4 or 4½ inches aperture, a knob way
be fitted to the centre of the cap
which will enable it to be handled
easier in a dim light (see Fig. 14).
If the camera is attached as near the centre of the
declination axis as possible, the cap may usually be
reached from the eye end without difficulty, unless
the guide telescope is of more than 4½ feet focal
<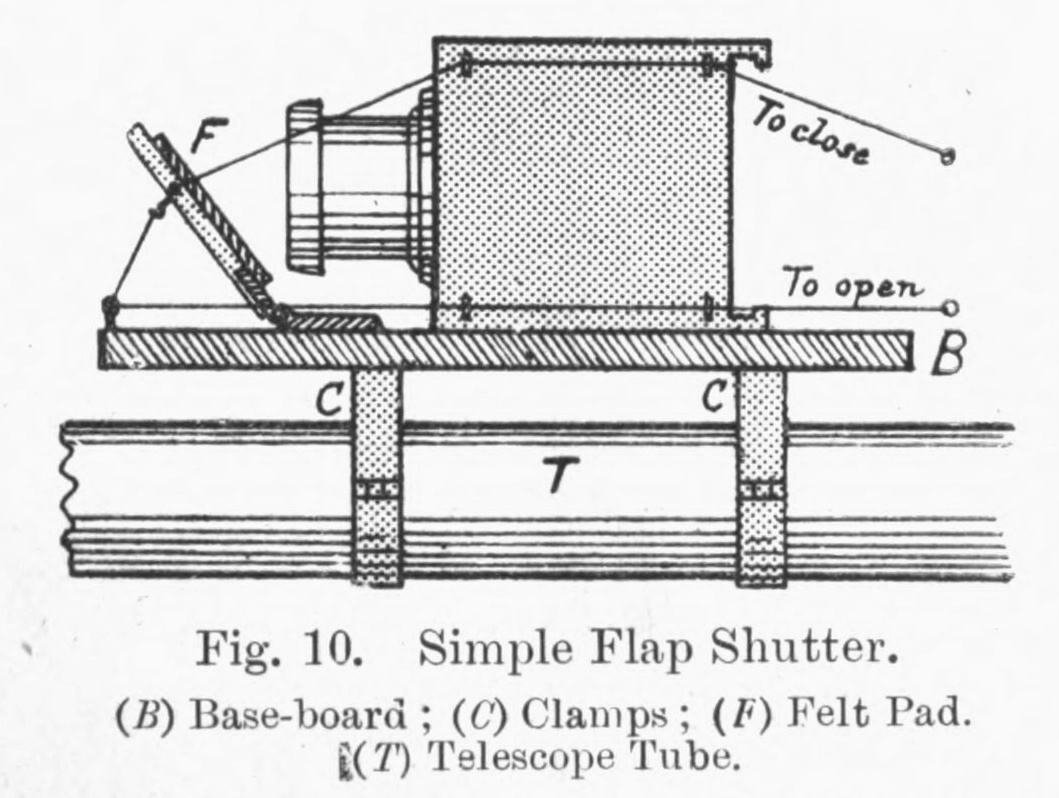 a name="page24">
length. In this case some form of shutter which can
be closed from the eye end of the telescope is necessary.
A light wooden board hinged to the bottom board of the
camera and covered on the inside with felt, makes a
good shutter. It can lie opened or closed by a cord,
but care must be taken that it does not flap about in
wind, or close suddenly as the telescope and camera
move in Right Ascension.
a name="page24">
length. In this case some form of shutter which can
be closed from the eye end of the telescope is necessary.
A light wooden board hinged to the bottom board of the
camera and covered on the inside with felt, makes a
good shutter. It can lie opened or closed by a cord,
but care must be taken that it does not flap about in
wind, or close suddenly as the telescope and camera
move in Right Ascension.
The usual brass object glass cover is generally a fairly close fit, and for exposures with a telescope a cardboard cap fitting more loosely over the object glass cell will be found useful. Have the outside of your lens caps painted white, as they are then easily located. when laid down in the dark.
Driving Clock.-- For all photographic work with portrait lenses of moderate aperture and focal length, a good well-cut hand slow motion in practised hands is superior to a poor or 'wandering' driving clock. The writer has obtained good round sharp images of stars with lenses up to 19 inches focus by hand driving. Beyond this focal length, the difficulties increase, and if satisfactory work is to be done a good driving clock is essential. Those who cannot afford such a luxury -- to whom this handbook is more particularly addressed -- may like to experiment with clocks of the home made order. Several easily-made types will be found fully described in the back numbers of the 'English Mechanic.' [Vols. lxxv and lxxvi, 1902-1903, &c. See also Appendix.] The simplest principle is that in which a weight pulls the telescope round, the descent of the weight being controlled by the clockwork train: in the ordinary equatorial clock the weight drives the clock and the clock spindle is connected by suitable spur or bevel gear to the R.A. driving circle. A simple experimental driving clock on the former principle made by the writer, is described in the Notes on the construction of apparatus, in the Appendix.
Plates.-- As the light emitted from all celestial bodies except the Sun and Moon, is of feeble intensity, rapid plates are necessary. The faster the plate, the coarser the grain of the emulsion, and this should be remembered in cases when enlargement is necessary. The finest grained are the Lantern and Process plates, which are useful for direct photographs of the Sun. The most suitable type of plate for each class of subject is indicated in the chapter devoted to it.
The writer has carefully tested, by exposures of varying length, many of the well-known makes on the market, and has come to the conclusion that very few brands are suitable for critical astronomical work, though all may answer perfectly for ordinary terrestrial photography.
Some plates marked with a very high speed number were found to be slower in recording detail than others of lower speed when used under similar conditions. The emulsion, too, varies considerably, and pin-holes occur in spite of every precaution. Small non-sensitive spots are another trouble. These little worries, of course, sit lightly upon the regular photographer, for with a few deft strokes of the pencil or knife they disappear, but it must always be borne in mind that in astronomical work any form of retouching, spotting, or intensification of the original negative is entirely inadmissible.
It would be invidious to name any particular brand of plates. Every worker must experiment for himself, and having found a suitable plate, stick to it as long as its quality and speed remain reliable. The large observatories use the various commercial brands of plates, the only difference being that the emulsion is usually coated on to thin plate-glass, thus insuring a perfectly flat surface.
Backing.-- All plates must be thoroughly and carefully backed. The effect of using unbacked plates is shown in Plate IV. Plates sold ready backed are not always satisfactory, for the backing must be in optical contact with the glass.
The worker is strongly advised to back his own plates immediately before use. This avoids any danger of the backing being too dry and getting on to the film of the plates in the form of powder. An excellent formula for backing is that recommended by Professor Comstock in the circular respecting the Observation of Halley's Comet, published by the Astronomical and Astrophysical Society of America, 1910 -- a circular full of valuable hints, which should be in the hands of every astro-photographer.
The formula is as follows:-- 2 parts white sugar, 1 part burnt sienna. Cook the sugar, without water, until nearly in the 'caramel' stage, and then add the sienna; heat a little more, stirring well. Finally, add about half an ounce of alcohol or methylated spirit to each pint of backing, to act as a dryer. This backing will keep indefinitely. When it is too hard, moisten with a little water.
The backing must be applied to the back of the plate as a stiff paste, with a broad brush, and should be applied just before using. A piece of thin paper pressed upon it will prevent its being rubbed. Before developing, remove the backing with a swab of damp cotton wool.
Loading Dark Slides.-- Do not dust the film of the plates before loading into the slide. Hold them by the edges, at an angle, film side downwards, and tap one edge lightly against the rim of a dish or the edge of a shelf. Also remember to wedge them in the slide so that they cannot shift during exposure, as explained p.15.
Exposure.-- Details will be found under each class of object, as the duration varies greatly ; the factors introduced by magnified images are explained on pages 20 and 37. The state of the atmosphere has to be considered (pages 7, 62), and also the altitude of the object. When the Sun is low, every photographer knows that exposures have to be lengthened, because a considerable portion of the actinic rays is absorbed while traversing the increased depth of atmosphere. The same cause affects exposures in astronomical photography, and consequently objects at a low altitude require a much longer exposure than those at the zenith. Definition is also affected, so that it is extremely difficult to obtain satisfactory plates of objects within 15° of the horizon unless the night is exceptionally clear. All celestial objects therefore, should be photographed at as high an altitude as possible, i.e., when on the meridian, to obtain the shortest exposure and least atmospheric disturbance.
If, however, the object is near the Sun, the brightness of the sky before dawn or after sunset will soon fog a plate, and the time of exposure should be reduced.
In closing this chapter on apparatus, it is well to emphasize again the importance of rigidity and careful adjustment. Do not mount a heavy 12 lb. portrait lens camera on a small light stand, and expect to get good pictures. Work with a small lens and enlarge afterwards.
Adjustment of Equatorial Mounting.-- It is not necessary in a handbook of this description to give directions for the adjustments of a fixed equatorial stand with divided circles and verniers. Full details will be found in any good astronomical textbook such as Chambers' Handbook of Descriptive and Practical Astronomy. The portable Equatorial stand without circles presents its own problems of adjustment, and the best methods the writer has come across are those given by Dr. H. Whichello in a paper read before the Liverpool Astronomical Society. [Journal Liverpool Astronomical Society, 1912-13, pp. 16-21.] These directions are indicated below; the details given in square brackets are amplifications or explanations for the benefit of those not accustomed to this class of work. The adjustments should be made before fixing the camera on the telescope or table; the guide telescope, however, must be mounted in the latter case, and must have been carefully collimated (p.31). The notes on pages 16 and 19 as to stretcher bars, and fixing the equatorial head on the stand, should also be attended to.
1. Adjustment in Azimuth (Meridian Position).-- This can be done roughly with a compass or meridian mark previously obtained from the Sun. [See Appendix.] Having placed the stand or tripod in such a position that the polar axis is as nearly as possible in the plane of the meridian, point your telescope up to the zenith. Place a spirit level in two directions across your object glass and move the telescopic [on its axes] until the object glass is horizontal: [the line of collimation will then point exactly to the zenith, and thus pass through the meridional great circle.] Now clamp the telescope in Right Ascension (if there in no clamp, fix the polar axis, by tightening the bearings, or using a table cramp).
As the telescope is free to move only in declination, we may now regard it as a transit instrument. Now take the transit of a star (see p.32) and move the whole stand in azimuth till it transits at the right time (a list of times of transit of a number of fixed stars is given every month in the English Mechanic). By repeating the process on one or two more stars, you will be able to get them to transit to within a minute of the right time, with which you may well be satisfied until adjustment 2 is made.
2. Elevation of the Polar Axis to the altitude of the Pole.-- Cut a piece of wood into a triangle with one right angle and one angle equal to the latitude of the place of observation. The best way to do this is to mark out the triangle on squared paper, paste it to the wood and saw straight through. If your polar axis can be got at between the bearings, and if it has parallel sides, place the [longest side of the] triangle of wood on the top of the axis, with the 'latitude' angle uppermost. [The original has 'its shortest side at the top,' but this is only for places with greater latitude than 45°N. or S.] Placing the level on the top of the triangle, move the axis till the level is horizontal [by raising or lowering the support of the stand at the point where it faces the Pole].
If you cannot get at the polar axis you must
attack the problem indirectly. Place your telescope
over the axis and parallel to it. You have to
judge by the eye if it is parallel, but a moderate
deviation fortunately does not matter; now place the
triangle on the top of the telescopic [latitude-angle uppermost,
as in the former case, Fig. 11], and [adjust] the
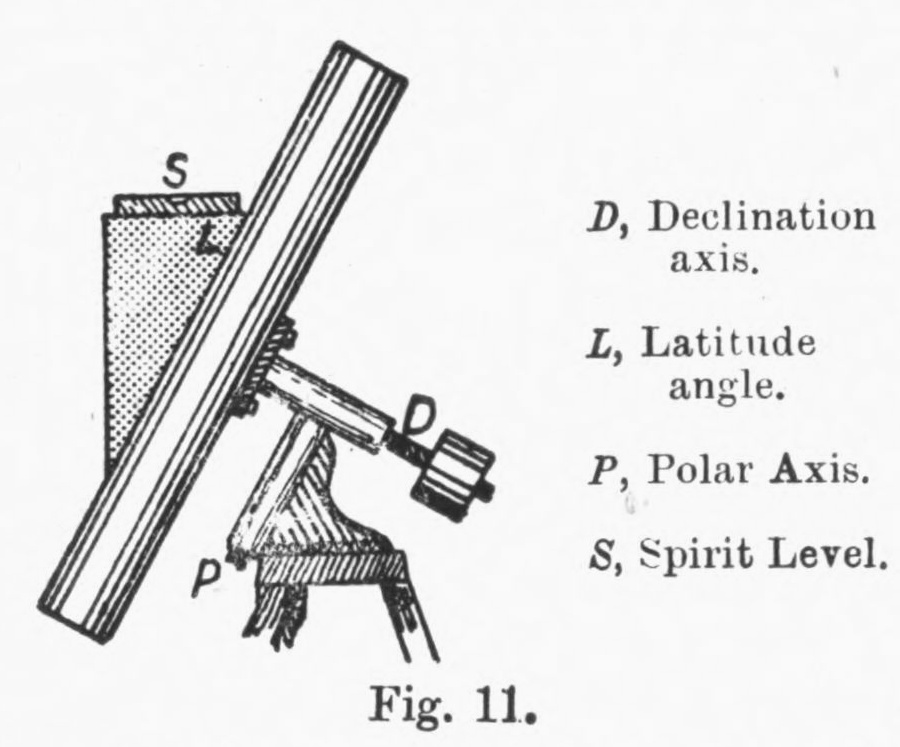 polar axis [up or down] till the top of the triangle is
shown to be horizontal by the level. Keeping the
telescope clamped in Declination, turn it [first to
the] E. and [then to the] W. side of the stand, and again
see if the top of the triangle is level in each case when
placed against the upper aide of the telescope tube. If
it is not, the telescope was not parallel to the axis in the
first instance, and you must make it so and go over the
ground again. By these simple methods, the second
of which can be performed by daylight, we can get the
stand within a degree or so of truth.
polar axis [up or down] till the top of the triangle is
shown to be horizontal by the level. Keeping the
telescope clamped in Declination, turn it [first to
the] E. and [then to the] W. side of the stand, and again
see if the top of the triangle is level in each case when
placed against the upper aide of the telescope tube. If
it is not, the telescope was not parallel to the axis in the
first instance, and you must make it so and go over the
ground again. By these simple methods, the second
of which can be performed by daylight, we can get the
stand within a degree or so of truth.
3. To perfect the Azimuth position.-- A little before the time of transit of, say, Polaris, place the telescope vertical by using the level across the object glass, as before, and clamp in Right Ascension. Now point it to the Pole Star and move the whole stand in azimuth till the star is central. Swing the telescope to the other side of the Polar axis, again level the object glass, clamp in Right Ascension, and bring it on to Polaris. If the star is central, both collimation and azimuth are correct. If not, they most be made so. [It may be explained that the motion of the Pole Star is so slow that in the short interval between the two observations it is almost inappreciable. Observers in the S. Hemisphere can observe δ Octantis, and in both Hemispheres upper and lower transits can be utilised.]
If the adjustment is carried to such a point that Polaris, or the circumpolar star used, is in the field of your highest-power eyepiece, with the telescope on either side of the Polar axis, this is sufficiently correct.
Collimation, or adjustment of the telescope parallel to the Right Ascension axis, and at right angles to the Declination axis, is usually done before the instrument leaves the maker's hands. It can be tested by clamping the telescope in declination, and observing whether a star appears in the same position relative to the centre of the field when observed with the telescope on either side of the Polar axis. Guide telescopes on a table are similarly tested for collimation, and any adjustments required are made by the adjusting screws.
When once the adjustments of a portable equatorial have been satisfactorily made, the positions of the legs of the stand should be carefully marked. A good plan is to sink three flat tiles into the ground flush with the surface, and chip a hole in the centre of each, in which the points of the legs can rest. The tiles, if placed on grass, can remain in position. and the worker can be sure of being able to set up his apparatus each night with the minimum amount of time, trouble, and adjustment. Some makers of portable equatorials supply iron sockets for fixing on the ground into which the legs of the tripod are inserted, these are most satisfactory; any additional adjustment is seldom necessary.
Balancing, and Adjusting Image.-- The guide telescope being mounted, and the stand carefully adjusted. the camera may be put on and secured in such a position that a bright star seen in the telescope is fairly central on the focussing screen. The main point is to distribute the weight in such a manner that the stand is nicely balanced in all positions, and if several cameras of varying weights and lengths are mounted, some little ingenuity is sometimes required. Unless the weight is well balanced, a jerky movement is inevitable, especially when working on or near the meridian.
Cameras should be mounted as near the centre of the Declination axis as possible and the weight distributed evenly. By sliding the camera or table on the telescope tube, and with the aid of additional weights, both axes of the stand must he balanced carefully, so that the instruments will remain in any position unclamped, as little strain as possible being thrown on the driving mechanism.
The camera should he carefully adjusted parallel to the guide telescope by getting the image of the Moon well centred simultaneously in both instruments, and then carefully clamping up the camera. A ground glass focussing screen with the centre plainly marked on the rough side of the glass, by drawing pencil lines diagonally from each corner, will save a lot of trouble.
If two cameras are available, and the 'table' in used, it is a good plan to have the smaller one adjustable laterally on the telescope by means of a slotted screw hole, two thumbscrews being used, one acting as a pivot thus, if one is fortunate enough to get a comet with a long spread of tail which cannot all be secured on one plate, the second lens can be adjusted to follow on after the first. This method is also useful in trying for meteors.
Observing a Transit.-- 'Taking a transit' is noting the exact time at which a star crosses the centre of the field of a telescope moving exactly in the plane of the meridian; an eyepiece of low power and large field is used, with crown-wires so arranged that one wire is exactly perpendicular to the horizon, thus ⊕. If the time agrees with that in the English Mechanic Table, or that found from the Nautical Almanac (N.A.), as explained on p.90, the telescope is correctly set; if the star transits too soon, the whole stand must be moved in azimuth westwards, or eastwards if too late, as it is not in the plane of the meridian.
The observer requires to know (1) exact Greenwich time within a few seconds, and (2) his longitude within a few minutes of arc, as the times of transit given in the English Mechanic List are those for Greenwich. The longitude can be obtained from a large-scale Government map, such as the British 1-inch Ordnance Survey map, or the 6-inch map, which gives it, with still greater accuracy.
To correct for Longitude.-- Add to the figures given in the List 1 minute for every 15' the observer is W. of Greenwich (Subtract if E. of Greenwich) or 20 seconds for every 5'.
Thus 15° difference of longitude = 1 hr. difference of time.
Thus 15' difference of longitude = 1 min. difference of time.
Thus 15" difference of longitude = 1 sec. difference of time.
Probably the simplest rule for finding the longitude correction is to express the observer's longitude in seconds of arc, and divide by 15: the answer is the number of seconds of time, to be added to, or deducted from, the Greenwich Time. (1°=3600", 1'=60").
When calculated, it will be found convenient for reference to note the figures in the space provided on p.92.
General Notes.-- In ordinary photography, the lenses used are designed for the purpose, and have usually all necessary information as to focal length and focal aperture engraved on the lens mount. An operator has only to focus the image on the ground glass, set an indicator to the 'stop' required, consult an exposure table for the light-factor appropriate to the hour and month, and then he can go ahead.
But in ' telescopic' photography the conditions are quite different. The instrument is not designed for the purpose, and in refractors the actinic rays come to a different focus from the visual rays, so that the ground glass requires suitable adjustment. Focal lengths and apertures have to be determined, and suitable stops manufactured, by the photographer himself, and except for solar photographs, ordinary exposure tables in their usual form are useless, Fortunately, however, all the necessary information can be ascertained without difficulty, and this chapter indicates the methods by which it may be obtained, and explains the conditions introduced by a magnified image, which are quite outside the domain of ordinary photography.
Primary Focus.-- When the object glass of a telescope is used without an eyepiece, an far as the visual rays are concerned it is to all intents and purposes an ordinary camera lens, though of much longer focus than usual. Thus it forms an inverted image which can be focussed on the ground glass screen of a camera, and the point at which this image is sharpest is known as the 'primary focus' of the object glass. The size of the image formed depends on the focal length of the object glass, increasing or diminishing in the same ratio.
To find the Focal Length of an Object Glass.-- Point the telescope at the Moon, and having removed the eyepiece, place against the end of the eyepiece tube the film aide of a spoilt, undeveloped plate, which is better than ground glass, the grain being finer.
Then having carefully focussed the image by the rackwork on the telescope, using a focussing glass in the manner explained in detail on page 48, cautiously remove the screen, and measure in inches the distance from the back of the object glass to the eyepiece tube end. This distance is approximately the visual focal length of the object glass for objects at infinity; the chemical or photographic focal length is obtained by experiment. In Newtonian reflectors, measure from the centre of the mirror to the centre of the 'flat,' and thence to the eyepiece-tube end. For another method, see p.89.
To find the Chemical Focus.-- The actinic or chemical rays are more refracted than the visual rays, hence in simple lenses this focus is nearer the object glass than the visual one (p.8). But in the compound lens of an ordinary achromatic object glass, the compensating lens designed to make it visually achromatic usually over-compensates (but sometimes under-compensates) the actinic rays by 1/40 inch or so; thus the chemical focus will be longer than the visual one: the former, therefore, requires to be ascertained by actual experiment. 'Photo-visual' telescopes can be had in which both foci are coincident, but these are expensive.
In this case the 'carrier' is used, and the primary image is carefully focussed on a screen placed in a double dark slide with both shutters drawn out. A permanent mark is then made on the carrier tube close up to where it enters the rackwork tube, so that it can be replaced to exactly the same point when desired; a similar mark is also made on the rackwork tube itself where it enters the body of the telescope. Thus, whenever the two tubes are adjusted to these marks, the primary image should be sharp on the plate.
Next, having filled the dark slide with plates, rack in the rackwork tube about ¼ inch and make an exposure at one end of a plate: then rack out the tube say 1/8 inch, and make a second exposure on the same plate (see p.14), and so on outwards till the whole length of the plate is filled up. A light mark is made on the tube before each exposure.
On developing the plate, the sharpest image, or images, indicates which mark corresponds most nearly to the chemical focus, and a second series of exposures in that neighbourhood, with very small alterations of focus, will enable the exact spot to he marked permanently on the rackwork tube. The difference between this mark and the visual-focus mark is added to the length of the visual-ray focal length, in order to arrive at the chemical or photographic focal length of the object glass. It is advisable to use a focussing screen when an eyepiece or enlarging lens is employed to magnify the primary image.
Size of the Primary Focus Image.-- Table II. on page 89 gives an idea of the diameters of the Sun and Moon as seen on the ground glass at the primary focus of telescopes of various focal lengths. The angular diameter of these luminaries is constantly changing, but the Table is based on a rough average of 31'.
Magnified Images.-- It will be seen from the same Table that the primary-focus images of the Sun and Moon are so small that to obtain pictures only 1 inch in diameter, a lens of about 9 feet focal length is required. In telescopes of shorter focal length, this is got over by magnifying the image formed at the primary focus, by means of an eyepiece, putting the plate at a suitable distance from the eyepiece and focussing, to suit, as in a magic lantern. For photographic purposes, however, the practical limits of magnification are very small, and the possessors of refractors, especially, must not expect satisfactory results, as the magnification of course accentuates the imperfections due to the chemical focus differing from the visual one.
Moreover, this gain in size is accompanied by a decrease in brilliancy, as the amount of light entering the telescope is the same, whether magnified or unmagnified, whereas in telescopes of longer focal length there is no reduction in brilliancy, as it is customary to increase the area of the object glass in proportion to focal length. Some light is also lost in the eyepiece, which adds to the length of exposures required, over and above the theoretical exposure required by the magnification.
Exposure for Magnified Images.-- Doubling the focal length doubles the diameter of the image but increases its area four times, so that four times the exposure is required when the area of the lens is not increased. Therefore, with the eyepiece image, as the aperture remains the same, magnifying the primary-focus image two diameters requires four times the exposure: if magnified three diameters, nine times the exposure, and so on, the increased exposure required being the square of the number of diameters the image is magnified. It must be borne in mind that the greater the magnification, the quicker the image travels across the plate (see p.3), and nothing beyond 'snap-shots' should be attempted without a good equatorial mounting (see p.20).
Stops.-- The full apertures of ordinary refracting telescopes are in the neighbourhood of ƒ/12 to ƒ/15, and when photographing the Sun at the primary focus, it is necessary to stop them down to about ƒ/64 by means of a diaphragm fitting the front of the tube, otherwise a very fast shutter would be required to avoid over-exposure.
Stops can be made from thin zinc or tin, carefully blackened with matt varnish, and the holes should be exactly central, and have smooth, clean-cut edges. To attach them to the telescope, they may be fitted with a velvet-lined rim, similar to that of an ordinary lens-cap.
The diameter of the hole for any required 'stop' is found by dividing the focal length of the object glass, expressed in inches, by the ƒ/number required. Thus ƒ/64 for a telescope of 39 inches focal length is 39 inches ÷ 64, or .609 inch in diameter.
The effective aperture or ƒ/ratio of the object glass is obtained by dividing the photographic focal length by the clear aperture of the lens. Thus a 3-inch object glass of 39 inches focal length is 39 inches ÷ 3 = 13; the ƒ/ratio is therefore ƒ/13.
In Newtonian reflectors, the photographic focal length is the same as the visual one, but in calculating the focal ratio of a mirror, the reduction in effective linear aperture due to the amount of light stopped out by the 'flat' and its support should be taken into consideration.
THE SUN.-- In photographing the Sun through a telescope at the primary focus, as already mentioned the aperture should be stopped down to an equivalent of about ƒ/64 (see p.38). Slow lantern plates will be found best, and they must be carefully backed. Some form of fairly rapid shutter will be required. M. L. Rudeaux recommends a wide sheet of blackened cardboard, with a slit about 1½ ins. wide, which can be moved rapidly in front of the object glass. As the Sun's direct rays are very penetrating, it is well to cover up the dark slide and carrier during exposure with a focussing cloth or piece of dark calico.
If the image is projected into a camera by means of an eyepiece or negative lens, a considerably longer exposure will be required, depending on the amount of magnification, or else a correspondingly larger aperture than ƒ/64 must he used. Correct exposure is mainly a matter of experiment, but the altitude of the Sun ought to be taken into account, if at all low, for in mid-winter, especially in latitudes similar to that of Scotland (54°-58°), even the mid-day intensity of the light may be only a quarter of what it is at mid-day in June.
Phenomena for Photographing.-- The chief interest of solar photography is the recording of sunspots and faculæ especially the change of the former in shape and size, during their passage across the disc. Sunspots, as is now well known, vary in number in a fairly regular cycle of about 11-1/3; years, the minimum being about 6½ years later: the last maximum was in 1918.
An interesting study for beginners in which fine definition is not essential, is to take a series of pictures of the progress of a sunspot across the disc from side to side in about 13 days. The Sun's axis of rotation appears from the Earth to sway to and fro about 26° on each side of a line drawn at right angles to the celestial equator, and, as the result, the path of a sunspot is at one time of the year curved downwards, and at another time of the year curved upwards, while half-way between the extremes, the path is a straight line. The exposures should be made at solar noon, on successive days, with the camera carefully levelled, so that the great circle passing through the Suns centre is at right angles to the horizon; the true inclination E. or W. of the Sun's axis is thus more easily found. But if mid-day is not convenient, make all the exposures at the same hour.
When the plates are developed, take a tracing of the first, marking carefully on the tracing the border line of the negative, to serve as a 'register' line. The remaining negatives are then also traced on it in succession, keeping their border lines parallel to the 'register' line, and by joining the positions of the sunspots, the elliptical curve of their path will be found. Towards the limbs, the spots will be closely crowded together on the tracing.
The extremes of curvature are about April 5 and Oct. 10, and there is no curvature about Jan. 4 and July 6.
Another interesting study is to photograph the Sun on the days when the Earth is in perihelion and aphelion, viz., about Jan. 2nd and July 3rd, magnifying the image to about 2 inches in diameter. Prints of each negative are cut in half and placed together, and it will be seen that the difference in diameter is quite perceptible. The same instrument and eyepiece must of course be used, and the amount of camera extension, etc., must be absolutely the same for each exposure.
An interesting series of pictures can be taken during the progress of a partial eclipse, but the writer has never been able to obtain very consistent results, owing to the difficulty of judging the exposure required for the gradual obscuration of the sun's disc.
Solar prominences may also be photographed, but require a special spectrograph of great dispersive power, and are quite outside the limits of ordinary amateur work.
If the reader is fortunate enough to observe a total solar eclipse (see annexed list), he can try, by means of a telephoto lens [see p.86.], to obtain pictures of the corona. Its brightness varies considerably at different eclipses, but to the eye the portion nearest the photosphere would appear to be about as bright as the full Moon on the average, and the exposure may be judged accordingly. The light, however, falls off rapidly with increasing distance from the photosphere, and the streamers are fainter still, and require much longer exposure to bring them out.
| Date. | Locality Visible. | Duration Minutes. |
| 1922, Sept. 21. | E. Africa, Australia | 6.1 |
| 1923, Sept. 10. | California, Mexico, Central America | 3.6 |
| 1925, Jan. 24. | United States | 2.4 |
| 1926, Jan. 14. | E. Africa, Sumatra, Phillippines | 4.2 |
| 1927, June 29. | England, Scotland, Scandinavia | 0.7 |
| 1929, May 9. | Sumatra, Malacca, Philippines | 5-1 |
| 1930, Oct 2l. | Pacific Ocean, Patagonia | 1.9 |
| 1932, Aug. 31. | Canada | 1.5 |
| 1934, Feb. 14. | Borneo, Celebes | 2.7 |
| 1936, June 19. | Greece to Central Asia and Japan | 2.5 |
| 1937, June 8. | Pacific Ocean, Peru | 7.1 |
| 1940, Oct. l. | Colombia, Brazil, S. Africa | 5.7 |
| 1941, Sept. 21. | Central Asia, China, Pacific Ocean | 3.3 |
THE PLANETS.-- Very little useful work is possible with amateur equipment, and under the best circumstances the results will be far inferior to these obtained by visual observation even with a very small telescope, for the reasons explained on page 4. Unless a long focal length is available, the image of a planet is so very small and faint, that when sufficiently enlarged, the grain of the plate is so pronounced as to blot out all detail. The following figures will speak for themselves. On page 89, in the Table of primary-focus images, the diameter of the Sun or Moon, when measuring 31', or 1860", is given as being about .65 inch for a mirror of 72 inches focal length. Jupiter, even at his maximum, is only 50", hence in the same telescope, the actual diameter of his disc will only be 50/1860ths of .66, that is, about .02 or 1/50th of an inch. In a 3 inch telescope of 36 inches focal length it would be only 1/100 of an inch.
This refers, of course, to the visual image. Halation or over-exposure on a planet will bring out a large ill-defined image, which must not he mistaken by the beginner for a true representation of the planet's surface.
Although unsuited for ordinary amateur study, it may be of interest to mention that the photographic plate can record the presence of minor planets -- a large number of which were discovered by its means. A lens covering a wide field is adjusted to the Ecliptic, which represents their average path; the camera is then very carefully driven and guided for two or three hours, so that the star discs will come out round and sharp. If there is a minor planet in the field, it will leave a short trail on the plate, not a disc, its proper motion in the interval being usually quite appreciable.
General Notes.-- As the image of the Moon photographed with telescopes of the dimensions usually found in the hands of amateurs is small, even if amplifying lenses are used, the chief desideratum is to get a negative of extreme sharpness, which will admit of considerable subsequent enlargement. (See Note p.79).
With the exception of a few exposures made with a 3-inch refractor, the writer's experiments in lunar photography have all been made with a 6-1/4 inch Newtonian reflector of 6 ft. focal length and aperture about ƒ/12, on a portable tripod mounting. The reflector will be found more suitable for this work than the refractor, owing to the difficulty already mentioned of obtaining critical photographic definition with the latter instrument. The writer's reflector gives an image of the Moon at the primary focus 5/8-ths of an inch in diameter, and enlargements from negatives so obtained have been made up to 10 inches in diameter which show no trace of movement or falling off in definition. The Frontispiece shows examples of lunar photography.
In a stationary camera, the Earth's rotation carries the image of the Moon across the plate by the amount of her own diameter in about two minutes -- neglecting her proper motion, which relatively is small. For an image of say 2 inches in diameter, this would mean the very appreciable movement of l/60th inch in one second from which it is apparent that, with a fixed telescope to get reasonable sharpness, exposures must be of the shortest, not exceeding say 1 second, even at the primary focus. A clock rated to follow the stars, while cancelling the effects of the Earth's rotation, does not give a motionless image, as the Moon's small proper motions in Right Ascension and Declination, soon make their presence felt.
Under the most favourable circumstances (see p.46), it is possible to photograph the Fall Moon in 1/20th second at the primary focus, with an aperture of ƒ/12. As already mentioned, however, the image is small (see Table II., p.89), and if it is magnified, a time exposure is required to make sufficient impression on the plate.
Time exposures may be either hand or clock-driven. Hand guiding cannot compete with an equatorial in perfect adjustment driven by a good clock, but as the average amateur equipment probably hardly realises either of these conditions, in the writer's opinion it is preferable to photograph at the primary focus with a very short exposure (it may be clock-driven) and enlarge afterwards, as this tends to greater sharpness: the lesser exposure minimises any imperfections due to the atmosphere, and avoids those of long guiding or driving. The following notes are given for the guidance of those who wish to try time exposures.
Clock-driven Exposures.-- The Moon's motion in Right Ascension eastwards among the stars amounts at maximum to about 1/44th of her diameter per minute, or 1/266th per 10 seconds, and she will lag to that amount behind a telescope adjusted to follow the stars. If desired, however, this movement can be practically eliminated by slightly retarding the rate of the clock.
The lunar motion in Declination is less important, being never half that in Right Ascension. At maximum it is about 1/650th of the Moon's diameter in 10 seconds, diminishing gradually to zero and then rising again to a maximum; this takes place twice every lunation, (see Nautical Almanac). The minima occur at the time when the Moon attains her greatest N. or S. Declination, and about these periods, for practical purposes, her motion in Declination may be counted as being eliminated altogether.
From these figures it is evident that with a clock rated to follow the stars, magnified images up to say 2 inches in diameter will be of fair sharpness if the exposure is not prolonged beyond 10 seconds or so. Always watch the image during exposure, in the finder or guide telescope; in case of any irregularity of the clock's rate, it can be corrected with the hand slow motions.
Time Exposures without a Driving Clock.-- In a reflector of 6 feet focus, a field ¼ inches in diameter will include, approximately, 1° of arc, and with telescope at rest, the Moon would cross this field in 4 minutes (time). To get the best pictures, if time exposures are required, use the largest guide telescope available, and guide on a crater with a high-power eyepiece. Photograph B in the Frontispiece was taken in this way.
Best Seasons for Lunar Photographs.-- For a given phase, there is an unvarying time of year at which the conditions of altitude in temperate latitudes are much the best, while six months later they are always unfavourable.
| Moon's Age. | Most Favourable.* | Unfavourable.† |
| 3-4 Days | End of April | End of October |
| 1st Quarter | Vernal Equinox | Autumnal Equinox |
| Full | Winter Solstice | Summer Solstice |
| Last Quarter | Autumnal Equinox | Vernal Equinox |
| 25-26 Days | End of July | End of January |
Thus in the latitude of London, at the vernal equinox, the 1st quarter Moon never souths less than 57° above the horizon, and may be 67°, while at the autumnal equinox she never souths higher than 20°, and may be only 10°, according to her latitude.
Exposure Factors.-- As explained on p.27, in arriving at the correct exposure required for celestial objects generally, altitude, atmospheric conditions, etc., have to be considered. In lunar photography, however, in addition to these there are three special factors which have to be taken into account.
The first has to do with the phase of the Moon. When Full, her illuminated area is exactly twice what it is at either First or Last Quarter, and her total light should therefore be twice as bright. But observation shows that instead of being twice as bright, at Full she is actually 8.7 times brighter than she is at First Quarter, and 10 times brighter than she is at Last Quarter, [Astrophysical Journal, Vol. xliii., p. 117, 1916.] so that at these last two phases, exposures must be four or five times longer, in order to obtain a negative of equal density and detail with one taken at Full. For lesser phases the increase of exposure is still greater, that for a phase of about 3 days before or after New Moon being two or three times longer than for First or Last Quarter, or 12 or 13 times longer than that for Full. The decrease in brightness is due to the shadows of the rough surface of the Moon, which are seen most prominently from the Earth in the young or old Moon -- the illumination being more or less at right angles to the Earth -- but which gradually become less visible or disappear altogether, as the Sun and the Earth come into the same line about Full.
The second factor is the position of the Moon in her orbit. When she is in apogee, exposures should be one-third longer than when she is in perigee -- or vice versa, one-fourth shorter -- the reason being that at these two points of her orbit, her light-intensity is in the ratio of 3 to 4, as the result of her different distance from the Earth.
The third factor has to do with the region of the disc which it is desired should come out best on the negative. Only about Full is the brightness approximately the same at both limb and centre; at other times the region towards the terminator, where the sun's rays fall very obliquely, is much less bright than the limb, especially photographically. The 'seas' also, (Plate I.) come out far darker on the photograph than their relative visual brightness, being much less actinic than their surroundings.
It will be found that owing to this unequal illumination of the Moon's surface, it is impossible to bring out the maximum detail over the whole disc on one negative. Generally speaking, the terminator, i.e., the edge which lies nearest to the unilluminated portion, comes out under-exposed. and this has the effect of giving to the Moon an age which does not correspond to the real age at the date of exposure. There seems to be no cure for this difficulty when photographing at the primary focus; but the writer found when using a Barlow amplifying lens (p.80) a more even illumination of the disc was obtained; but the exposure required was increased approximately in proportion to the square of the magnification, as indicated in the previous chapter (p.37).
Thus, when detail is required near the terminator, or in the 'seas,' exposures must be lengthened, and it will be seen from the facts mentioned above, that while there is some latitude in lunar exposure, just as there is in ordinary photography, better and more uniform results will be obtained by taking them into account.
Focussing.-- Correct focussing is all-important in lunar photography, both with primary and enlarged images. Ground-glass focussing screens are far too coarse for this purpose, but a plate which has been exposed to the light makes an excellent screen. A few scratches should he made on the film: an adjustable photographer's focussing glass is then applied to the glass side of the screen and adjusted until the scratches to the film are perfectly sharp: a fixed-focus glass will not do, as, plates vary in thickness. These scratches are for the purpose of ensuring that the image is sharpest when it falls on the plate; without them, an improperly adjusted focussing glass might cause the sharpest image to he in front of, or behind, the surface of the plate, but when both image and scratches are sharp at the same time, the image will fall correctly. Of course, in refractors, allowance has to be made for the chemical focus, as already explained (p.35).
The screen is then placed in the dark slide and carefully wedged into the exact position the plate will occupy by means of two pieces of cork. The slide should he placed in the slide carrier (or camera) with both shutters drawn out, and the whole apparatus attached to the telescope. The image of the Moon should then he very carefully focussed -- using the focussing rack of the telescope, and the previously-adjusted focussing eyepiece applied to the back of the screen -- until the image of the Moon and the scratches on the film are both seen perfectly sharp and clear. The writer found some little practice necessary, for one's sight sometimes has a tendency to adjust itself to a slightly incorrect focus, causing confusion.
When once the focus is obtained, the positions of both the racking tube and the tube carrying the slide-holder, must be very carefully marked with a fine scratch, close to the collars holding them, in order to check any accidental movement due to the withdrawal and replacement of the dark slide. The slide should then be loaded with plates and replaced.
Exposing.-- A loose-fitting cardboard cap -- the lid of a box answers well -- should he placed over the end of the telescope, and the slide shutter drawn out. Then carefully examine your scratches on the racking tube and draw tube to be sure that no movement has taken place: if there has been any motion, re-adjust to the scratches. The finder or pointing, telescope having previously been carefully adjusted parallel to the main telescope, bring the image of the Moon exactly central on the cross wires.
The exposure should then be immediately made by raising the cardboard lid until it is clear of the end of the tube, and then rapidly drawing it off in a direction at right angles to the telescope tube and replacing, which will give an exposure of about ½ second more or less. This is for a primary-image photograph, with an aperture about ƒ/12 for magnified images the exposure is proportionately longer (see p.37). Great care is necessary when removing the cap to avoid setting up any vibration in the tube or stand.
If a slide carrier similar to that shown in Fig. 3 is used, a number of exposures may be made on the same plate by commencing at one end and moving the dark slide about an inch or so along the carrier after each exposure; but do not forget to bring the image on to the cross-wires of the finder each time before removing the cap from the end of the telescope tube, and to examine both scratches for possible movement.
Plates.-- The most suitable for lunar photography are those with a speed number of about 80 H. & D., a class rather faster than 'ordinary' but at the same time of fine grain. More rapid plates may be found necessary when photographing the thin crescent before first quarter; but in all cases use the slowest plates possible, provided that the exposure required is short enough to prevent any possibility of 'fuzziness' due to movement of the image. Isochromatic plates might perhaps be advantageous, as the Moon's colour index is much redder than sunlight (p.92). Always use backed plates.
Phenomena suitable for Photographic Study.-- Lunar photography is full of interest. As the Moon's angular diameter varies to a still greater extent than that of the Sun, a study of the apparent size of our satellite when Full near perigee and apogee will be instructive, the dates being obtained from an almanac.
The effect of libration on the general appearance of the Moon may also be studied. Thus in Plate I. it will be seen that the Mare Crisium is near to the limb, but at extreme libration it almost touches the limb itself. The libration of Grimaldi, near the opposite limb, is also interesting, with the waxing and waning of the narrow bright eastern boundary of the Oceanus Procellarum, part of which sometimes disappears altogether. Suitable times can be selected by the 'Lunar Physical Ephemeris' in the Nautical Almanac, column 'Earth's Selenographic Longitude and Latitude'; the extreme librations are in the neighbourhood of 7°-8°: mean libration 0°. When the Earth's selenographic longitude is -, the Mars Crisium almost touches the limb, but is farthest from it when the longitude is + : when the Earth's selenographic latitude is +, Plato is nearest the centre, but nearest the limb when the latitude is -.
At Full Moon, and for a few days before and after, the Moon is lacking in contrast and makes 'flat' photographs; the 'rays,' however, become most prominent.
Total lunar eclipses can be advantageously studied by photography, not only with telescopes but also with ordinary lenses and fixed cameras. Those interested in this subject cannot do better than read the account of the photographic observations of the eclipse of May 2 1920, in the 'British Astronomical Association Journal' for May 1920, pages 250-252, in which the results of various kinds of exposures are tabulated.
The Moon's appearance during the total phase of a lunar eclipse cannot as yet be predicted. Usually she remains quite visible, shining with a dull copper or orange light, the 'rays' and other prominent features being more or less distinguishable. In March 1848, however, her brightness was so great as to raise doubts in the unskilled as to the reality of the eclipse, while on the other band there have been times at which she was barely visible at mid eclipse, or even disappeared altogether. Thus it is very desirable to obtain trustworthy records of the actual intensity of her light during each ecliptic, also how it varies before and during totality, and photography offers the best means of accomplishing this.
With the telescope, a series of exposures showing the gradual advance of the penumbra and shadow across the disc can be taken on one plate (p.49) at the primary focus in the ordinary way, and as the phase is Full, conditions are in favour of short exposures. When totality begins, and the Moon shines by refracted Sunlight only, her light is photographically very faint, but in the 1920 eclipse above mentioned -- described as 'moderately bright' -- it was found possible to photograph the totally eclipsed disc in 5 minutes with an aperture of ƒ/6.5, an isochromatic plate being used; the camera was clamped to the telescope, which was hand-driven and used for guiding. This would be equivalent to an exposure of about 17 minutes at ƒ/12, or 8 minutes, at ƒ/8, but, of course, brighter or darker visibility would require suitable modification.
Stationary cameras are used for finding the intensity of the Moon's light from her trail on a plate. A few minutes before the eclipse begins, the plate is exposed to the Full Moon at the side of the plate, and left uncovered until a few minutes after the eclipse is over -- the times of doing this being carefully noted in Greenwich Mean Time, and also those of any change in conditions due to passing clouds, &c. As the eclipse progresses, the feebler light makes a fainter and fainter trail on the plate, till at mid-eclipse a minimum is reached; finally, as the light grows stronger again, the trail grows darker. Thus a continuous record of the change is obtained, and the brightness at any desired time can be found by measuring the angular distance the image has travelled from the start, or more conveniently by interrupting the trail for a minute, at regular intervals.
The intensity of the light is gauged by employing several cameras, with apertures diminishing regularly from say ƒ/16 to ƒ/45 or ƒ/64. Then, according to the brightness of the Moon, and the size of the aperture the trail will be more or less complete, and if one aperture is sufficiently small to leave almost no trail with (an assumed) maximum brightness, the intensity of less bright eclipses can be found with some accuracy from the aperture at which a trail first becomes visible The plates in each camera should be from the same packet, and as the light during totality is very red, probably isochromatic plates will give results more closely resembling visual conditions.
To include a complete trail on one plate, from entering to leaving the penumbra, wide-angle lenses of very short focal length are required, as the Moon's motion across the plate amounts to some 70° or even 90° during the longest eclipses -- lasting four to six hours -- but only to some 26° at maximum duration of totality, which is about 1¾ hours.
The following lenses are required to include a complete trail of 70° (=4-2/3 hours) on one plate under these conditions; it should be mentioned, however, that the penumbral stage, is scarcely, if at all, observable.
| Plate. | Longest focus lens including an angle of :-- | 70° | 26° |
| 4¼ x 3¼ | ... ... ... ... | 2½ ins. | 8½ ins. |
| 5 x 4 | ... ... ... ... | 3¼ " | 10 " |
| 6½ x 4¾ | ... ... ... ... | 4¼ " | 13 " |
Earthshine, or the 'Old Moon in the Young Moon's Arms' is a difficult subject and requires lengthy guiding, as it is very faint -- some 2500-4000 times less bright than the sun-lit portion of the disc. [Astrophysical Journal. Vol. xliii, p. 185] Favourable conditions, also are rare in temperate latitudes; the Moon being near the Sun when Earthshine is brightest, winter (evening) appearances are at a comparatively low altitude and thus affected by twilight, which also during summer may render it invisible for months, in latitudes above say 56°. The best opportunities are, therefore, in the late winter or spring, at times when the Moon has high north latitude, and is in perigee, at which latter time it is much brighter than ordinarily. Observers near the Equator, however, have more favourable conditions.
General Notes on Stellar Photography.-- Here we are dealing with conditions entirely different from those outlined in the preceding chapters -- with objects often far beyond the limit of visibility to the unaided eye, and in the case of faint stars and nebulæ, often away out of reach of average telescopes.
For this class of work the ordinary visual form of telescope, whether reflector or refractor, as used by amateurs, is entirely unsuitable, and unless the worker has a good clock-driven stand, and is prepared to mount a reflector of focal aperture between ƒ/4 and ƒ/5 it is advisable to stick to doublet lenses.
A few years' experience with a 6½-inch reflecting mirror of very perfect figure -- 23½ inches focal length -- convinced the writer of the possibilities of such an instrument, provided that it can be accurately focussed and satisfactorily driven. These conditions, however, were found impossible of attainment with the limited means available, and with reluctance the mirror was dismounted.
The area of the field covered by a mirror is small compared with a portrait lens, and the definition falls off rapidly, away from the optic axis. Focal apertures being equal, the mirror is faster than the lens. It is much cheaper, and the weight of an 6-inch mirror of 2 feet focus, with cell and tube, is much less than that of a 6-inch portrait lens; but the handiness of the portrait lens, the comparative ease of focussing and keeping the focus, and freedom from silvering troubles, renders it more suitable for amateur use.
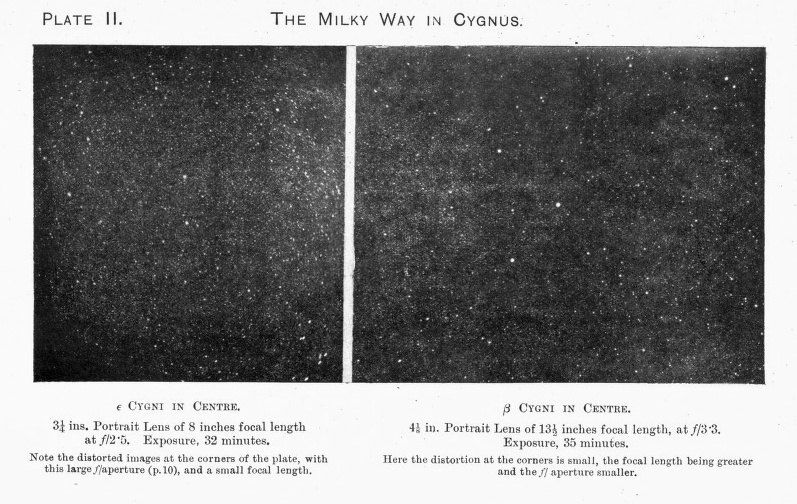
Of course if only a tripod or portable equatorial is available we are limited to anastigmats and portrait lenses of small aperture, but with these much useful work can be done. It is always advisable to use two or more lenses simultaneously. Accidents will happen, caps or shutters are forgotten, and really good nights are so few that it is wise to leave nothing to chance. Nothing is so disheartening as to find that one's only exposure say on a comet, is spoiled through photographic defects, with perhaps a week's run of bad skies to follow. Examining a plate of the Great Cluster in Perseus, the only exposure made on that particular night, the writer discovered near the centre of the field a small object which looked very like a comet, or a meteor caught 'end-on.' Here apparently was a real discovery! Subsequent exposures three nights later, however, revealed no trace of the object, proving that it could not be a comet, and inquiries of other photographic workers drew blank. The marking on the plate, therefore, might be a photographic defect.
Had a second lens been used simultaneously, the question would have been settled at once, for it is obvious that if of objective existence the marking would have appeared in precisely the same position relative to the surrounding stars on both plates; if a photographic defect, the chance against its occurrence in the same place on both plates is practically infinite.
It is always as well to remember, when making an exposure, however small your equipment, that you may be the only person photographing that particular part of the sky at that particular moment, and that provided you know your sky and that your plates are promptly and carefully examined, there is always a chance of an original discovery.
Star Clusters.-- Many of the larger open clusters. such as those in Perseus, Hercules, the Præsepe, &c., make fine pictures, but the scale of a portrait lens is insufficient to resolve them properly. and enlargement is necessary. Such clusters are difficult subjects to photograph as they consist of small faint stars which do not admit of being put sufficiently out of focus in the guiding eyepiece to give a fair-sized disc. In this case the only alternative is to select a fairly bright star, as near the cluster as possible, and use that as a guide, which of course, requires a special adjustment of the camera to bring the object to the centre of the plate.
All regions of the Milky Way will well repay photographic study, and as this part of the sky is fertile in variable and temporary stars it presents some possibilities for original discovery. A few pictures of the Milky Way are shown in Plates II. and III.
Nebulæ.-- The light emitted by the large nebulæ in Andromeda, Orion, &c.. is of considerable photographic intensity, and a short exposure, of say 20 minutes at ƒ/4, will easily exhibit their general outlines. But to obtain more extended detail, prolonged exposure with a high angular aperture is necessary, combined with very careful development of the plate. The 'telescopic' nebulæ, of which there are many thousands, are too small to be reached with portrait lenses. New ones are constantly being discovered photographically by means of the large reflecting telescopes.
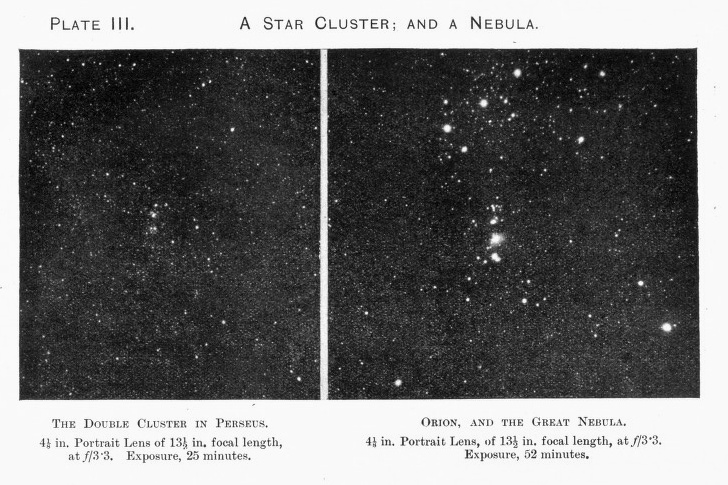
Some of the large diffused nebulosities, however, owing to their great area, can be more suitably photographed with a portrait lens than with a telescope of limited field. Among these may be mentioned the large outer spiral nebula in Orion, the 'America' nebula in Cygnus, and the long and complicated nebulosity running N. and S. of the star 52 Cygni.
These are all away beyond the reach visually of ordinary telescopes, and most of them will require an exposure of upwards of an hour at ƒ/3 to bring out their outlines; but there is a great fascination in being able to photograph objects which one cannot see, and the worker who can get, say, ninety minutes' exposure on a good night will find himself well repaid.
The amount of detail of these diffused nebulæ within reach of amateur equipment is generally so faint that it is difficult to reproduce on a print, but negatives can often be considerably fattened up,' by contact (see p.78).
Definition.-- A photograph taken with a good lens and backed plates (see p.26) should show star images perfectly hard and sharp, round, and above all small. Some lenses will not define stars properly, however carefully they are driven and focussed. Such should be scrapped after a fair trial, for they are useless. The reader is strongly recommended to obtain one or two of the beautiful portrait lens pictures of the Milky Way, etc, published by the Yerkes and Lick Observatories. A study of these prints will give a clearer idea of the result of perfect definition and driving than many pages of text. But do not be satisfied until your lens is perfectly focussed. A very small fraction of an inch makes all the difference between good and bad definition.
Covering Power of Lenses.-- The theoretical area of sky included by lenses of various focal lengths will be found in the Appendix (p.89), but this area will not be covered sharply. The star images near the edges will be distorted (p.10), and with some lenses to such a degree that identification will be difficult if not impossible. It will be found convenient, therefore, to keep a note of the angle covered sharply by every lens; this may be ascertained by comparing a print with a star map.
Focussing.-- The definition of a good portrait lens at the central portion of the plate is so perfect when the correct focus is obtained that it well repays extra care. A focussing screen answers for approximation, but actual trial exposures are the only satisfactory method.
(1) Get a fairly bright star in the center of the field of the guide telescope, preferably on the meridian, and near the celestial equator to get the most rapid motion across the plate.
Focus this star as sharply as possible on the camera screen, then put it slightly out of focus, after which carefully mark the position of the camera front, if a field camera, or of the focussing sleeve of the lens, if the latter has rackwork. Now remove the screen from the camera: substitute your loaded dark slide, bring the star again on to the across wires of the guide telescope, and without attempting to follow it, i.e., keeping the camera quite stationary, make an exposure of five minutes and replace the cap.
By commencing with the guide star in the centre of the plate, you are sure of being able to identify the first exposure, and can track off the later ones, either on the guide or any other star on the plate, from this. For it is absolutely necessary to 'know where you are' on a plate taken for focussing purposes, and the best and quickest guide is a star trail which commences in the centre. With a lens at ƒ/4 or ƒ/5, you will get probably twenty star trails at each exposure, and you need not necessarily adjust to the trail of the guide star, which gets further from the centre at each exposure.
(2) Alter the focus slightly in the direction of the correct focus, again marking the position, and allowing a few minutes interval, make another exposure of 10 minutes, proceed in the same manner and make three or four exposures, each twice as long as the preceding one, taking care that the adjustments are sufficient to cause the last exposure to be out of focus on the opposite side of the supposed correct focus from the first exposure.
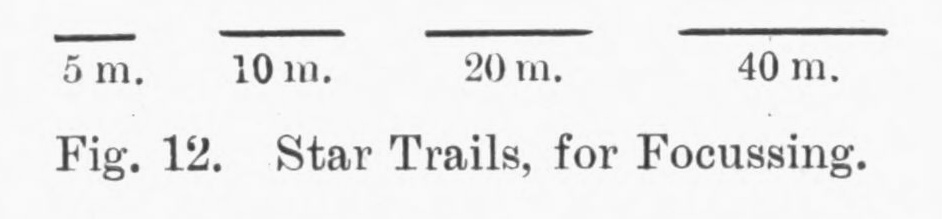
Always make good long trails, each one twice the
length of the preceding one, and beware of clouds;
a passing cloud will produce a trail something like
this  , and if you only get the first part of this trail,
you might think your focus was getting worse.
, and if you only get the first part of this trail,
you might think your focus was getting worse.
Number your markings on the camera front or lens sleeve, 1, 2, 3, etc. Develop your plate. A number of successive trails of varying sharpness, each increasing in length, will he found, and as the shortest trails represent the five minutes exposure, it is easy to identify them with the varying positions marked, and so arrive at the correct focus. If two succeeding trails are equally sharp, the focus lies between them. Adjust the focus by the trails in the centre of the plate; it is far better to cover a small field sharply than to try to 'average' the focus over a larger area. The effect of trying to average the focus is shown in Plate IV. A very slight focussing movement will make all the difference between good and bad definition, and when once the right position is obtained, fix everything securely to avoid any chance of accidental disturbance.
Guiding and Exposing.-- Before making an exposure,
bring a star into the field of the telescope, and let it
'drift' across; note the direction of movement across the
field, and turn the eye-piece tube round until one of the
cross-wires is exactly parallel to the star's movement.
Then put the image of the star out of focus until it shows
a fair-sized disc. Bisect it exactly with the cross-wires
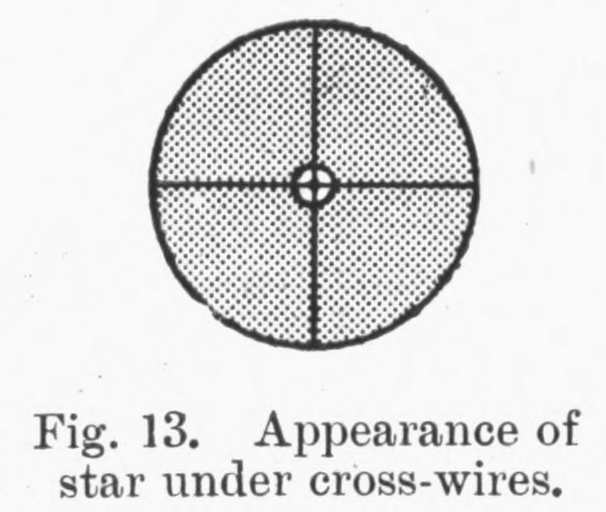 and make sure that the disc travels out of the field on the wire
like a 'pearl upon a string.' We are then sure of being able to
observe any irregularity of movement in Declination, whether due to
instrumental errors; or atmospheric refraction. Choose
a fairly bright guide star to commence with, and having
set the cross wires upon it (the shutter of the dark slide
being previously drawn), carefully and quickly uncover
your lens. If two or more lenses are used, uncover the
smallest first and largest last. The guide star must then
be kept exactly bisected on the cross wires by means of
the slow motion or clockwork, during the entire period
of the exposure, and the results obtained depend very
largely upon the accuracy with which this is done.
and make sure that the disc travels out of the field on the wire
like a 'pearl upon a string.' We are then sure of being able to
observe any irregularity of movement in Declination, whether due to
instrumental errors; or atmospheric refraction. Choose
a fairly bright guide star to commence with, and having
set the cross wires upon it (the shutter of the dark slide
being previously drawn), carefully and quickly uncover
your lens. If two or more lenses are used, uncover the
smallest first and largest last. The guide star must then
be kept exactly bisected on the cross wires by means of
the slow motion or clockwork, during the entire period
of the exposure, and the results obtained depend very
largely upon the accuracy with which this is done.
Before commencing an exposure say of forty-five minutes, rig up a convenient seat, and settle yourself as comfortably as possible. If working with a portable tripod stand, a pair of small household steps with a couple of cushions and a mat for the feet can be made into a fairly comfortable observing chair, while a low folding deck chair -- raised above the ground if need be -- will suit some positions admirably. A tall folding clothes-screen, with a cloth firmly fixed round it, and steadied by cords attached to tent-pegs, will form a good temporary telescope house, shielding the observer, and protecting the apparatus from vibration by the wind.
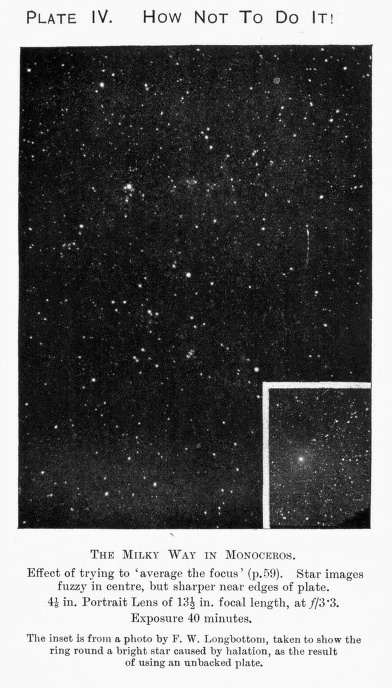
Learn to use the telescope with either eye, and to keep both eyes open. Begin with short exposures, say ten or fifteen minutes, and gradually increase the time as you gain skill in controlling your apparatus, always remembering that a short exposure, properly driven, will show more than along one with a lot of 'run-off.' Working at ƒ/4, if a slight run-off does occur, it may not show on the resulting negative provided that it is quickly corrected.
If clouds, however light, should happen to drift across the field during an exposure, cover up your lenses at once, even though the guide star can still be seen in the eyepiece, otherwise the star images are liable to come out large and woolly. An exposure may be continued after an interruption by cloud if care is taken to ward against accidental displacement of the plate; the eyepiece also of the guide telescope should on no account be disturbed.
Always keep an eye on the sky during an exposure, and if a meteor is seen anywhere near the area photographed, time it as accurately as possible, for you may be fortunate enough to catch it on your plate.
EXPOSURE.-- The law of exposure for stars is different from that of all other photographs, being in direct ratio to the clear aperture of the lens, irrespective of its focal length. Thus a lens of 12 inches focal length, working at ƒ/12, only needs the same exposure as one of 3 inches focus working f/4, because the actual aperture is 1 inch in each case. This pecularity is due to the fact that star images are always points, no matter what the aperture or the focal length of the lens may be, whereas in other photographs, increased focal length simply spreads the light over a larger area, thus weakening its intensity, unless the aperture is proportionally increased. Comets and nebulæ obey the usual law.
Duration of Exposure.-- This will depend, of course, upon the results aimed at. If it is desired to produce a photographic chart of a constellation, say for the purpose of identifying the position of a variable star or one of the faint planets, the exposure need not exceed thirty minutes, with a lens working at about f/4-5 and using plates of a speed-number about 400 H. & D. Too long an exposure will overcrowd the picture.
With nebulæ, if it is desired to secure faint outlying detail, the necessary exposure may run into hours, though in this case the bright central portions will come out over-exposed. On the Milky Way, the longer the exposure, the greater the number of faint stars recorded.
On some nights, few and far between in Great Britain, when the air is calm and the background of the sky approaches an almost velvety blackness, moonlight being absent, more can be secured in 30 to 40 minutes than in an hour under general conditions. For on these exceptional nights the contrast between the object and the sky is much increased, and the degree of contrast is generally more important than the absolute intensity of the object.
It will be found also that more detail is obtained during the first half of the exposure than the last half -- that is to say, the detail obtained in an hour's exposure on a given object is less in proportion to the exposure time than the detail obtained in half an hour. The writer's view is that, apart from any tendency to fog, the sensitiveness of the emulsion of fast plates falls off very rapidly during prolonged exposure.
Plates.-- As the aim of all long-exposure photography it to record the greatest possible detail in the shortest possible time, the fastest plates obtainable should be used, preference being given to those found to have a reasonably fine grain, which permits of enlargement when necessary; unfortunately, in general, the faster the plate the coarser the grain.
Photographic and Visual Magnitudes.-- The visual magnitude of a star is found by comparing it with a 'standard' polar star (real or artificial) at the name altitude. The photographic magnitude is similarly obtained by comparing the diameter of its disc on the negative with that of a 'standard' polar star at the same altitude, photographed under the same conditions as to exposure, etc., it having been found that the diameter of the discs is an index to the relative amount of light emitted. From these measurements the actual photographic magnitudes are deduced, each magnitude being about 2½ times as bright as the one below it.
But as stars vary in colour, red stars, being less actinic, will have less photographic effect on the plate than white stars of the same visual magnitude. They will, therefore, act as if they were white stars of lesser brightness, so that their discs will come out fainter on the plate than their visual magnitude would lead one to expect. It is evident, therefore, that visual and photographic magnitudes must differ to some extent according to the colour of the stars, and it has been found that while some stars are photographically a little brighter than they are visually, others may be nearly two magnitudes less bright. The difference, in fact, depends on the proportion borne by the actinic intensity to the visual intensity, or, in other words, to the 'type' of the star. The difference between the visual and the photographic magnitude is known as the 'colour index.'
In Harvard Circular No. 160, Professor Pickering states that "the colour of all stars having; the same type of spectrum is the same, and that the correct photographic magnitude of stars up to the 8th magnitude, or fainter, can be deduced from the known visual ones, without the trouble of measurement, by means of a short Table." This is given in the Appendix (Table VI.). Stars of intermediate type are found to have approximately proportional equivalents. It will be seen by the Table that stars of Class A,"which will include one-half of the stars of all magnitudes," have their visual and photographic magnitudes the same. For stars much fainter than the 8th magnitude, the Table is unsatisfactory, "owing to the difficulty in classifying the spectra," and the measurement method is employed.
The measurement of the magnitudes on a negative is quite beyond the scope of the ordinary amateur. Not only does it involve the use of an expensive measuring instrument, but in addition it is a very delicate operation, demanding much skill and judgment. And as stars near the edge of the negative, though equal in size and density to others near the centre, are for optical reasons really fainter, allowance has to be made for 'position' on the plate. Thus there is a good deal of figuring to be done in addition to the labour of measurement.
Identifying Stars.-- It will often happen that when a picture is taken of a portion of the heavens with which the worker is unfamiliar, identification of the principal stars on the plate is exceedingly difficult. Photographic and visual magnitudes differ very considerably; the scale, too, is smaller than a naked-eye view, and 20 minutes' exposure on the crowded portions of the Milky Way on a good night will secure thousands of star images, the result of which is often absolutely bewildering. A reversed image (p.14) is also confusing when comparing with an atlas, or portrait-lens photographs.
A good plan is to put a mark on the edge of the plate which, when in position. will be at the top side of the camera. Then with a good star atlas (Norton's Atlas should be in the possession of every amateur) the principal stars can soon be identified from the central star on which the telescope was guided. Some practice may he needed, but generally, after a little concentration, the whole group or constellation seems to jump into view, and the proper S. and N. points can be marked on the edge of the plate.
In examining a negative, place it in a printing frame with a sheet of perfectly clean white paper behind, and close the back of the frame as if for printing. By this method the star images stand out strongly against the white background, and detail can be seen which might be missed altogether if the negative was examined by simply holding it up to the light.
Recording Exposures.-- If more than one camera is used, name them A, B, C, etc., and when the slides are loaded, put a corresponding letter in pencil on the margin of the plate. Always keep a record of every plate exposed. The writer uses a notebook, recording on the left-hand page the date, time, duration of exposure, lens stop, and plate, also state of the sky, leaving the right-hand page for notes on the results obtained. The details, date, and time of exposure, can afterwards be written on the margin of the negatives in ordinary ink, using a fine pen.
The introduction of the photographic plate into astronomy has taught us much of what we know of the physical conditions of comets. With few exceptions, all faint comets, whether new discoveries or periodic comets returning to our ken after an absence, it may be of many years, are first found by photography. When a periodic comet is about due, the approximate position in the sky at which it should appear is carefully calculated. A set of positions, or Ephemeris, for given dates is published, and all observers who tackle such work, immediately commence to photograph the region night after night.
If nothing is found, a new set of positions may be tried, until the comet, very small and faint, is at length brought to light, and the photographic campaign proper can begin. The average small comet is generally a very disappointing object in the telescope, faint and hazy in outline, but some are strong in actinic light, and it is surprising how quickly they can he photographed. Morehouse's Comet, 1908, was a good example of this. Although it could never be called a brilliant object in the telescope at its brightest phase, a few minutes exposure at f/4 was sufficient to show it's outlines (Plate V.)
New comets are often found in the neighborhood of the Sun, as they are then generally at their greatest brilliance.

If the reader wishes to try his hand at comet-catching, he may carefully sweep with his telescope in the western sky immediately after sunset, or in the eastern sky before sunrise, and photograph any suspicious looking object. But you must know your sky well, or you will be continuously misled by well-known nebulæ, or even stars seen through a hazy horizon.
When you discover a comet, not in the sky, but merely in the columns of the daily Press, carefully mark its position on your star map from the information given. If after careful search you cannot see it in your telescope, put in your plates, using if possible two cameras, as recommended in Chapter VII., and make a good long exposure, guiding on any fairly bright star as near to the ascertained position of the comet as possible. On examining your negatives, the comet, unless it is too faint for your instruments, will usually come out as a short fuzzy trail with perhaps a small central condensation, and if its magnitude is on the increase, which is often the case on discovery, it is soon possible to set the telescope on it. Those who have well-adjusted equatorial stands with circles will, of course, be able to set their instruments to the comet's position at once; but, failing this, the above method will enable a faint comet to be kept under observation until it is bright enough to be seen in the guide telescope, or if its brightness is decreasing, until it disappears out of range of our camera. As soon as it can he well seen in the telescope, guiding should be commenced on the comet itself.
Guiding on a comet, unless it has a fairly bright nucleus, or head, is sometimes difficult.
Focus the head or brightest part carefully, and turn the eyepiece to get its direction of motion across the field, as recommended for stars, and keep the head of the comet carefully on the cross-wires during the exposure.
On examining his negative, the beginner may be surprised to find that all the star images are drawn out into short trails varying in length according to the exposure given. This is quite as it should be, for we must remember that a comet has a motion of its own, sometimes extremely rapid. The shape of the surrounding star trails is a good general test of the accuracy of the guiding. If these are irregular, or of a zig-zag formation, the guiding is inaccurate.
Exposure.-- When a comet's position is near the horizon and it sets soon after, or rises shortly before the Sun, which often is the case when it is at its greatest brilliancy, the difficulties of photographing it successfully are much increased, as it is projected against a more or less illuminated background. In this case the contrast between the comet and the sky is feeble. The brightness of the sky will fog the plate and blot out the image of the comet if the exposure is too prolonged. The worker must be guided entirely by experience, bearing in mind that it is better to err on the side of too short an exposure rather than be unable to develop the image properly. Even on moonlight nights fair photographs can be obtained if a good long dew-cap is used on the lens, and provided the comet is not too near the moon; but much depends on the atmosphere prevailing.
In photographing comets it is advisable that the camera should be adjustable on its mount in such a manner that the head of the comet can be displaced to one side of the plate while still covered by the guide telescope. In this way the maximum length of tail can be recorded. A handy portable equatorial, fitted with a 3-in. portrait lens and guide telescope, is a most useful kit for comet work even if a larger fixed mount is available, for comets have a way of appearing in all sorts of awkward positions, and it may happen that one's only chance of success is from an attic window! Windows of rooms, however, are rather unsatisfactory places for both telescopic and photographic work, as the least movement on the door, or a gust of wind, sets up tremors. Also the air of a heated room is apt to make the air in the neighbourhood of a window unsteady, if it is cold outside.
When you get a comet, photograph it at every available opportunity, carefully recording; the time and details of each exposure. A good series of pictures will show the wonderful and varied changes in appearance which most comets undergo, better than any amount of eye observation, and the plates have the additional advantage that they are permanent records which may afterwards be of considerable value when combined with other series as a basis for the physical study of cometary phenomena. It is work particularly suitable for amateurs, and many fine records of comets have been secured with small and inexpensive apparatus.
Excellent work can be done with a portrait lens, say, of 10 to 15 in. focal length, supplemented with an anastigmat of about 6 in. focal length, for showing the spread of the tail, if the comet be a large one. The shape and length of the tail will often change from night to night. Smaller subsidiary tails will appear and afterwards vanish.
Any sudden disturbance or 'boiling' of the comet noticed in the guide telescope should be carefully noted, as this may be cometary, not atmospheric.
Meteors.-- The writer has always considered the successful photographing of meteors to be plainly a matter of chance; for although he has exposed a great number of plates under conditions of varying suitability, not one meteor has so far been recorded. This experience, however, should in no way discourage others, for it is somewhat uncommon. Other workers have been successful in securing meteor trails after a few exposures, and doubtless a thorough and carefully planned campaign by half-a-dozen determined workers would prove successful and would add considerably to our somewhat meagre knowledge of the radiants, etc., of these mysterious bodies.
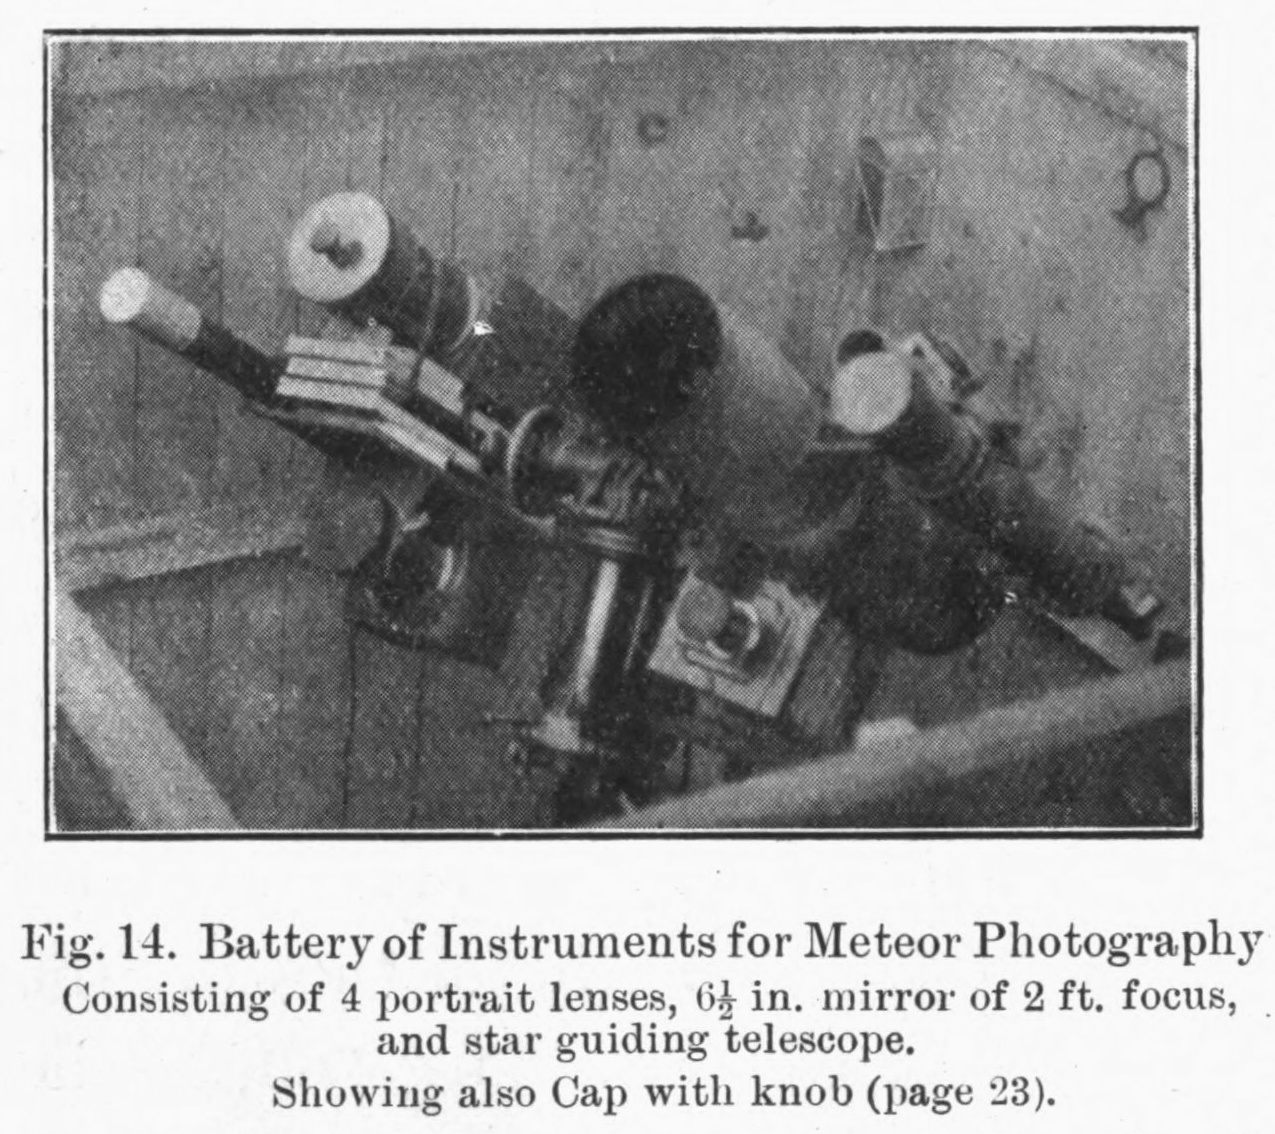
The portrait lens, owing to its large field, is the best type of instrument; but in trying for a meteor shower every available lens and camera should be used. The writer's method is to attach all the cameras to the equatorial, as shown in Fig.l4, and adjust them to cover as large an area of sky as possible, allowing same overlap in the case of lenses having a relatively small angle of view: Table III. in the Appendix will be found convenient for this purpose. The guide telescope is then set on a fairly bright star, some distance off the radiant as plotted on a star map, and the whole battery driven for as long an exposure as possible. A careful watch is kept upon the sky during the exposure (with a little practice this can easily be done), and any meteors seen are carefully timed, and the direction of flight noted as well as possible.
Exposures may also be made with fixed cameras. These should be propped up on the ground or any suitable support, carefully trained in the right direction. This simple method may appeal to any photographers possessing ordinary cameras with rapid lenses, and they have a good sporting chance of scoring over the man with more elaborate apparatus.
A meteor recorded on the plate appears as a straight streak, varying in length and intensity according to its brightness. All plates exposed for meteors should be carefully gone over with a magnifying glass, for a faint trail may easily escape notice if the negative is not carefully examined; the two or three seconds of visibility are scant enough to leave an impression on the plate, even for a bright meteor. For this reason the fastest plates should be used.
Details of the times when the different showers may be expected are given in any good almanac, and particulars of the radiants are published in the monthly 'Astronomical Notes' in the English Mechanic, but a few of the chief periodic showers are noted on p.89.
If two or more observers situated some distance apart can co-operate in meteor photography, their results will be of scientific value; for if the same meteor is recorded at two different stations, its height and direction of flight can be determined accurately. Details of all meteors seen or photographed should be sent to the Director of the Meteor Section of the British Astronomical Association. [136 Rodenhurst Road, Clapham Park, London, S.W.A.]
Development of Plates.-- It is somewhat difficult to lay down any precise instructions for the successful development of astronomical photographs. Much might be written, and pages of various formulae given; but after all, experience, and extreme, almost antiseptic, cleanliness are the chief aids to success; and those readers who have successfully followed the methods of ordinary photography are not likely to make many mistakes. It must be borne in mind that our object in astro-photography is to produce negatives of extreme sharpness and accuracy of detail, and any method which would tend to produce the slightest effect which has no objective existence must be carefully avoided.
The following notes are the outcome of the writer's own experience, but doubtless other methods are equally applicable.
(1) The backing should in every case be carefully cleaned off the plates by means of a clean sponge or swab of cotton wool moistened with warm water, taking, care not to get any of it on to the blot side, which should be carefully kept dry.
(2) Tap the edge of the plate against some firm object, in order to dislodge any minute particles of dust, &c., which might be on the film side.
(3) On no account wet the surface of the film before pouring on the developer, as this is a most frequent cause of air bubbles, which are very difficult to dislodge.
(4) Use plenty of developer, sufficient to cover the plate, and be careful to pour it over the plate with a broad sweep, as, if it all impinges on one spot, that region will come out darker than the rest.
(5) Rock the plate frequently, and see that the table is level, so that the developer will not run to one end of the dish.
(6) Keep the plate covered up from the light as much as possible during development.
(7) Have your developer and fixing bath at the same temperature.
(8) Never suddenly rinse a plate under the cold-water tap before fixing; this will sometimes cause blisters and markings on the film which are impossible to remove.
(9) See that your dark room light is 'safe.' There is no harm in plenty of red light as long as it is safe, and is not allowed to fall continuously on the plate. It may be tested by exposing a new plate near the red light, one-third of the plate being exposed for ten minutes, another third for five minutes only, and the remainder completely covered up from the light the whole time. On developing, the extent to which the exposed portions are blackened will indicate the safeness, or otherwise, of the light.
In developing pictures of the Sun or Moon, any tendency towards rapid 'flashing out' of the image should be avoided. Commence with a weak developer, and when the image appears, the strength of the solution can be gradually increased until the desired amount of detail and density are secured. This is easier to control with a solution which is slow in action.
This method may also be applied to comets and nebulae; but it should be remembered that prolonged development will blot out the brighter details of a nebula, though it will bring out the maximum amount of faint extension of nebulosity.
In the case of stars, a fairly rapid and vigorous developer is recommended, and little is gained by prolonged soaking.
In all cases a careful watch should he kept upon the background of the plate, and development should he stopped before the background -- if it shows signs of rapid blackening -- is opaque to the ordinary developing light.
This fogging or blackening of the background is rather an important point. A great deal depends on the state of the sky at the time of the exposure. On some occasions when there is present a lot of what may he called 'sky light,' for want of a better name, it is practically impossible to get a satisfactory negative. An east wind, even though the sky seems clear, will generally give trouble in this way. Comets photographed against a morning or evening sky are the most difficult to develop properly, but in this case it is well to push the development as far as possible consistent with securing a good amount of contrast between the image and the sky. It must not be forgotten, of course, that the density of the background is considerably reduced after fixing, particularly with some brands of developer.
Fixing should be done in a freshly-made bath and plenty of time allowed.
A thorough final washing is essential to ensure permanency.
Developers.-- The present writer has invariably used one-solution developers, and gives preference at present to Azol, but if the worker is in the habit of using one particular formula, and thoroughly understands its working, he will be well advised to stick to it, varying the strength of the solution as required. Generally speaking, one-solution developers are very clean and free from any tendency to produce stain, but require development to be pushed rather further, as the density of the negative is considerably reduced in the fixing-bath.
Drying.-- The drying of negatives is a matter often treated too lightly and left to chance, but negatives which have been allowed to dry unevenly or on which particles of dust, etc., are allowed to settle while drying are very unsightly, and the defects difficult to remedy afterwards.
The ordinary drying rack is usually much too cramped, and if one is used, the negatives should be inserted in every fourth or fifth groove to allow free circulation of air. The rack should be set up in a warm atmosphere in winter time preferably in a room having a fire, and in a place where dust, etc., is not likely to settle on the plates.
A very good plan is to make a light wooden cage covered with thin muslin, such as is used for protecting meat from flies, etc. If the drying-rack is put in this cage the whole arrangement may be put in a draught or on a mantelshelf with no fear of dust settling on the plates.
The method, often advocated, of drying by means of a bath of methylated spirit should not be employed, as the commercial spirit is not pure, and usually results in stains or markings.
Enlarging.-- If any serious work is attempted, it is very necessary to be able to make enlargements either on glass or paper. An enlarging lantern is not suitable for astronomical work. Generally speaking, the detail is so faint and the critical definition required is so delicate that it is advisable to make an enlarged positive, and then take off a negative by contact, and if prints are required, produce them direct either from the enlarged positive by contact, or from the enlarged negative.
For these processes a daylight enlarging camera should be used. It should be of the adjustable bellows form and is not a very expensive instrument to buy. One that will enlarge from quarter plate to 8½ × 6½ is quite big enough, and if the reader is fairly handy with tools he could easily construct one for himself, provided the dark slide and focussing screen were bought. If a good rapid rectilinear or anastigmat lens of about 5 in. focus is available instead of the simple single lens usually sold with these instruments, so much the better. In use the instrument should be propped up in a window, preferably facing north, in such a way that the light from the sky falls direct on the negative. Even illumination is secured, and the necessary exposure considerably reduced.
The enlarged image should be very carefully focussed, the easiest and quickest method of doing which is by the use of a special focussing plate. This is nothing more than an ordinary spoiled plate with a number of squares ruled on the film by means of a fine scriber point and a steel straight edge. The point must cut clean through the film on to the glass. This is put into the negative holder, film side towards the lens. If now a magnifying focussing glass is used on the screen, the image of the squares can very easily be made perfectly hard and sharp, and the focussing plate may then be removed and the negative put in, with the comforting feeling that all is well.
Carriers for holding small-sized plates in a dark slide, wherever used, are a frequent source of trouble unless they are in correct register. If they are used with a daylight enlarging camera, supposing for instance that we want to make an enlargement of a comet on to a quarter-plate, be sure that the plate when in the carrier comes into exact register with the focussing screen; that is to say, that it is exactly the came distance from the lens. This is not always found to be the case, and it is better to have a piece of ground glass of quarter-plate size, to fit the carrier, and focus on this and thus insure correct register of the plate.
Minimising Granulation.-- Apart from negatives of the Sun and Moon, which present little difficulty, the chief trouble in enlargement, is excessive granulation, owing to the employment, of necessity, of very rapid plates.
If a negative, taken on a plate of any average make of a speed number about 300 H. & D., be enlarged direct to about six diameters, the grain on the resulting print will be found to be so pronounced as to almost resemble a minute black powder over the entire background of sky. If a considerable amount of enlargement is required, as is sometimes necessary in tracing a faint comet or a new star, it is best to proceed as follows:--
Make an enlarged positive either on a special 'process' plate or a good brand of 'lantern' plate; both these classes of plates have a very fine grain and slow speed. The magnification or enlargement should not exceed about two and a half or three diameters.
From this positive a further enlargement can be made either on a plate or paper, as required. The resulting granularity is thus reduced to about one half the amount which would have occurred if the enlargement had been made direct from the original negative. Exposure will vary with the amount of enlargement, density of negative, and brightness of the light, and it is consequently impossible to give any definite instructions.
' Fattening up.'-- When it is desired to produce the greatest possible amount of visible detail from a negative of a comet or nebula, begin by making a positive, by contact, on a very slow plate. Then make a fresh negative from the positive, and repeat the process, giving in each case a full exposure. By careful manipulation, the resulting detail on the final negative will show a marked improvement on the original. It is difficult to give details of the exposure required; this will vary with the density of the negative, power of the illuminant, etc. Using lantern plates, and holding the printing frame at about 6 ft. from an ordinary incandescent gas burner, 10 to 15 seconds exposure may be required; but of course this is only approximate.
It should be noted however, that the shorter the exposure and more rapid the development the greater, the tendency towards granulation.
Intensification.-- The reader who is an expert in photographic manipulation may feel tempted to try the effect of intensification by mercuric chloride in order to increase the amount of detail. It cannot be too strongly urged that this or any other process of intensification should not be resorted to in astronomical photography. The writer once intensified some short exposure negatives of the Pleiades group and obtained a magnificent amount of nebulous extension which was afterwards found on careful comparison with Lick and Yerkes photographs to have no objective existence!
Printing.-- The print from which the illustrations in this book were made were for the most part produced on glossy Velox paper; but any paper, whether P.O.P. or gaslight, is equally suitable. A glossy, smooth surface paper is best. Prints of the Sun or Moon usually come out better on P.O.P., as the density can then be carefully watched during printing.
For the production of star charts, &c., the method in which the stars are represented by black dots on a white background has much to recommend it, owing to its clearness, the print being made from a positive. To obtain the best pictures of the Moon, the method already described, of making an enlarged negative on glass and afterwards printing from it by contact, should be employed.
In conclusion, and for the encouragement of the beginner, who might be a little disheartened by the many pitfalls -- the true amateur works at his hobby because he must and needs no encouragement -- the importance of small-scale photography as an adjunct to more advanced work should not be overlooked. Opportunities will arise when a photograph of the field surrounding a new or variable star, or a chart of some particular region on a certain date, is required for some special investigation, and the reader who can supply it will, apart from his own work, be assisting in the advancement of one of the oldest and noblest of the sciences
Barlow Lens.-- This, as usually made, consists of a double concave lens placed in front of the eyepiece, and increases the magnifying power of an eyepiece by about 50%. It is a useful accessory, inasmuch as it gives an intermediate power for each eyepiece of a set, and increases the highest power.
Cameras.-- When constructing cameras for astronomical photography, the following points should receive attention:--
(1) Keep everything as light an possible, consistently with rigidity, in order to avoid unnecessary weight on the mounting and stand.
(2) Take scrupulous care that all joints (also bellows, if any) are perfectly light-tight, as the apparatus may be used in full sunlight.
(3) The inside of the camera should be carefully blackened with ebony stain, care being taken that it is not laid on so thickly as to dry shiny.
(4) The face of the camera back should also he blackened, and covered with a piece of thin black velvet to prevent light entering between the slide and the camera back, during exposure in sunlight.
(5) Be sure that the back is accurately 'squared on' to the lens, otherwise the focus will not be equal on each side of the centre; a few trial exposures may be necessary before the slide-holder is finally screwed up. Always use screws, as any little adjustments required after the camera is finished can be made without much trouble.
Lenses having rackwork focussing can be mounted on tubes of stout tin or zinc in place of the usual bellows or box form of camera (see Fig. 8, p.22). All that is necessary is to cut off a suitable length of tubing and square off the ends accurately. A turned hardwood stopper is made to fit tightly into each end, one stopper being bored out to take the lens flange nicely; the other has a square hole approximately 3¼ x 4¼ inches, and is fitted with brass or wooden rebates to take the dark slide.
Stout cardboard cylinders, used for packing various articles, can often be obtained of considerable diameter. These are most useful; if given one or two coats of enamel paint, they are exceedingly strong, and will stand screws being driven through them even better than thin wood.
Tubular cameras are even less bulky than the ordinary forms, and are well suited for using on small light equatorials.
Box cameras need no special instructions beyond mentioning that they should be strongly made of seasoned wood to avoid any possibility of warping or shrinking.
Dark Slide Carriers.-- Get a piece of brass tube of the same diameter as the tube carrying the eyepiece, and approximately the same length; the special tube known as 'optical tube' should be used if possible.
On one end of this tube solder a stout brass flange -- not thinner than S.W.G. 17 or 18 (about 1-20th inch), as it must be rigid -- with three equally-spaced screw holes. It is advantageous to let the end of the tube project through the flange to the extent of about 1-24th inch, this provides a light-trap for say stray light penetrating between the flange and the front when working in full sunlight.
Plane up a piece of 3/8 inch mahogany or other good hardwood, and fit it with grooved bars or rebates similar to those on an ordinary camera; the bars should be fixed across the grain of the wood to check any tendency to warp. The carrier should be made about twice as long as the dark slide itself, so that by moving the latter along the grooves, several successive exposures may be made on one plate. This could not be done over the whole length of the plate if the carrier were not extended. (See Fig. 3, p.14).
The bars having been fixed, a smooth hole of the same diameter as the bore of the flanged tube is cut in the board, halfway between the bars, and in the centre of the carrier. The flanged tube is then carefully fitted to this hole, on the opposite side to the bars, a small rebate being cut out to suit the projecting end of the tube.
A coat of dead black varnish inside the tube and hole, and over the face of the carrier, and a spring from a printing frame to secure the dark slide in any position, completes the apparatus. A piece of thin black velvet may he glued on the face with advantage, to ensure that the slide is light-tight during an exposure.
Those with the necessary appliances and mechanical skill, can fix the carrier to the eyepiece tube itself by a flange with a small male screw with the same thread as that on the eyepiece -- 17 threads per inch is the standard.
Clamps.-- The following will he found convenient for adjusting, or quick removal.
Take four pieces of 3/8 or 1/2 inch wood and cut them
in pairs to a loose fit on the telescope tube, the upper
half being broader than the lower. Line each pair with
thin leather to give a good grip and avoid scratching
the tube, then make the clamp a tight fit on it.
Next clamp each pair closely together in a vice, and
screw at one end a hinge as indicated in Fig. 15;
on the opposite side of the central hole, drill one piece
with a 5/16 inch (full) hole, and in the corresponding
piece fit a brass nut to suit a 5/16 inch thumbscrew
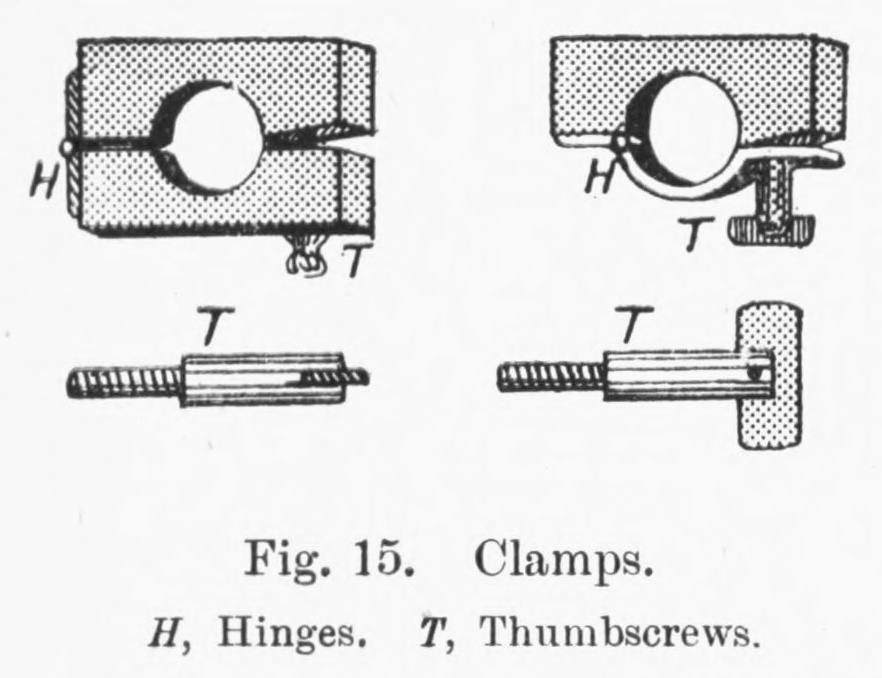 T. Finally a small portion of the under clamp should
he planed off to allow the clamp to grip, as shown in
the sketch. If desired, an alternative design may be
adopted for the lower clamp, a hinge being riveted to
a strip of stout brass (S.W.G. 16 or 17) and bent round
to closely encircle the telescope tube; it also should be
lined with thin leather. The long screw will be found
convenient for clearing the telescope tube; the wing is
a piece of stout brass soldered in a saw cut.
T. Finally a small portion of the under clamp should
he planed off to allow the clamp to grip, as shown in
the sketch. If desired, an alternative design may be
adopted for the lower clamp, a hinge being riveted to
a strip of stout brass (S.W.G. 16 or 17) and bent round
to closely encircle the telescope tube; it also should be
lined with thin leather. The long screw will be found
convenient for clearing the telescope tube; the wing is
a piece of stout brass soldered in a saw cut.
These clamps are either screwed to the bottom of a single camera, one at each end, or to a strong, light board or table, sufficiently wide to hold two or more cameras, as shown in Fig. 2. By loosening the thumbscrew, the apparatus can be quickly removed, or slid round or up and down the telescope tube, to get correct balance, as explained in the paragraph on balancing (p.31). Care must be taken to have the upper portion of the clamp high enough to keep the field of view of the lens clear of the end of the telescope.
Driving Clocks.-- The writer adapted the escapement of an alarm clock by attaching a small pulley to the hour hand spindle, and connecting thus with a cord to another pulley attached to a small counter-shaft running in bearings. This counter-shaft carried a turned drum of hard wood. A wire cord passing completely round a groove in the R.A. circle, its end fastened with a setscrew, led on to the drum, and was given three turns round it and thence to the weight.
By calculating the correct size of the pulleys, the hour spindle of the clock made two revolutions to one of the R.A. axis, and the escapement of the clock prevented the drum being revolved by the weight excepting at the correct speed. This arrangement worked fairly well and was very sensitive to control, but the escapement soon wore out and the slipping of the cord round the pulleys was difficult to obviate.
An excellent control has been made from one of the powerful spring motors used for revolving the show stands in shop windows. These are generally governed by a fly or fan, and have a fairly steady rate of speed.
Gramophone motors, with the spring replaced by a cord and weight, have been successfully adopted to control instruments of considerable size. Details of how to construct such a driving clock will be found in the English Mechanic, Vol, lxxvii, April 1903.
Photographic Reflecting Mirror.-- The 6½ inch mirror used by the writer is shown mounted in Figs. 6 and 14. It is a parabolic mirror of 23.5 inches focus, silvered on the face, with an effective aperture of about f/4.
The mounting is a circular tube of galvanised iron. The photographs are taken at the primary focus on plates 45 x 60 millimetres (1¾ x 2-3/8 ins,), carried in single metal dark slides, which obstruct less light than the wooden type. The slide holder is supported on a bracket with lock nuts and adjusting screws for focussing. The plate, of course, faces the mirror, and the image is reversed as regards left and right (p.14). The mirror rests on thick felt in a tin cell with three adjusting screws for squaring on, similar to the ordinary form of Newtonian mount (Fig. 16). It is the work of the Rev. W.F.A. Ellison, and is of excellent figure. The tube was made by a local tinsmith, and has a circular hole about 5 inches in diameter, cut out opposite the plate holder to enable the hand to be introduced to manipulate the dark slide. This hole is kept covered by a black cloth during an exposure. The plate holder and focussing screws were 'adapted' from gas fittings.
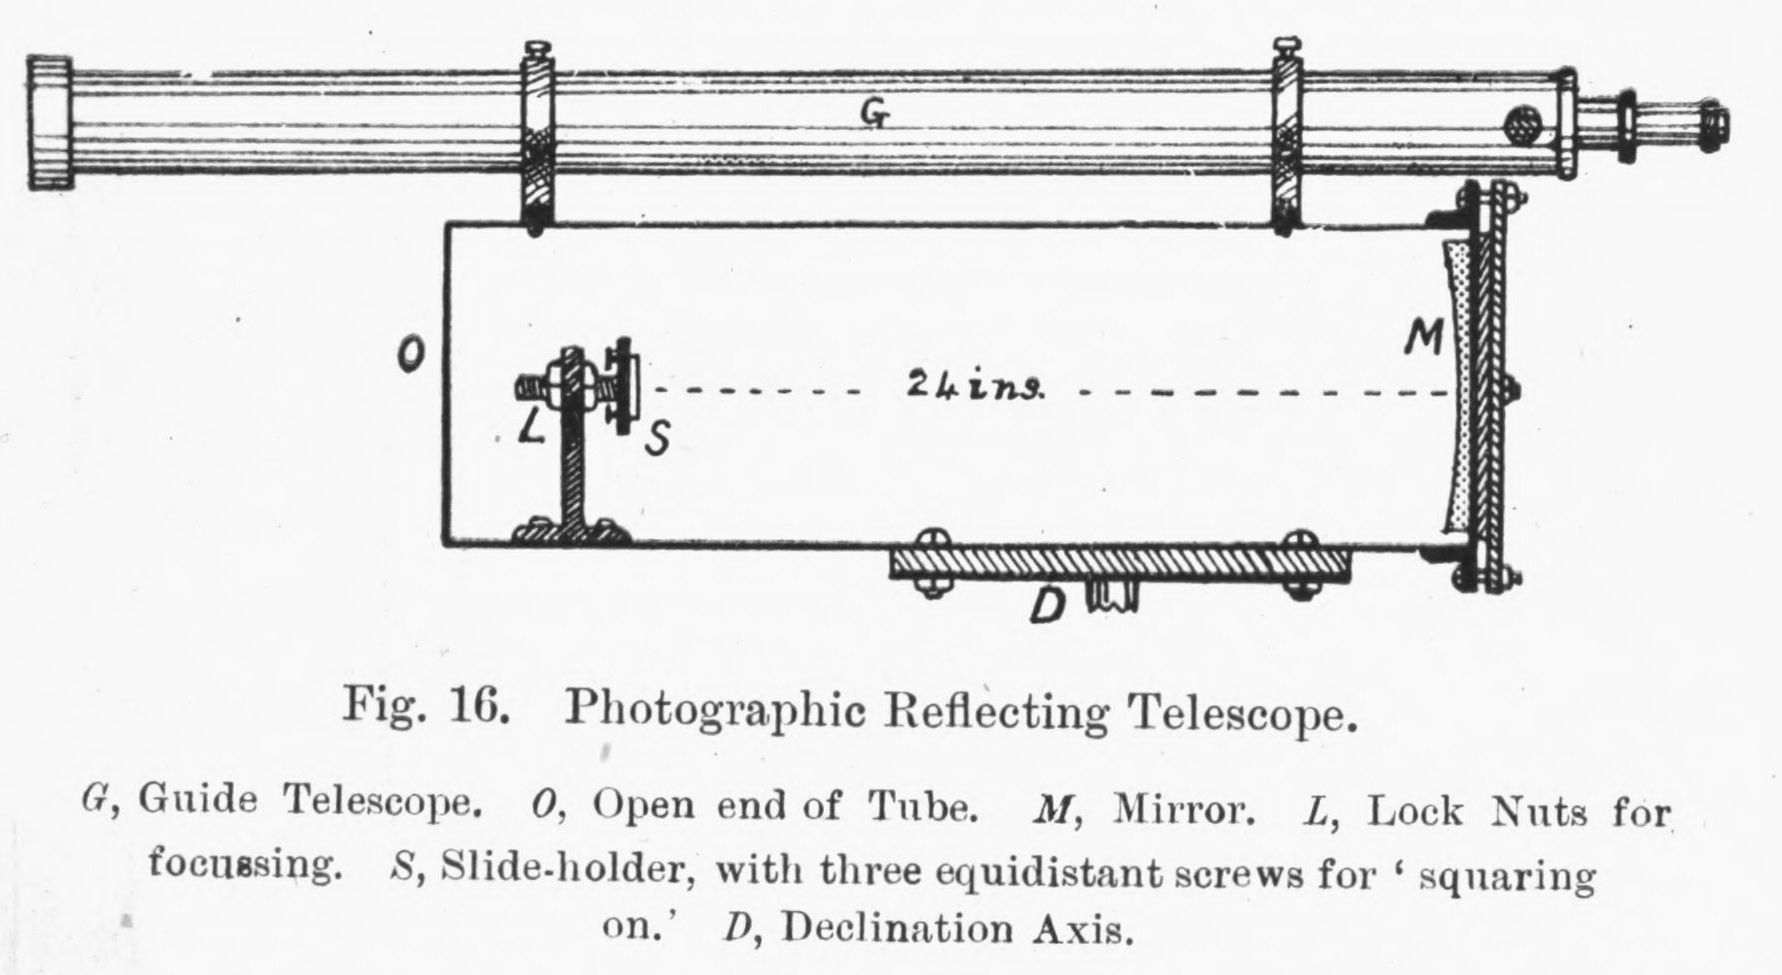
Even with a good clock-driven equatorial, the successful mounting and driving of such an instrument will test the skill and patience of the amateur to the utmost. The few examples taken with hand slow motions and short exposures will serve to show the scale and light grasp. When freshly silvered, it is much more rapid than a portrait lens of same ƒ/ aperture.
Stands.-- For home-made portable tripod stands the following points should be attended to:-
(1) See that the legs are of ample section to bear the weight. It is better to have an extra heavy stand than one that is too light to carry its burden steadily.
(2) See that the pivots have not the slightest trace of 'shake,' either sideways or vertically. Their bearings should be long, so as not to wear, and three or four inches apart, which enables them to resist twisting strains applied at the centre of the top.
(3) The top of the stand should be perfectly flat, so that the pillar of the telescope has no tendency to rock when screwed down.
(4) The extremities of the legs should be at least a square inch in area, to give a firm bed on softish ground; the metal points should not be longer than about 3/8 inch, which is sufficient to give a good grip.
Telephoto Lens.-- This consists of an ordinary camera lens, anastigmat or portrait, with a double concave or negative lens mounted behind it. The effect of this combination is to increase the focal length considerably, with a comparatively small increase of camera extension. Such a combination, even with a very rapid anastigmat (positive) lens, will not work at much higher than f/10, with a magnification of 2½ diameters, and is consequently useless for astronomical photography -- excepting as indicated on page 41, for recording the Corona streamers during a total Solar eclipse.
Telescope House.-- The comfort and convenience of a simple inexpensive telescope house is very great, and the observer who has sufficient space and sky room to erect one will find himself well repaid. Moreover, it will the found that the instruments will be much more frequently used, as observing in the open, after snow or rain, when definition is often quite good, is a severe trial of one's enthusiasm.
The best type for photographic work is undoubtedly one in which the roof is arranged to run completely off. It is much easier and cheaper to construct than either a dome or drum-shaped roof, is less liable to stick, and has the advantage that once it is off there is no shifting or revolving, however long the exposure. The objection lodged against the run-off roof is that it makes the house draughty, but if a refractor is used, the eye end is usually well below the level of the walls, and with a reflector, the nearer one gets to the open air the better for its performance.
The author's telescope house is well illustrated in Figs. 6 and 17. The framework is 2 x 3 ins. and the sides and floor ¾ inch tongued and grooved boarding. The floor is raised 18 inches from the ground, giving a free air space, clear under the building. The pillar of the equatorial goes through a hole in the floor without touching it, giving ventilation from below and avoiding any chance of vibration. This is most important, as it prevents rust, and 'sweating' on the instruments: perfect ventilation is essential, whilst the house is closed. The roof frame is 2 x 2½ ins. covered with ¾ inch floor board, on top of which is laid tarred felting. It runs on six small steel wheels, originally made for the bottoms of the American type of travelling trunk, arranged equidistant in pairs on either side, the centre pair being arranged to take more weight than the end pairs; this prevents binding. The wheels simply run on the wooden framework without any metal or other lining, and the roof is prevented from slipping off the framework by means of a piece ¾ x 2 ins. screwed on each side, as shown in Fig. 17. The frame pieces of 2 x 3 ins, are carried out beyond the house to a distance equal to the length of the house, and thus form a pair of 'rails' on which the roof runs off; the ends of the frame pieces can either be supported by the garden wall or on posts braced across. A stop piece should be bolted to the end of each rail, to prevent the roof being pushed off too far.
The walls were built as low as possible to attain maximum sky room, and the gable of the roof just passes clear of the instruments placed horizontally, with the Declination axis pointing E. and W., but a door might be made on the gable end, if required, allowing the roof to pass over the telescope end.
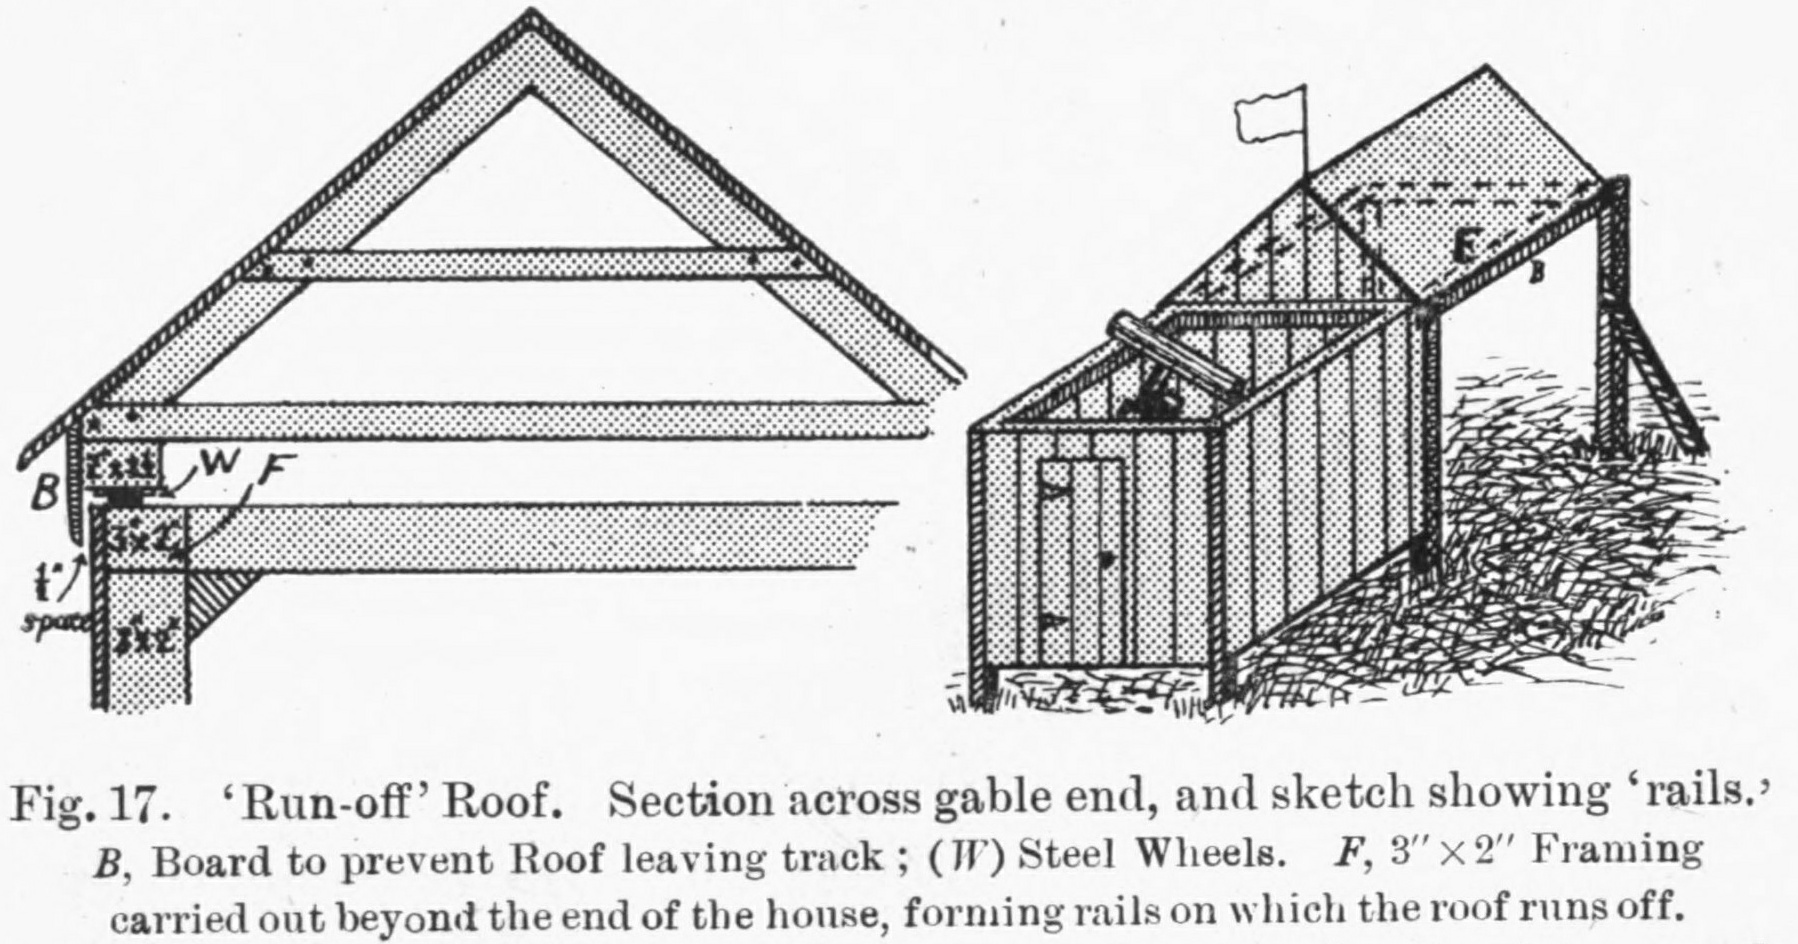
This house, which measures 7 ft. x 7 ft, inside, and 6 ft. from floor to frame pieces carrying the roof, has been built twelve years, and has been removed twice. It is still dry and water-tight, and the roof can be pushed on and off with one hand.
For a handy make-shift telescope house see p.61.
To Find true North and South.-- For preliminary adjustment the following may be found useful, if Greenwich time is known within a few seconds; the compass is only an approximate guide, as the accurate magnetic variation for the locality is usually difficult to obtain without observation. Not only does it vary from about 13°W in the east, to 20° W. in the west of the British Isles at present (1921), but it also decreases yearly, and not altogether uniformly, by some 9 minutes of arc, or a whole degree in 6 or 7 years.
Suspend a weighted string from a nail in the side of a pole fixed on a level surface, and mark the extremities of the shadow of the string at the instant of local noon, when the Sun crosses the meridian: the line joining them will be true N. and S. Local noon is obtained by adding, for 'after clock' (for 'before clock,' subtracting) to Greenwich noon the Equation of Time for the day, taken from an almanac, and then adding (or subtracting) the longitude correction required, see p.33.
Thus for May 5, 1920, in longitude 2° 20' W. --
Noon, Greenwich civil Mean Time (G. M.T.) Sun before clock on May 5:-- subtract Sun crosses the meridian at Greenwich, G.M.T. Correction for observer's W. longitude (p.33), add Sun crosses the meridian in 2° 20' W. at G.M.T.
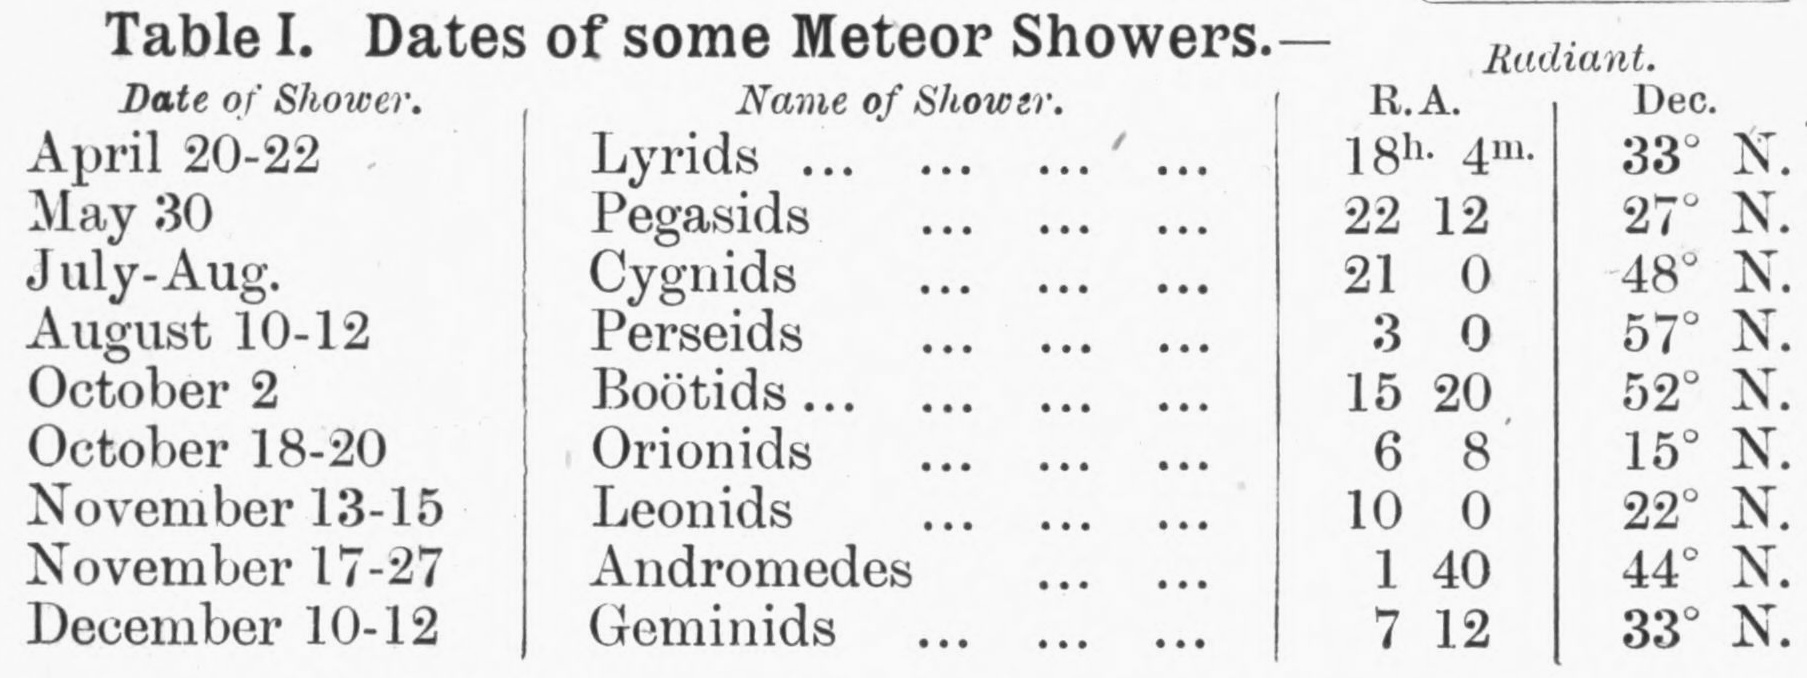
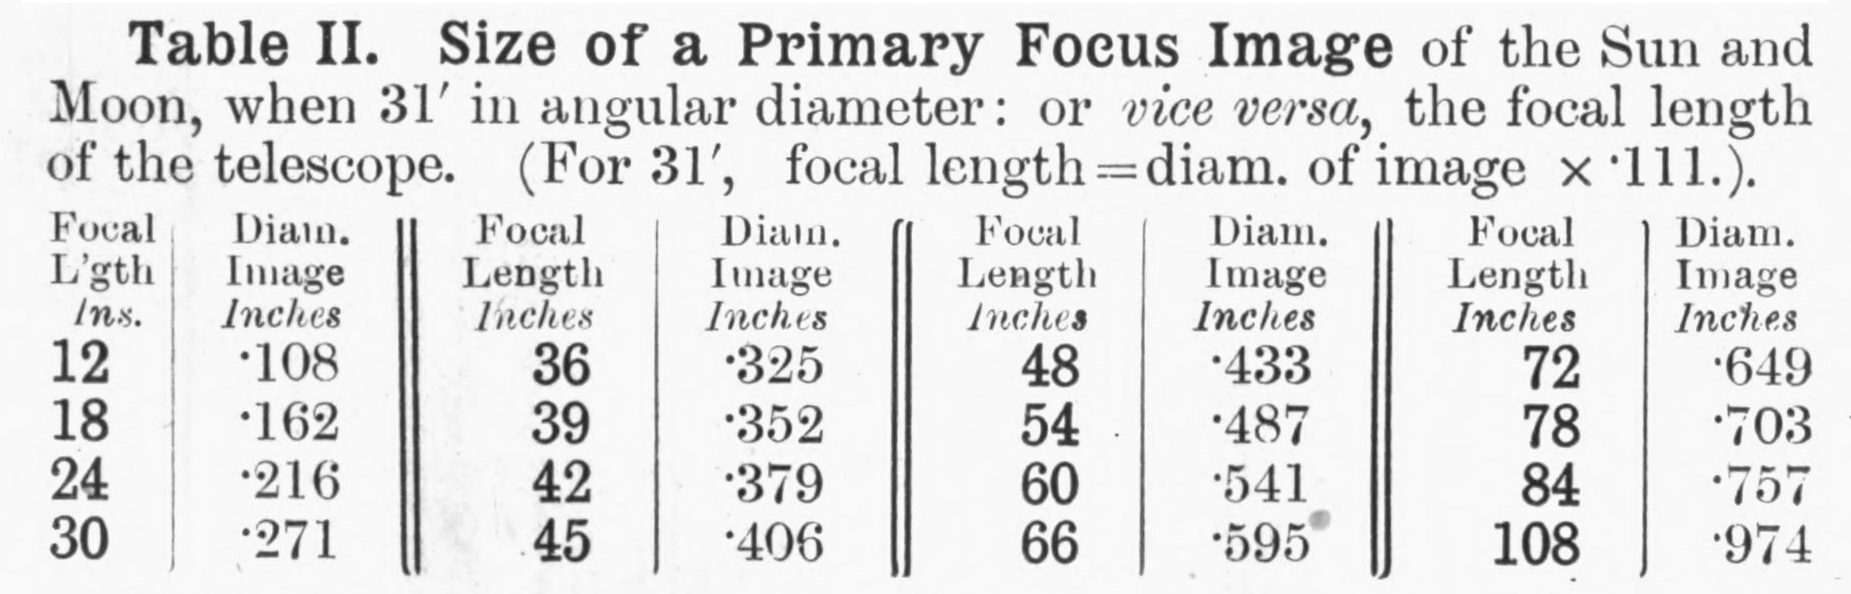
To find the Mean Time of a Transit, from the Sidereal Time in the List of 'Apparent Places of the Stars' in the Nautical Almanac (N.A.), used to regulate observatory clocks -- known also as 'clock stars.'
The Mean Time (time shown by an ordinary clock) of the transit is not given in the N.A. and has to be found by the observer, [A short list giving Mean Time is published monthly in the English Mechanic. There are also Conversion Tables in the Nautical and Whitaker's Almanac.] but the process is quite simple, using Table IV. and V.
1. Turn up the list of 'Apparent Places of Stars' in the N.A., and find the Right Ascension (R.A.) of some suitable star for that particular date; fraction of a second may be valued to the nearest second, for photographic purposes.
2. Find the 'Sidereal Time' (= R.A. of the Sun) for the same date, given in the Tables at the beginning of the N.A. Should this be greater than the R.A. of the star, add to the latter 24 hrs.
3. Correct this Sidereal Time to the observers longitude, by adding for W. longitude (or for E. subtracting), .6571 second of time, for every degree of longitude he is E. or W. of Greenwich; Table IV. shows this with sufficient accuracy.
4. Subtract the corrected Sidereal Time from the R.A. of the star, and from the answer deduct the correction in Table V. opposite, for the corresponding number of hours and minutes; the answer is the 'Greenwich Mean Time' (G.M.T.) of the transit at the observer's meridian. The nearest Sidereal minute in Table V. suffices, as the time will be less than 1/12 second out.
Thus for δ Orionis, observed in 3° W.:--
| R.A. of star, Feb. 9, 1920 (5h. 27m. 57s.;+24hrs.) | =29h. 27m. 57s. | |
| Sidereal Time at mean noon Feb. 9, | 21h. 13m. 9s. | |
| Correction for 3° W. (Table IV) Add, | 0 0 2s. |
=21 13 11 |
| Difference, = interval from noon to transit, in sidereal time | 8 14 46 | |
| Less Correction for 8h. 15m. (= nearest min. in Table V.) | 0 1 21 | |
| Answer, G.M.T. of transit at 3° W. | = 8h. 13m. 25s. | |
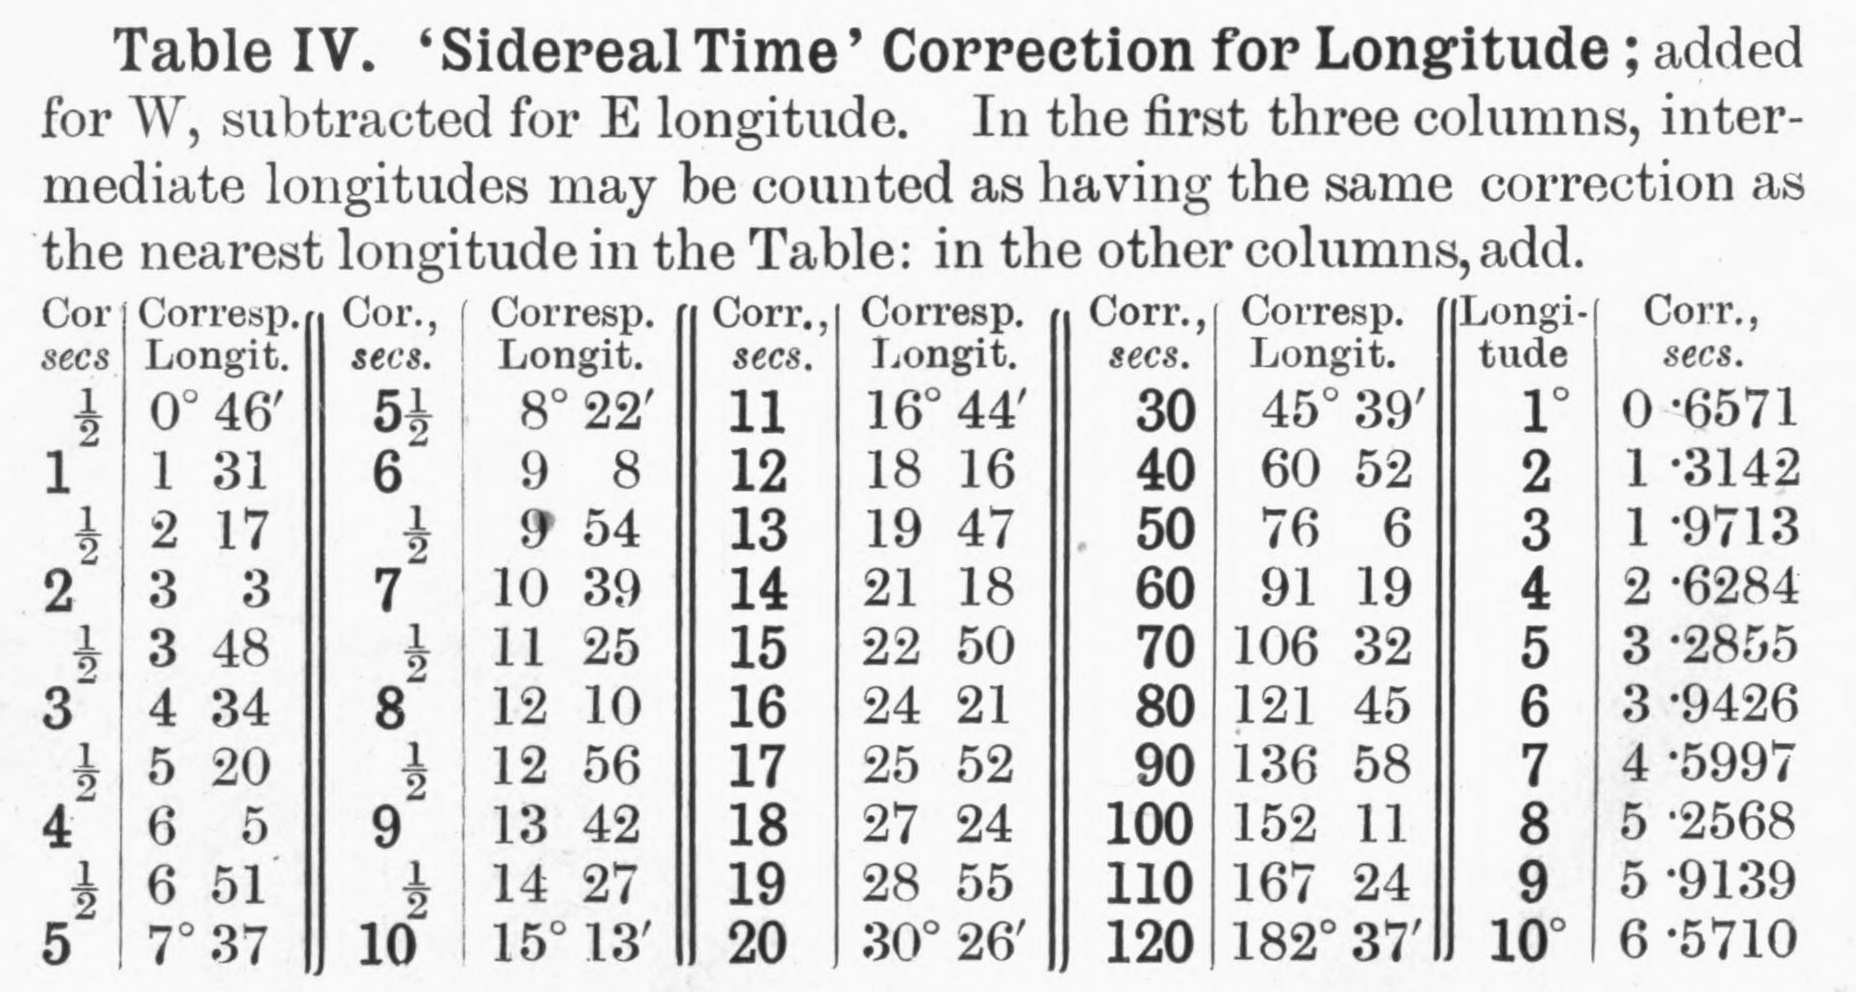
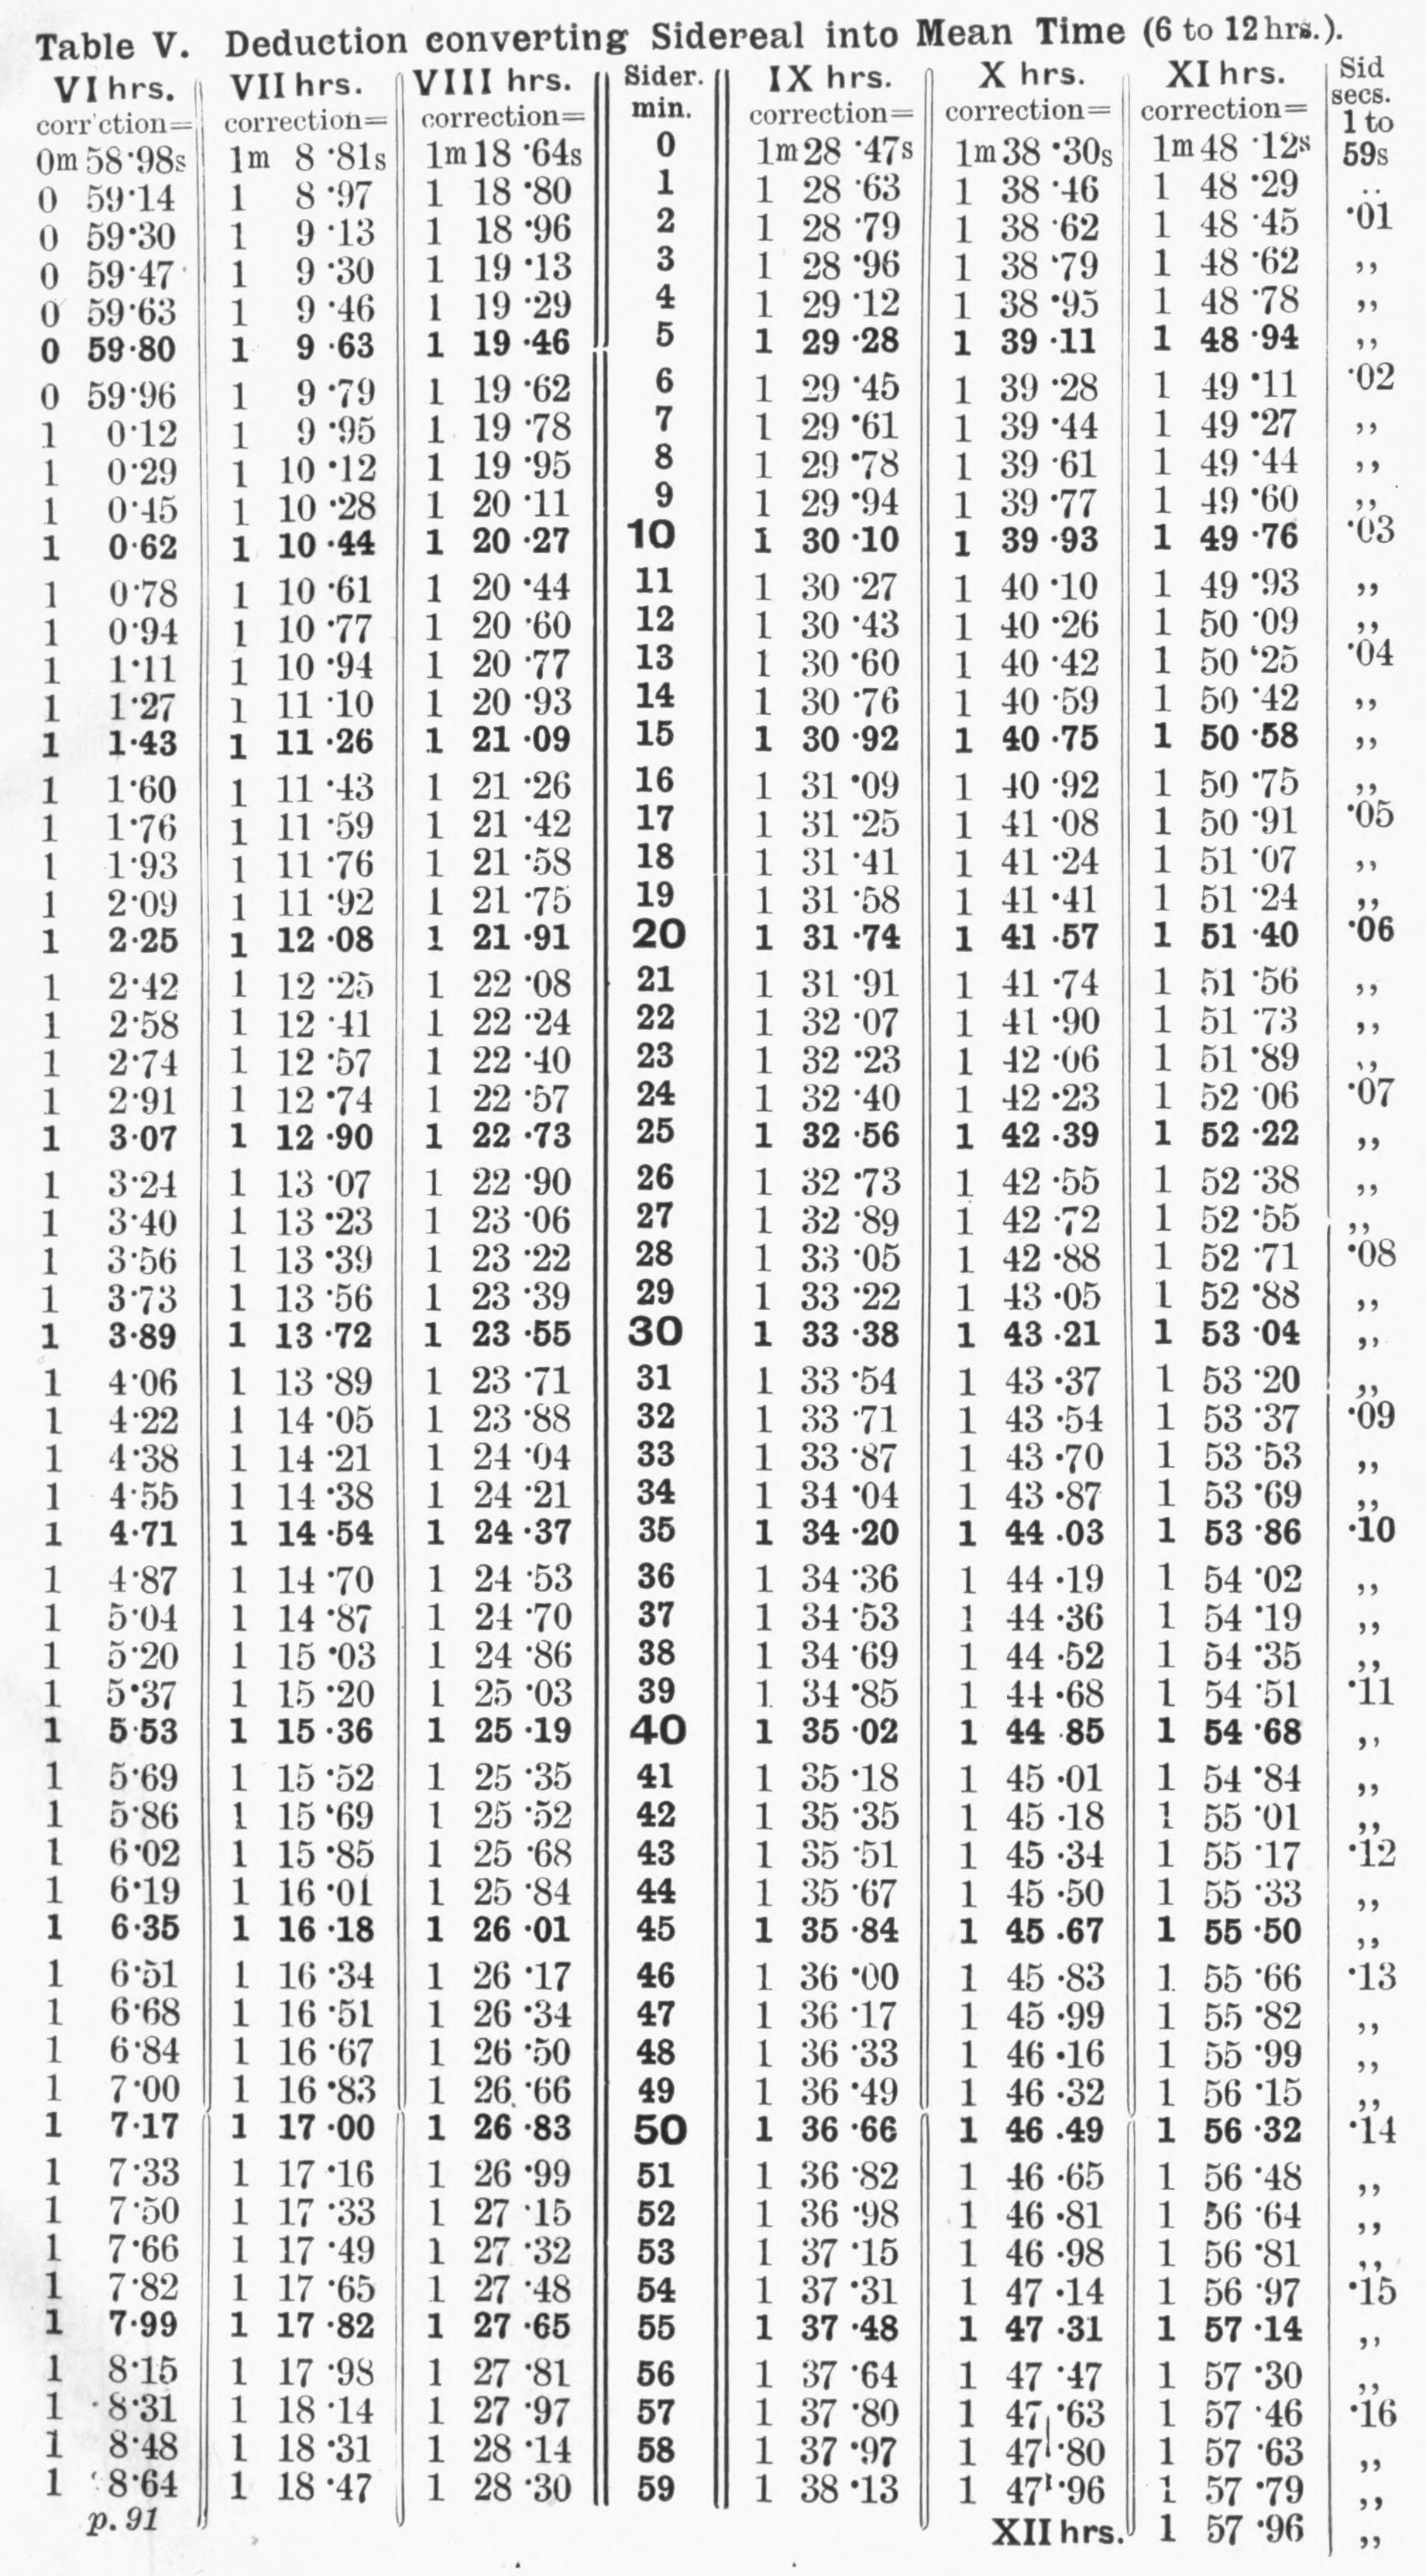
Table VI. To Reduce Visual to Photographic Magnitudes.
(From Harvard Circular No. 160). The difference between the
visual and photographic magnitude is known as the 'colour index.'
"The constants found for each class of spectrum, to reduce the photometric to the photographic magnitudes, are as follows:--
| Type | B. | A. | F. | G. | K. | M. |
| -0.31 | 0.00 | +0.32 | +0.71 | +1.17 | +1.68 |
'Accordingly, if the visual magnitude of a star is 5.00, and its spectrum is Class A, the photographic magnitude will also be 5.00. If the spectrum is Class B, the photographic magnitude will be 5.00 - 1.21 = 3.69, and if of Class M, it will be 5.00 + 1.68 = 6.68.'
By reversing the signs, the Table will give the visual magnitudes corresponding to the photographic magnitudes.
The 'colour index' of the Moon and of each of these planets, on the same scale, is given below, the Sun being +0.79 (Russell Astrophysical Journal, 1916).
Moon +1.18, Venus +.78, Mars +1.38, Jupiter +0.50, Saturn +1.12.
| Observer's | Time Correction for Longitude | ||||||||
| Latitude | Longitude | ||||||||
| ° | ' | " | ° | ' | " | ||||
| h. | m. | s. | |||||||
|
|