Lessons
from the Loonfeather
Observations
of a first time boat builder
by Charles
Hall I've just completed building my first boat, a stitch-and-glue sailing dinghy
built from plans. Building it was a lot of fun, and I learned so much in the
process. You'd think after reading Messing About in Boats for a few years
the actual building of a boat myself would hold few surprises -- WRONG.
No, I didn't learn how to get a perfect varnish finish, or how to cast bronze
hardware. I learned simpler, more basic stuff. Just things you never encounter
outside of building a boat, no matter how many bookcases you build for the den,
or how big that garden shed is you built. And this was just an 11-foot dinghy
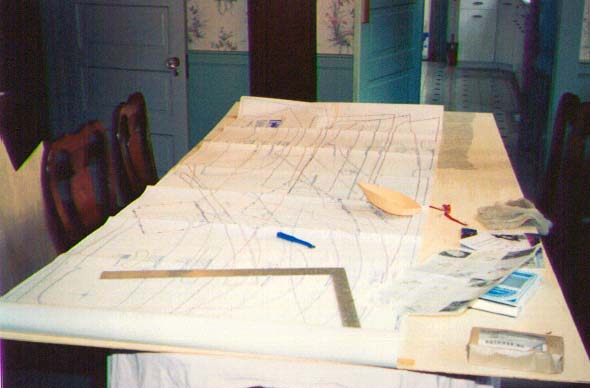
Lesson #1 - Full-size Patterns vs. Lofting
The Loonfeather plans come with full-size templates for all the pieces
of the boat. In fact, they're all on a single piece of paper! Now imagine how tricky this first step would be if you had to loft the plans
yourself from a set of measurements? Lofting is a two-day class at my local
maritime museum. In my opinion, a first time boatbuilder working alone should
avoid lofting. A goof here will cost you dearly.
Lesson #2 - Thin plywood cuts like butter
Now I've done my share of work with plywood, but I was really surprised at
how easy it is to work with ỳ" plywood. I guess I'm more accustomed to thicker
plywood. There's not much call for ỳ" bookshelves :-) This stuff cuts like butter.
Put a nice hollow-ground blade in your little saber saw and you won't even have
to sand it (so I'm not a perfectionist). My saber saw is the cheapest variable-speed
saw I could buy, and it's ten years old. Worked perfect. A fancier, heavier
saw would not have been as good. The fancy scroll features some have aren't
useful here, and light weight is.
Lesson #3 - There are no right angles
There are no right angles. Think about it. There are no right angles. Your
square, your framing square, your combination square - put'em away. There are
hardly even any straight edges! The most useful tool you can have is a long
thin springy bit of wood (known as a "batten") to lay down on your plywood and bend into
a smooth ("fair") shape. Something to smoothly connect-the-dots of your pattern-marks.
And as someone else once said, if you find a nice batten, hang on to it. You'd
be surprised how hard it is to find a nice knot-free strip of wood eleven feet
long.
Lesson #4 - There's nothing to measure
Your tape measure has a certain utility, but by and large this is a free-hand
project. If it looks right, it is. In most cases there's just no way to measure
what you're looking at. See Lesson #3. So put away your tape measure and your
yard stick.
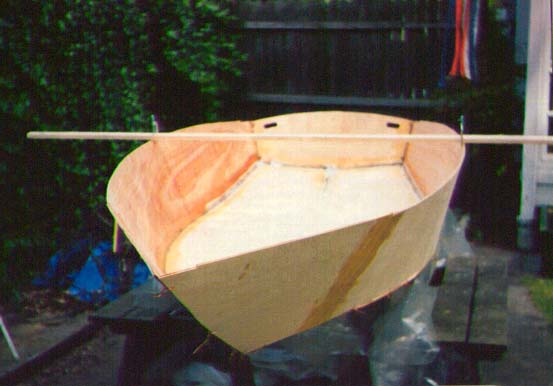
Lesson #5 - It really is an instant boat
The initial cutting of boat parts from plywood is dramatic and fast-moving.
The day you wire it all together and it takes on a "boat" shape is truly exciting.
You've built a boat!! Your friends will be amazed.
Lesson #6 - It's not really an instant boat
Have you ever driven past a home construction site every day for a while?
You'll see lots of activity at first, but, no progress - just a foundation.
Then suddenly, between when you drove by in the morning and when you pass by
that evening, there's a house! The studs are up, the roof trusses are in place,
roofers show up in no time. You'll have to meet the new neighbors soon
but
no you won't. There's a surprisingly long period between the house taking shape
and the last carpenter walking out the front door. What happened? It's all those
pesky little pieces on the inside that slowed them down. And guess what? It's
the same on your boat!
I did the first phase of my boat under a tree in the backyard, I figured
I'd have it fiberglassed and water-proof in no time. Well, some other stuff
intervened, but the last phase of the boat seemed to take forever - it was a
good thing I had a house with a basement by then.
Lesson #7 - All boat building projects get interrupted
In between the first few weeks of my boat project and the last, there was
a three-year hiatus. We moved to a new house, I changed jobs, my wife changed
jobs, there was a death in the family, hurricane Fran hit, etc. At first, I
thought it was just me; but then I noticed lots of other telling phrases in
letters and articles where other folks had the same thing happen. Huge, long
time-outs from their boatbuilding. It must be an immutable fact of nautical
life.
Lesson #8 - Never let your project take too long
When I began my boat, it was the most ideal boat on earth. It had a novel
seating arrangement, it could be car-topped, you could sail it, row it, sleep
in it. It was perfect. Well, after three years I realized the most comfortable
seats are in kayaks, my back is so bad I'd never be able to car-top it, I no
longer wanted to row anything and I'm not going boat-camping. Times had changed.
My life has changed. Don't let your project take too long.
Lesson #9 - It's not going to be perfect
As the boat nears completion, you begin to realize it won't be perfect. After
all, this is your first boat. No one is going look at it and say "Which
store did you buy that boat from?". Little imperfections creep into any big
project. And even a small boat can be a big project. There are many opportunities
to screw up. The big screw-ups you tear apart and fix, but if you try to fix
all the little screw-ups you'll never finish the boat. I guarantee you that
most unfinished boats stop here, when the builder realizes it won't be as perfect
as he dreamed it would be.
Lesson #10 - It's going to be good enough
The Loonfeather's designer made some marvelous design decisions. There are
many, many points where a roughly cut free-hand edge is capped by a smoothly
curved bit of edging. Or where that hard-to-fit triangular bit in the bow can
be installed at any angle that fits the shape you cut. Gradually, you begin
to see that your screw-ups won't be so obvious. In fact, you'll forget a lot
of them ever happened.
The long gunwales on the Loonfeather would be just a raw ỳ" plywood edge,
an edge you had to cut free-hand. But the plans call for two thin strips of
pine that you glue and twist along the edge. Then you can come back and sand
the plywood down to meet the smooth pine edging. It really looks great.
But now, you realize that you need a special tool
Lesson #11 - Buy an electric sander
I don't sand my projects much. Just take off the splinters and get a good
coat of paint on it. But on a boat, every ripple in a curved edge stands out.
So, unless you want to sand by hand for the rest of your life, buy a sander.
Not some sissy-little vibrating thing, I mean a belt-sander. We're talking "wood
removal" here. The one I bought takes 3" belts, I guess it's the smallest model
they make. That's the kind you want: small and light.
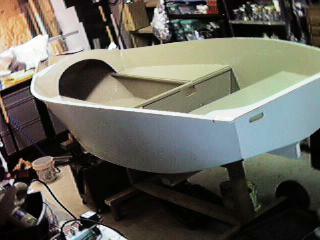
Lesson #12 - It going to look pretty good
Even with my limited skills, the design of the boat will keep it from looking
too bad. In fact, it looks pretty good. At ten-feet you'd look at it and think
I'm a master carpenter. Up close, well, you won't get splinters in your hand.
My next boat
Now that I'm an expert (he-he) I know exactly what the next boat will be.
First it'll be small enough not to take over the entire basement in case it
takes a long time to finish. Second, I'll try to schedule enough time for it
so it doesn't take a long time to finish. There are these skin-on-frame kayak
plans from Hobbycrafts. They say it can be built in 10 hours... and it
ought to use even fewer tools! I'll let you know how it turns out.
- So much for construction -
Between the delaminating plywood and uncomfortable layout I had to give up on this boat.
I sawed it up and took most of it to the dump, keeping the nicely curved bow and stern
for some future wall-hanging. Too bad, she was pretty wasn't she?
Sept. 1998


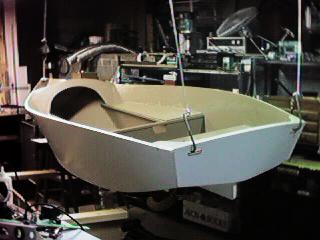
Post Mortem
 The boat came out looking fine. I borrowed a sail from some other project to
get it on the water and see how it worked. Sadly, the boat was short-lived.
Despite my satisfaction with the construction process, there were several
fatal flaws:
The boat came out looking fine. I borrowed a sail from some other project to
get it on the water and see how it worked. Sadly, the boat was short-lived.
Despite my satisfaction with the construction process, there were several
fatal flaws: