PakYak PlansVersion 4.0


Click to visit other pages |
PakYak PlansVersion 4.0
Click to visit other pages |
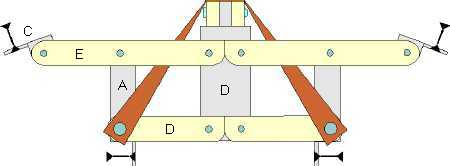
 Stringers are seen edge-on, braces are folded flat against stringers.
Half of frame is visible, the other half is identical (it looks the same from the other side).
Folded frame is about 3" thick (2" for two sets of stringers plus 1" for two sets of braces).
The angle bar pieces join the braces to the stringers.
As can be seen here, the length of the stringers can't be any shorter
or the braces wouldn't fold, but the stringers could be lengthened from
2' to 2½' or even 3', stretching the PakYak from 12' to 15' or 18'.
End brace, unfolded:
This is the view looking from an end.
The unfolded top center stringer fits over a projection in the center aluminum piece.
The strap snaps in place to lock down the top stringer, triangulate the brace and hold it in the set-up position.
Mid brace, unfolded:
This is the view from the middle of the boat.
The top angle bar snaps in place against the top of the brace to lock it in the set-up position.
Center brace, unfolded:
An end piece on the side stringer brace inserts through a slot in the bottom stringer brace.
A strap and buckle lock the top side rail and the side stringer brace in place. (The top side rail is attached to the skin with snaps.)

|
Additional detail drawings will give exact dimensions, hole locations and so forth of individual pieces.


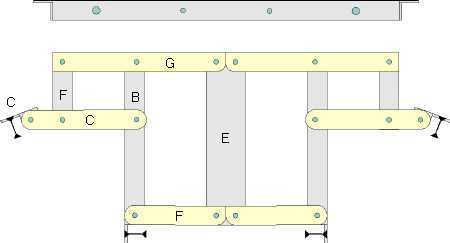
The drawing on the left is the way the frame would look unfolded flat. It is not unfolded flat to this extent during actual set-up.
The drawing on the right is after the first set-up step. The frame is inserted in the skin during this step.
The short pieces at the top in both drawings are the center braces. The stringers of the other end join to these braces.
The first action of this set-up step is to bring the ends of the side stringers in to the middle and snap them in place under the rubber loop (as shown at bottom right), and swing the top mid stringer up and over the end brace. Then the end of the frame can be slid into the end of the skin.
The braces are raised to their vertical positions and the top stringer is raised and unfolded to engage the tops of both braces.
When both ends have been unfolded in this fashion, the center stringers are pushed down and the center braces levered up to force the frame fully into the ends of the skin, stretching the skin lengthwise.
When folding, from the stage shown in the drawing on the left, first the end (lower
section) is folded back and up under the middle section (behind the braces) then both
those sections together are folded back and up under the remaining section. Then the
two halves of the frame (the one shown and the one not shown) get folded up together.
 The drawing on the right here shows the frame fully unfolded, after the second set-up
step.
The drawing on the right here shows the frame fully unfolded, after the second set-up
step.
The braces have been levered out to spread the bottom stringers and raise the side stringers into position. This action gives the skin its side-to-side stretch.
The side rails (gunwales) are shown here in outline. They lock to the tops of the center and mid braces. When folding they stay with the skin (not the frame).
Below is an end view showing how the stringers meet at the end and the side stringers rotate out and up.
Here the end view is tilted to give a better perspective so it is a little easier to distinguish the braces and stringers.
When both ends of the frame are unfolded flat and inserted in the skin, the braces are set up and expanded, as shown here. To expand, begin with the end braces, but work all the braces part way open, then go back and expand them fully. Push the bottom stringers apart a bit, then press down on the top of the brace to get the full lever action. Details of a slightly modified configuration are shown here in a BRACE ASSEMBLY update.
 View at stern or bow |
 View amidships |
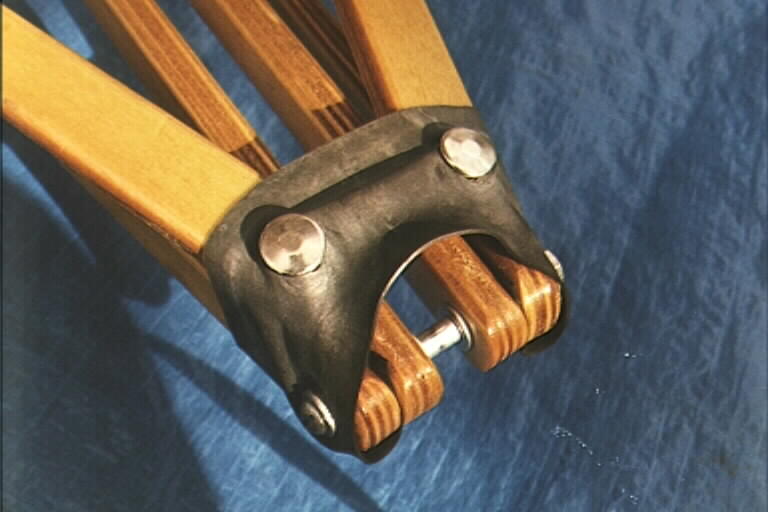 These drawings depict the construction of the rubber strap which binds the ends of the stringers together
at the bow and stern. Click on the photo to enlarge it.
These drawings depict the construction of the rubber strap which binds the ends of the stringers together
at the bow and stern. Click on the photo to enlarge it.