PakYak PlansVersion 4.0


Click to visit other pages |
PakYak PlansVersion 4.0
Click to visit other pages |
 The skin fabric is nylon canvas (pack cloth). The top can be lighter weight (and a
different color) than the bottom. About 12˝ feet of each fabric is needed.
The skin fabric is nylon canvas (pack cloth). The top can be lighter weight (and a
different color) than the bottom. About 12˝ feet of each fabric is needed.
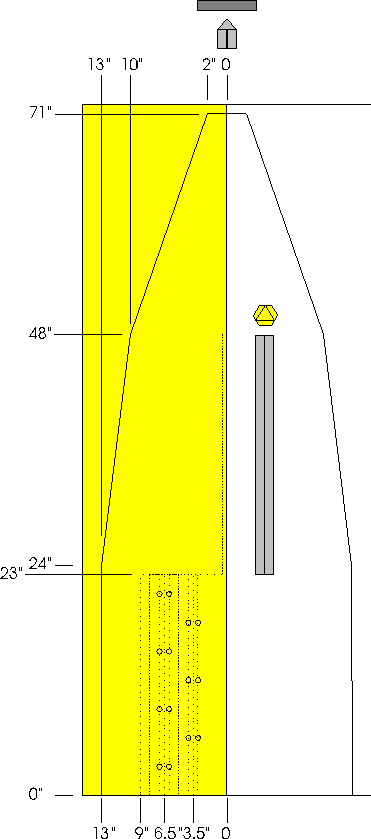
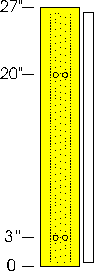
This drawing shows half of the skin outline, with one quarter of the skin dimensioned.
The skin is symmetrical about the lines labeled 0".
Nylon pack cloth typically comes in 60" width, so the pattern uses half the width.
There are four layers. three of fabric:
The outline shape shown in this pattern is the same for all four layers. It is the edge of the foam and the seam of the fabric layers.
The sewing is done with the layers inside-out, so when inverted the fabric edges will be inside:
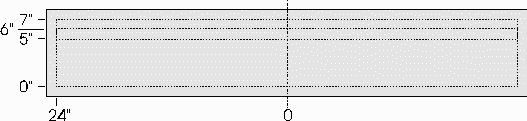
 For the cockpit, the fabric is cut lengthwise on the 0" line (23" both ways) and cut to
the 9" line at both ends to make the snap flap. The pairs of dots show where snaps
are attached to mate with the snaps on the inside and outside of the gunwale rail.
For the cockpit, the fabric is cut lengthwise on the 0" line (23" both ways) and cut to
the 9" line at both ends to make the snap flap. The pairs of dots show where snaps
are attached to mate with the snaps on the inside and outside of the gunwale rail.
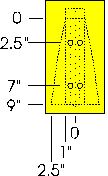
Before folding, sewing and installing snaps, pieces cut as shown at top right are sewn to the snap flap to wrap around the end of the gunwale. After folding it is sewn to the deck skin.
 The next drawing shows how this piece appears after it is aligned to the snap flap and
attached. (Sew it only as far as the inside of the first row of snaps, so it won't
interfere with the folding of the inner snap flap.)
The next drawing shows how this piece appears after it is aligned to the snap flap and
attached. (Sew it only as far as the inside of the first row of snaps, so it won't
interfere with the folding of the inner snap flap.)
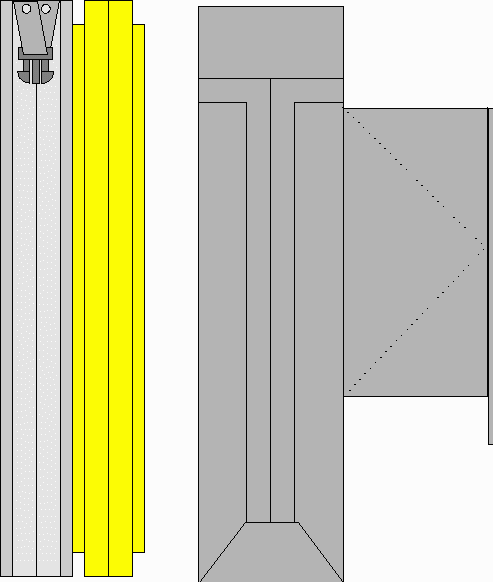
A one-inch wide piece of closed-cell foam, 64" long, is sewn inside the outer snap flap to improve the water seal. It can be fixed in place with double-stick carpet tape before sewing.
The drawing at lower right shows how the end piece looks when folded around and sewn to the deck.
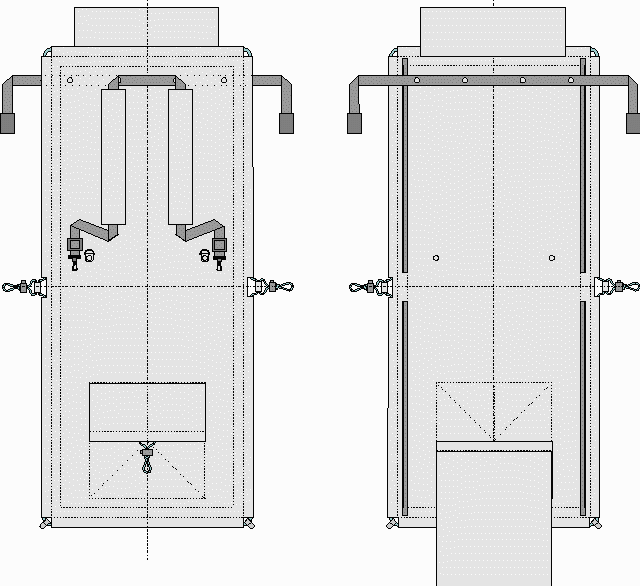
The skin pattern drawing also shows the placement of the deck zipper. A 25" zipper is separated, the halves are inverted and the outer edges lined up on the center line, so after it is sewn in place and the halves are zipped together the fabric edges will be on the inside of the skin. The triangular piece covers the end.
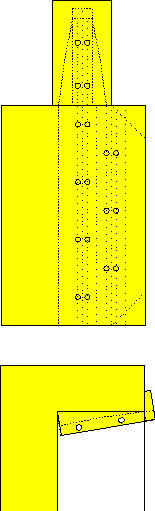
 The drawing on the right shows an inside flap that attaches to one side of the deck
skin, next to the zipper, to improve the water seal. Like the gunwale snap flaps, this
has a piece of closed-cell foam sewn into it. The snaps mate with snap halves on the
top stringer.
The drawing on the right shows an inside flap that attaches to one side of the deck
skin, next to the zipper, to improve the water seal. Like the gunwale snap flaps, this
has a piece of closed-cell foam sewn into it. The snaps mate with snap halves on the
top stringer.
Now align the layers and sew the side seams.
The final touch is the end loops, seen at the top of the first drawing. They are 6" pieces of 1" nylon web strapping folded as shown and sewn into the ends. Be sure to insert the strap between the top and bottom skin layers with the loop inward when sewing, so the loop will be out when the skin is inverted.
The 30" wide 12 1/2 yard length of fabric left over is used to make the spray
skirt/pack cover.
 The spray skirt/pack cover is made of two layers of fabric with a layer of closed-cell
foam between.
The spray skirt/pack cover is made of two layers of fabric with a layer of closed-cell
foam between.
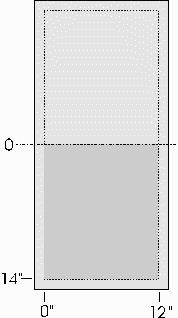
The darker area in the drawing is the closed-cell foam pattern, 18" by 46".
The fabric is cut from the piece remaining after the skin fabric has been cut, which is 30" wide by 12' long
The two main pieces are 24" by 52".
Here are the steps for sewing the fabric:
 | typical corner fold |
The waist band:
 The back pad:

The other details shown in the drawings above are the attachment of the pack straps and zippers and threading of the shock (bunji) cord and draw strings.
There are two 22" separating zippers. The halves are sewn into the inside of the cover so the mating ends are toward the middle, 3" apart.
The shoulder straps have closed-cell foam pads, 2.5" wide by 14" long. Cut the fabric pieces to make the pad sleeves 6" wide by 15" long. Make the long seam inside-out and invert it. Insert the foam and run the strap through the pad sleeve before sewing the ends. Make sure the strap and the seam in the sleeve are on top of the pad.
The straps (and the bottom D-rings) can be pop-riveted in place. Use half-inch washers on both sides so the rivets won't pull out. The inside strap at the top secures the skin and frame in place in the pack.
There are two 3-foot pieces of shock cord in the ends, attached to two 4-foot (or so) nylon cords in the sides. The cords come out the side openings and through plastic sleeves (pieces of a Bic pen barrel) and button-stops as shown. Another 4-foot or so nylon cord is the draw string for the skirt opening.
The drawing also shows half-inch by one-inch metal quick-release tabs on the shock cord at the lower corners of the skirt. Both these tabs and the D-ring holders can be made from short pieces of the 1/16" aluminum angle bar with one flange bent over.
The drawings below show the pack complete with straps and fanny pack waist band. Notice how the back pad pulls down to close the outside of the pack. Two small grommets in the lower corners of the pad allow it to be tied off to the D rings (or secured with a short shock cord).
When needed, the skirt opening offers about half a cubic foot of pack space, as shown in the drawing above, and additional gear can be strapped on below it.
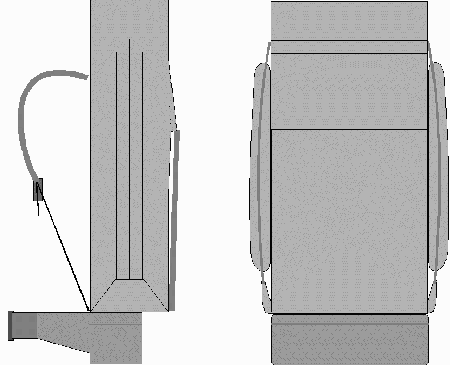
The drawing on the right shows two small auxiliary packs attached to the sides. Their attachments help trim up the bottom corners of the pack. These packs are 7" by 16" pockets with zipper closures made of the same pack fabric. The top ends clip to the buckle halves attached to the center of the gunwale rails (shown in the drawing on the left above).