ZIP
ZIP
 PDF (16Mb)
U.S. Navy Target KitesMARK 1Five-foot kite with wooden frame
MARK 1, Modification 1Five-foot kite with metal frame
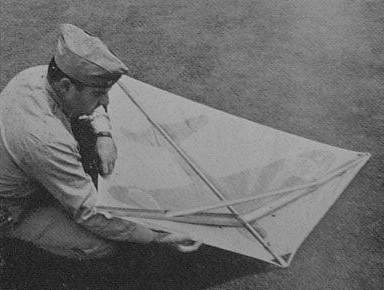
MARK 2Seven-foot kite with wooden frame |
|
| CHAPTER | TITLE | PAGE |
|---|---|---|
| I | GENERAL DESCRIPTION | 3 |
| II | ASSEMBLY AND ADJUSTMENT | 5 |
| III | REEL, HARNESS AND FLYING BARS | 13 |
| IV | FLYING Theory, Time required to learn, First lesson, Intermediate lesson, Maneuvers, Methods of landing, Twists in the line, Instructing others. | 17 |
| V | USE AS A TARGET
Crew, Equipment, Range conditions, Preparations for firing, "Commence Firing," Scoring, Use in light winds, Towing on a closed course, Shuttle towing, Unmanned shuttle towing, Rigging for single-line flight, Single-line reels, Use at sea aboard ship, Towing with a launch. | 29 |
| VI | CONSTRUCTION AND REPAIR
Frame, Control unit, Cover, Substitutions, Repairs. | 39 |
| VII | MARK 1, MODIFICATION I (SINKABLE) TARGET KITE | 43 |
| VIII | MARK 2 (SEVEN-FOOT, LIGHT WIND) TARGET KITE | 45 |
| IX | COMPARISONS WITH OTHER TARGETS, OTHER USES AND CRITICISMS | 47 |
| X | HOW TO ORDER | 51 |
U. S. Navy Target Kites are designed to serve as maneuverable aerial targets for gunnery training, from ground or ship.
All targets have certain advantages and disadvantages. The only perfect mark is an enemy airplane, but by the time that appears it is too late for practice. Any target which contributes to improvement in marksmanship is worthwhile. Because of the kite's natural ability to ascend in a wind it becomes a "natural" as an air target, but an ordinary kite is too easy a mark for modern gunnery requirements. The Navy's kite was therefore made maneuverable.
It differs from the kites of our boyhood in four ways: It is well designed aerodynamically; it requires no tail; it has a rudder; and it flies with two lines. It is properly designed and built; if it is properly assembled and adjusted and intelligently handled it can perform evolutions which require the gunner to develop high skill to track it and shoot it down.
The Mark 1 kite is five feet in size, weighs slightly under two pounds, and needs a ten-knot wind for flight. The size of the sticks is required by the stress which the kit undergoes in maneuvering or being towed, as well as the need to withstand injury when hit by bullets.
The two flying lines serve as control cords to steer the kite around the sky. Pulling either one moves the bridle stick which is connected to the rudder by tiller cords. A slight movement of the rudder slants the kite and causes it to move off to one side. A full movement brings the kite around in a loop; these can be made to right or left, or alternated to form figure-eights, either vertical or horizontal. A full movement quickly followed by a straightening of controls inverts the kite, diving it vertically. Nearing the earth another full- movement brings it upright and it rises by its natural kite action. The area of its maneuvering is about ninety degrees wide and seventy degrees high; it is faster in higher winds--usually about twice that of the natural wind--and even faster when diving.
The usual distance from kite operator to kite is about 200 yards, but if greater range for the gunner is desired, the operator can be located at any distance from the firing line.
The Target Kite has numerous advantages: Its movements simulate those of an airplane; it requires flexibility of aim and develops both dexterous coordination and physical agility; its range can be varied; shooting it down gives the gunner the psychological satisfaction of a victory; it remains aloft for a useful duration of firing; it does not require complex apparatus nor numerous personnel for operation; and it is inexpensive.
For winds lighter than ten knots the frame of the Mark 1 kite can be cut down in section. The Mark 2 will fly in six knots and provides a slower, and larger mark for elementary instruction. In lighter winds or when calm, the kite can be towed by a jeep or rail car, thus adding the horizontal speed of the car to the aerial acrobatics of the kite. At sea, where adequate winds prevail or can be generated by the speed and course of the ship, the kite can nearly always be used.
The Mark 1, Mod. 1 kite is specially designed for use at sea--to sink rapidly when lost or shot down, so that no trail of floating debris will indicate the ship's position.
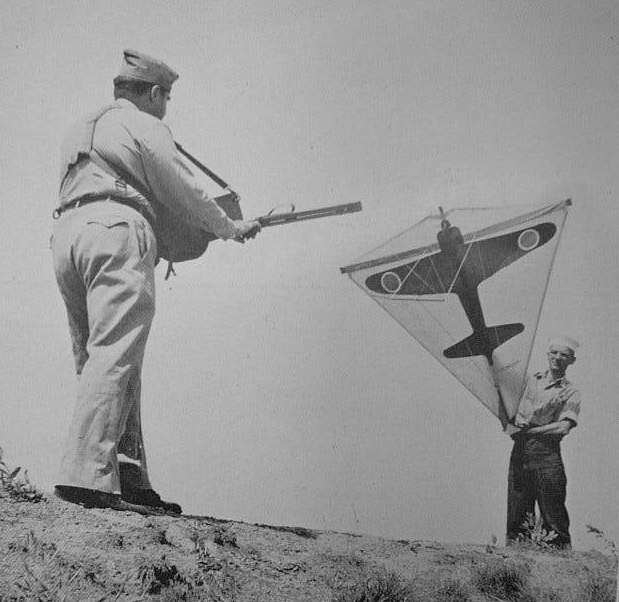
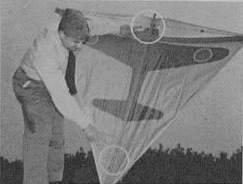
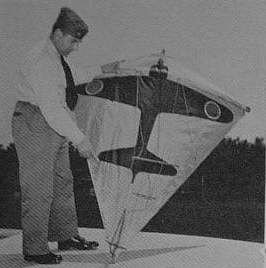
To stimulate the interest of the gunner, a silhouette of an enemy airplane is printed on the cover. The ground color being atmosphere blue, the outline of the kite merges into the sky so that the airplane is more prominent. Note that the most important target area of the airplane silhouette, represented by the pilot's cockpit, engine and tanks, is also the most vulnerable point of the kite-the cross axis. The silhouette being about one-ninth the size of the actual fighter, the simulated distance becomes nine times that of the line-length, and the speed of the kite also appears proportionate for an actual airplane at the simulated distance.
A downed kite when recovered can be easily put back into service by inserting a new stick, knotting a severed line, or patching the cover. Spares come with each issue, and more can be readily manufactured on the station. Thus, the original quantity issued can be extended by intelligent use and ingenious repair; but even if the kite is completely lost the cost is small--less than four dollars and a half.
Also--it's a lot of fun to fly it.
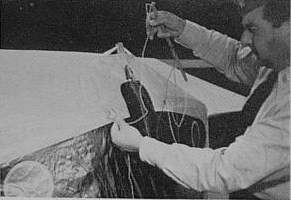
The kites have been manufactured by several sources and vary slightly in the methods of construction and packing. The following description covers the essentials.
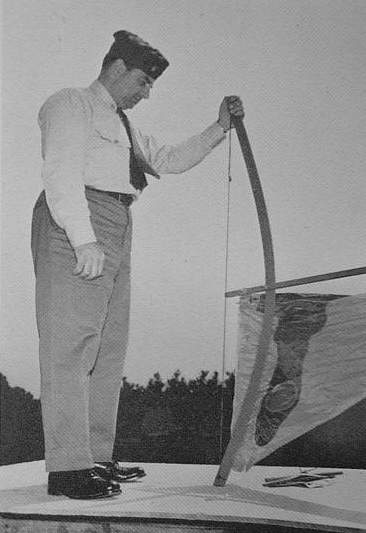
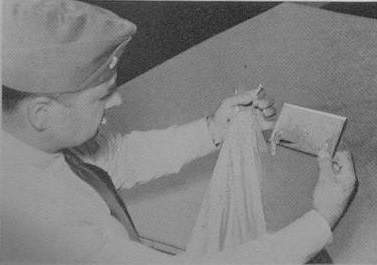
1. Unroll the kite: The sticks are at the center of the roll. The bridle stick, bridle, and control lines are wrapped together and hang from connections at front.
Although the manufacturer and inspectors make every effort to prepare each kite properly, such details as hardware and knots may become loosened in transit and should be checked during assembly.
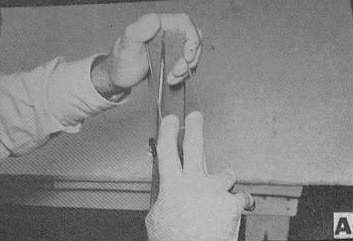 |
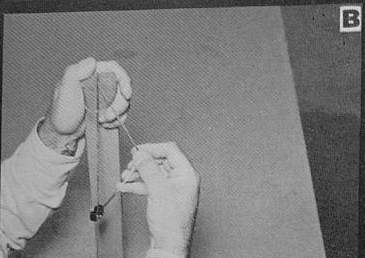
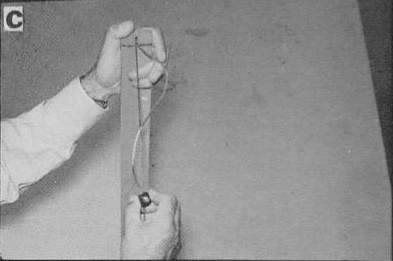
THE BUTTON-SLIDE METHOD
A. Bend spar and pull out top loop. B. Pull out line which ends in knot. C. Slide button down.
|
 |
 |
|
|
|
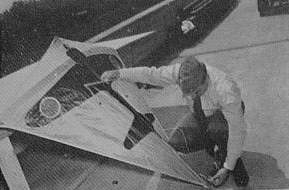
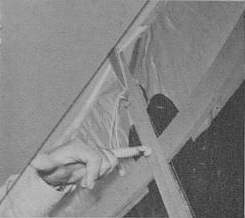
4. Attach cover; note that each corner has both a cringle-tape and a boltrope loop. These are inserted together in the long slot which is across the width of the spar-end. The tape serves to keep the cover from "creeping." The boltrope should lie smoothly so that when pulled taut it will move without binding.
|
|
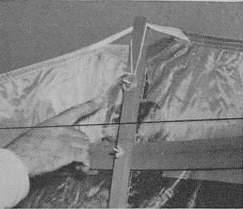
5. Tighten boltrope; pull top ends sufficiently tight to produce a taut outline of the kite, but not so tight as to bend the mast. Bring ends together and pass them under the large washer, laying them in the same direction as the twist of the wing nut. In some kites, in which the upper eyebolt has been replaced by a cotter-pin connection, this washer is under the cross-axis screw, where it serves the same purpose for securing the boltrope ends.
6. ATTACH FIN
A. Insert lug in slot
B. Secure with machine screw.
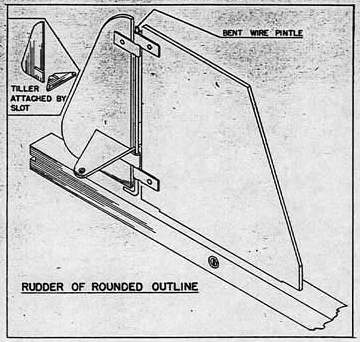
Most kite operators provide themselves with a small reamer tool to line up holes and clear them of paint. If the pintle is of the bent-wire type, be sure it engages all four gudgeons before seating the fin in its slot. Fabric under the fin-ends should be snug and flat and not interfere with free action of the rudder. The rudder of rounded outline uses a tiller inserted by halved-together slots. With this type, the tiller is packed with the lines and is to be fitted into the rudder slot after the lines are unwound. The rudder must be separated from the fin by removal of the pintle in order to fit the tiller in.
7. ATTACH CONTROL CORDS TO TILLER.
When unwinding control lines from their packing, keep them from entangling and straighten any twists in bridle lines or wires.
8. PUT MID-SECTION OF CONTROL CORDS INTO SPAR-EYES.
Screweyes in the spar should have been so inserted that the openings are toward outer ends; the amount of opening, together with the amount screwed into the wood, should be such that the tiller cord must be forced in and will not come out easily. The direction taken by the cord through the screweye must be in line with its motion.
The eight adjustments are important. After the parts are assembled they must be lined up correctly to impart the proper balance and angles for steady flight. A kite should never be released without having checked these eight items. After extended flying-or a hard landing, following repairs or even partial disassembly, recheck each step. There are four items on the rear of the kite, and four on the front.
As soon as the kite operator becomes familiar with the use and operation of this target, he will probably combine the adjustments with the assembly; but at first he will do well to go over each item individually.
1. BOWING GAP 8-9 INCHES.
2. BOLTROPE TAUT AND SECURED.
If the boltrope is not taut, the fabric is slack. A tight kite flies fast, and speed in maneuvers is essential. Give the hem of the kite a thump with the finger to test boltrope tension.
3. CONNECTIONS SECURE.
Twist each of the wing nuts on the back to make sure they are tight.
4. SPAR AT RIGHT ANGLE TO MAST.
Unless the spar is truly square with the mast, one half of the kite will be asymmetrical with the other, and the out-of-line condition will make the kite lean or maneuver unevenly. When squaring, apply pressure of the hands evenly to avoid splitting the spar.
5. CONNECTIONS SECURE.
On the front of the kite, check knots and snaps for security, and bridle and tiller lines for kinks or bends, being particular that there is no twist in the bridle and that tiller cords pass correctly through screweyes.
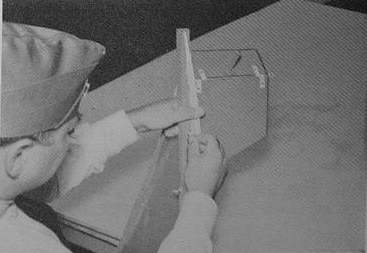
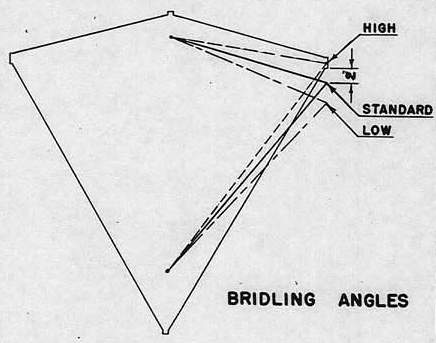
6. PROPER BRIDLING ANGLE.
This is one of the most important check-items. The difference of an inch in the bridle point can seriously impair the ability of the kite to fly. Carry the bridle stick over to the side of the kite with the line close to the cover. The peak of the bridle line, at the center connection of the bridle stick, should come to a point two inches below the end of the spar. If this does not check, loosen the larkshead connection by which the bridle is wrapped around the stick, lengthen or shorten either end as required, pull the connection tight, and recheck.
The behavior of the kite in the air is often an indication of any bridling fault. If the kite seems to undulate flatly or "porpoise," the bridling is probably too high; if the kite sits rather squarely to the line and refuses to rise to an efficient angle, the bridling is probably too low. Changes in the bridling should not be too abrupt; often a shift of half an inch will make the necessary correction. Usually, however, the 2" point under the spar will be found correct for the Mark I kite.
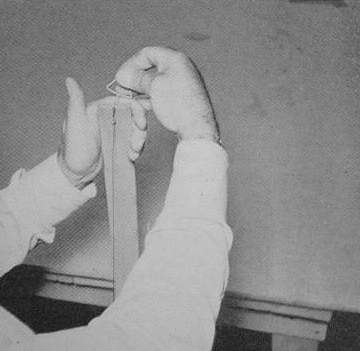
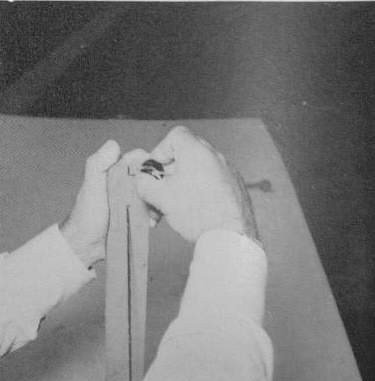
7. ALIGNING THE CONTROL CORDS.
The position shown, with the bridle stick held taut, is the best way to check the bridle and control lines. Hold back and upward on the bridle stick so as to put the principal tension on both ends of bridle lines; then, with bridle stick horizontal, adjust buttons in the tiller lines until the rudder is in a straight line with the fin. Also reduce the tension in the side cords so they are less taut than the bridle; it is important that the load of the kite's pull should come on the bridle, not the control lines. The tension on these cords should only be sufficient for smooth and free action of the rudder. Rock the bridle stick several times to insure free movement of the rudder.
8. LINES FREE AND CLEAR FOR THE TAKE-OFF.
The bridle stick will weave around the lines or the lines will foul on the rudder if no effort is made to prevent this. Stow the bridle stick either by pushing it between the boltrope and mast or suspending it from the top snap by one end. Then, when the kite is to be used, pull out the bridle stick and extend the cords to position, being sure they are free and clear as the kite takes the air.
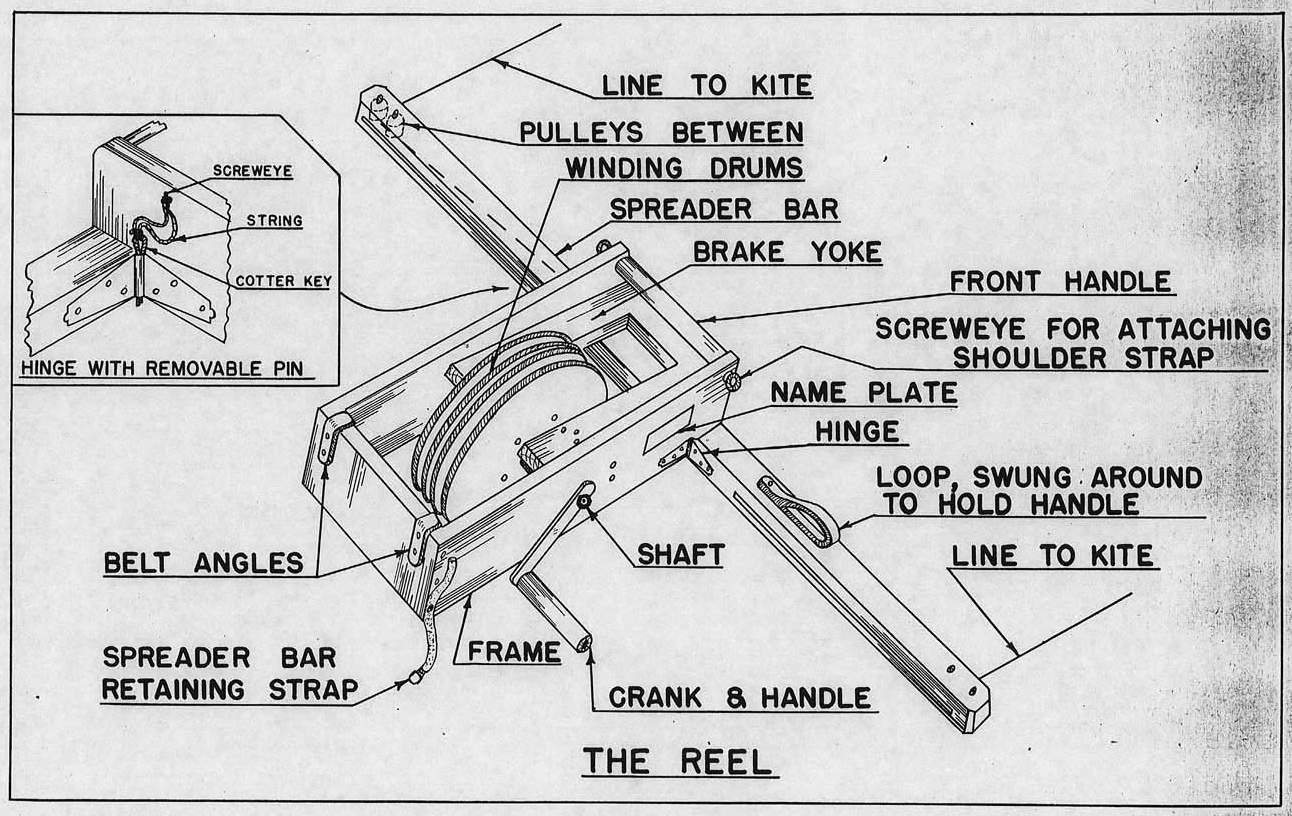
The reel has four functions:
1. Winding and unwinding the lines;
2. Adjusting the two lines to equal lengths;
3. Spreading the lines apart to facilitate control;
4. Braking the motion of the kite.
The winding assembly comprises a crank and handle which turn a shaft upon which the two winding drums are mounted. Each drum has a ratchet at its center. When the handle is turned forward, the ratchets catch and both are turned together. Turned in the opposite direction, the ratchets slip and either drum may be backed up independently. When two lines are being wound on separate drums, either line may drift on its drum and coil in such a way as to make the two extended lines of unequal length. In using the reel, it is best to hold the left hand on the reel of the line which is slack, and back up on the handle so that the taut line will pull out even with the other. This ratchet device is used only for evening the lines, not for maneuvering the kite.
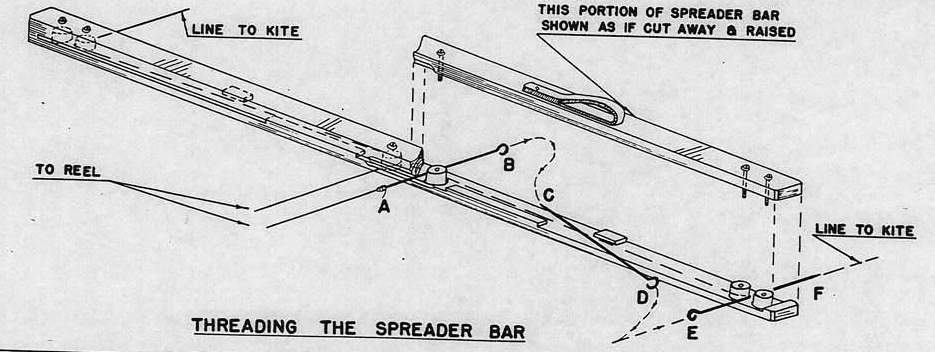
From the reels the two lines go forward to the center of the spreader bar, where they pass around pulleys and out spanwise to the ends of the bar, where there are other pulleys between which the lines go outward to the kite.
On the main shaft are two brake hubs. Upon these, the brake-lever can be pressed to slow down the outgoing speed of the lines. The left hand operates this brake. The thumb is hooked over the round cross-piece of the frame, and the fingers under the brake-yoke. When not in use, the weight of the brake arm raises the leather shoes from the hubs. The loop-strap is used to hold the lines fixed at a given length for a longer period.
The brake is always used to stop or slow down an outgoing kite. Don't make the mistake of trying to catch the rapidly revolving crank handle.
SERVICING THE REEL
The ratchets are oiled at the factory. Heavy grease should not be used; it tends to restrict the pawl-pins or rollers and may make the ratchets slip. Slipping is probably due to gumming of the lubricant. To correct, take off one side of the frame and one brake hub; remove the winding drums from the shaft. Wash ratchet assemblies with gasoline, reoil lightly and assemble. A drop of oil should occasionally be put on side bearings, handle shaft and pulley axles. Pulley journals must be kept tight, because vertical play in the pulleys permits the flying lines to jam. If brake-leathers get too smooth, powdered resin will improve their grip.
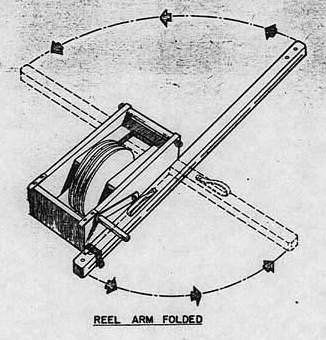
STOWING THE REEL
The spreader bar is attached to the frame by two hinges, the left one having a removable pintle. When this is pulled out, the bar can be swung parallel with frame and held there by a strap. The reel is shipped stowed, and it is easier to carry when folded. When swinging the bar, avoid fouling, the lines. At other times, particularly when reeling in loose lines, they may get down between the drums. Care will prevent this. Reels recently made have pigtail screws which act as line guides to reduce this possibility.
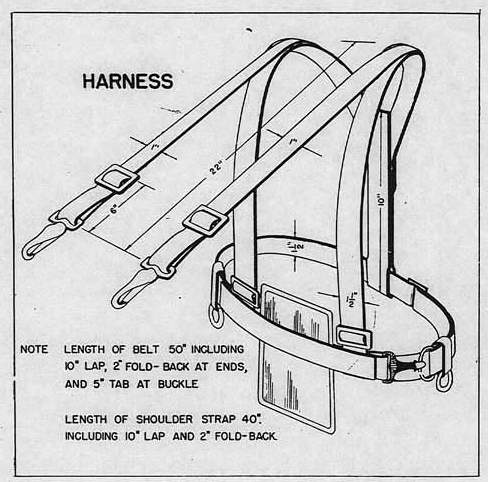
Although the straps furnished with the reels are adequate for supporting it when used with the operator's own belt, some may prefer a more complete rig. The drawing shows several useful features. It includes not only belt and shoulder straps, but also front straps better to support the reel, quick-release buckle, apron to protect the clothing and in which there are openings for the angle irons, rings to which safety lines can be fastened when flying the kites from aboard ship or a jeep, and a pocket for stowage of spare parts and tools. Such a harness can be sewed up by the ship's sailmaker or procured by requesting device 3-C-29-e.
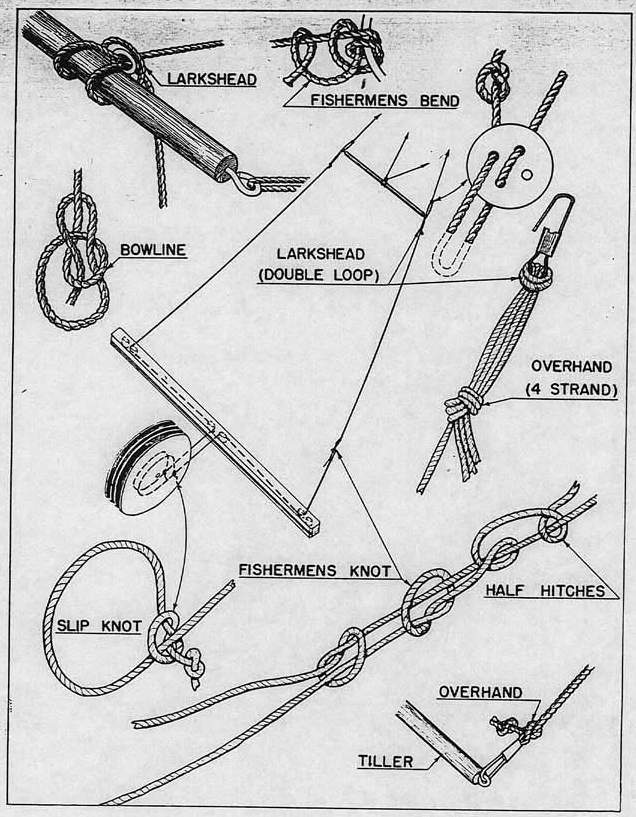 It may be necessary to renew flying lines cut by
bullets or broken when the kite is shot down. Use
a slip knot to attach lines to drums. To join a
severed line, the fisherman's knot is recommended. To
attach the snap to the line a larkshead tied in a
double-looped line is advisable. The details are
illustrated. Any knot weakens the line from its
original strength of about 70 pounds to about half.
All knots should be tied small and pulled tight so
they will pass easily around the pulleys. Wetting a
knot helps in pulling it snug.
It may be necessary to renew flying lines cut by
bullets or broken when the kite is shot down. Use
a slip knot to attach lines to drums. To join a
severed line, the fisherman's knot is recommended. To
attach the snap to the line a larkshead tied in a
double-looped line is advisable. The details are
illustrated. Any knot weakens the line from its
original strength of about 70 pounds to about half.
All knots should be tied small and pulled tight so
they will pass easily around the pulleys. Wetting a
knot helps in pulling it snug.
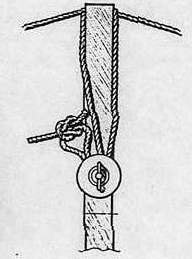
Because of the tendency of line to fray and part just under a knot, it is advisable to reinforce the attachment to the snap. Take two feet at the end of the line, double it into a one-foot loop, redouble it, and pass the end of the double loop into the eye of the snap. Spread the ends over the end of the snap, bring back to the eye and pull taut, forming a larkshead. Tie the other end of the loops with an overhand knot, pull taut, and trim. This knot is used not only with the reel lines but also with those on the flying bars.
The flying lines are small diameter to reduce wind resistance. The weight of the 400 yards is about 4/5 of a pound. The material is linen or linen hemp, which has less stretch than cotton. Extra line can be obtained from Navy stores by specifying USNAF Cat. No. R-27-T-2707-20. It is similar to that used for sewing airplane wings. It comes in pound tubes, each containing about 500 yards.
These are not furnished with the regular issue, but can be easily made on the station and are handy in some phases of flying the kite.
They may be either the slotted or drum type, as illustrated. For both types the lines used should be about 100 yards each, and of exactly the same length for each end of a bar.
The slotted type is easier to make, but its lines must be fully extended before the kite is launched.
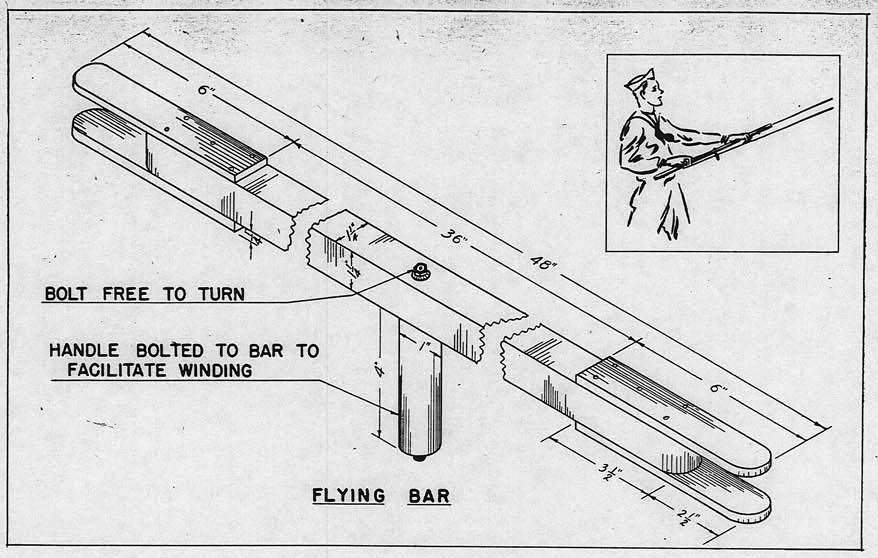
The drum type has end-hubs, flanked by two sides of masonite, rigidly fastened to the stick. Lines are wound on each end in the same direction. This permits the kite to be launched from a short distance and let out by relaxing the grip of the hands on the bar.
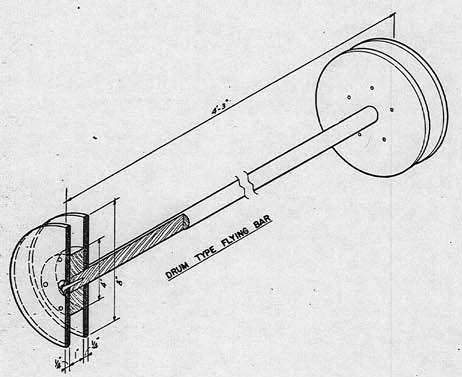
These bars are useful in elementary instruction and in towing the kite. They have the disadvantage of inability to reel in the lines. When the kite is landed, the loosened lines are wound endover-end on the slotted bar, or more easily rewound on the drum type by rolling the stick section down the legs as you walk toward the kite. This sets up a rotating motion of the drums and can be maintained almost as fast as a normal walk.
It is obvious that a kite requires wind. An ordinary kite needs only enough for support, but this target kite most have sufficient additional pressure to hold the flying lines rigid so that response to control will be prompt. The Mark I kite needs at least 10 knots. The wind should be steady and smooth. Very strong winds increase the speed of the kite, but reduce its arc of lateral swing.
Whenever possible, select a large open area without vertical obstructions. Hills, trees and buildings cause turbulence which interferes with proper maneuvering. However, an experienced operator will learn to overcome many of these difficulties by taking full advantage of the unique controllability of the target kite, and may even make use of disturbed air currents to assist the flight of the kite.
To understand the behavior and handling of this kite, it will be helpful to know the reasons for its design and action. It is inherently stable. Longitudinally, a keel surface is formed by the wind pressing the fabric each side of the mast. The fin at the bottom increases the keel surface and aids in keeping the kite erect. Its lateral stability is due to the bowing of the spar, which forms a dihedral angle like that found in many airplanes designed with their wings rising from center.
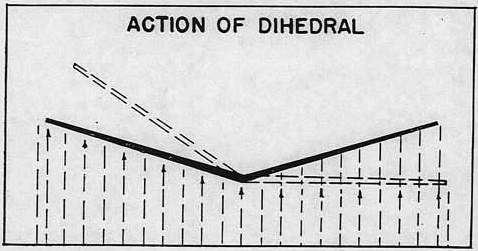 Rising wind receives lift; falling wing receives more lift; balance is automatically restored and maintained.
|
The bridle forms a V-shaped attachment with its apex connected to the flying lines and its two base points connected to the masts, proportioned so that the center of gravity, the center of pressure, and the center of thrust are in proper relationship. The bridle together with the keel and dihedral gives the kite three-dimensional stability. The flying lines extending down to the ground hold the kite at a positive angle to the horizontally-moving wind. The resultant of the wind force striking the inclined kite surface is a vertical lift.
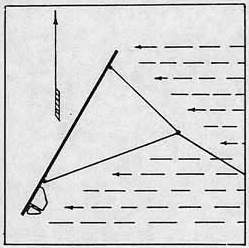 The Kite lifted by the wind. |
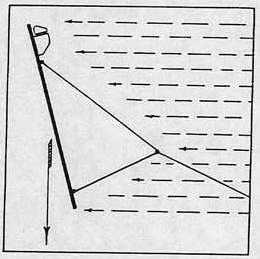 The diving action. |
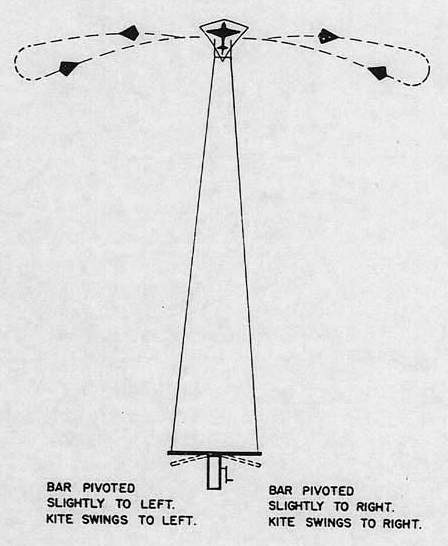
The rudder at the bottom provides a means of controlling the kite. When it is turned, the wind strikes its surface and exerts a side push which inclines the kite away from its vertical attitude. If, at this moment, the kite is not at its full ceiling, it will slant off across the sky; but if it is already as high as it will go, it moves sideways into a lateral swing.
If the rudder is moved "hard over" so as to turn the kite upside down, then quickly realigned with the fin, the inverted position is at a backward-leaning angle. The kite moves downward, but this is not a mere fall caused by gravity; it is pushed downward by the reaction of the wind. It is actually a "power dive," and the kite comes down fast.
In addition to the inherent stability and the rudder action, there is a third element in the control, namely, the pull of the control cords on the surface of the kite. Note that the bridle stick has about twice the span of the tiller, and that when the rudder has been moved hard over, the bridle stick has been moved through only a portion of its swing. This reserve is then utilized to pull against the screweyes in the spar and incline the kite on its vertical axis. The result is somewhat like the action of a sail on a boat; it assists in slanting the kite across the sky. Even when the rudder is moved slightly, the friction of the cords in the spar-eyes gives a partial yaw which is helpful in augmenting the kite's response to control.
These explanations should give the operator confidence in the kite's ability. Although in his first lessons the kite may seem to be erratic, he will understand that its oscillating is due to his own movements of the spreader bar. As he develops the ability to control it, its maneuvers will become smoother. In the meanwhile, a knowledge of the kite's inherent stability and the reason for its actions will help him in directing its course.
If the instructions contained in this manual are thoroughly studied, a half-day of practice in good wind conditions should prepare an operator to fly the kite. If the services of an experienced operator are available as an instructor, the time may be reduced to about half an hour.
If time permits, another half-day of practice in the maneuvers listed herein will give the operator greater confidence and skill and will result in more satisfactory runs for the gunners.
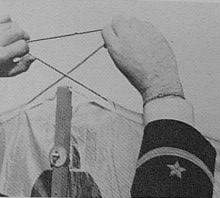
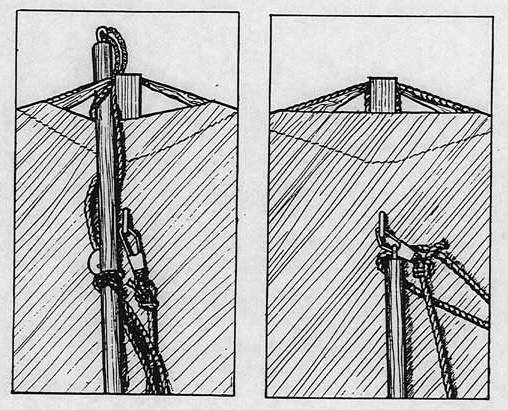
Some students find it difficult at first to coordinate the operation of the reel with the control of the kite. In order to reduce the kite's sensitivity and therefore enable more attention to be given to the reel in this first lesson, it is recommended that the rudder action be omitted by unhooking the control cords and attaching them to the lower loop as shown; all other assembly and adjustment items remain the same.
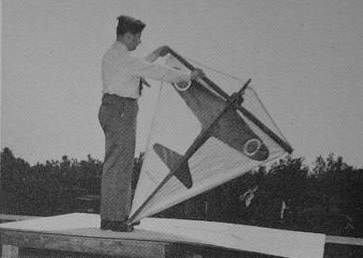
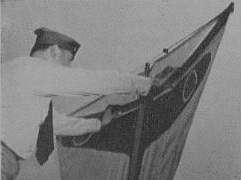
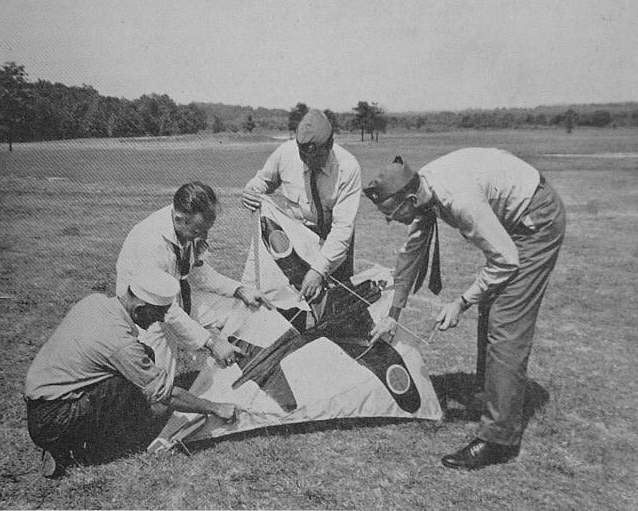
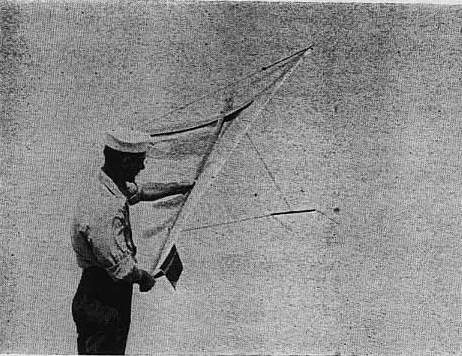 HOLDING KITE FOR LAUNCHING |
As shown in photo above, when launching the kite, hold left hand 1/3 up spar and right hand at root of mast but clear of rudder.
 TILLER CONTROL CORDS REMOVED FROM RUDDER |
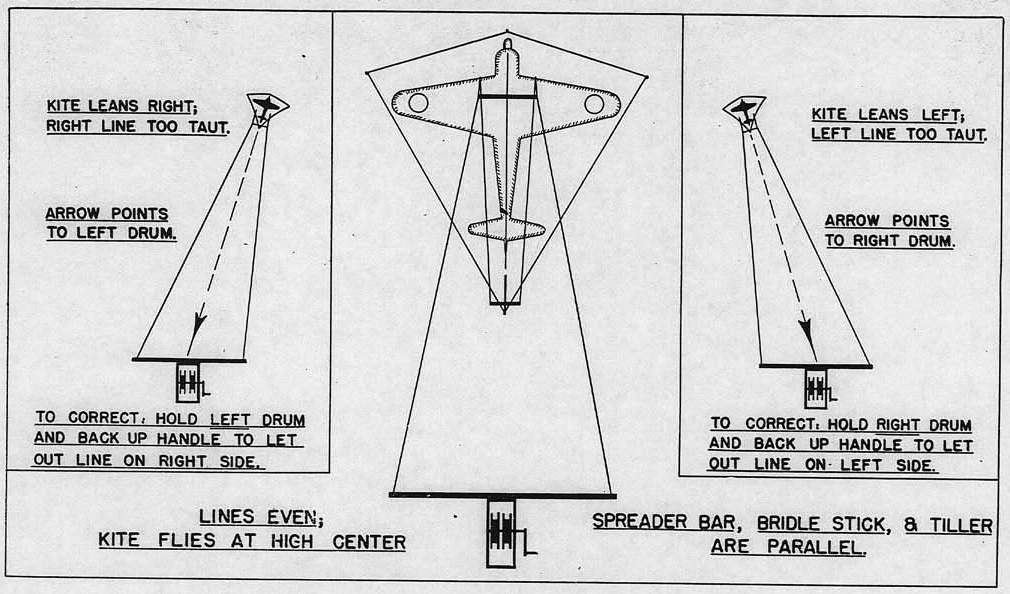
When the kite has completed its initial rise at the
length of line first extended, release the pressure on
the brake yoke and start to unwind on the handle.
After about ten turns, check the lines for evenness.
The kite itself will indicate whichever line is too
taut by leaning toward the side of the tighter line;
in fact, the mast might be considered as an arrow
pointing downward and showing which drum is to
be held by the left hand while the handle is backed
up to even them. Let out more line in short lengths,
checking evenness, and also practicing use of the
brake by releasing the handle and stopping the
kite by the left hand only.
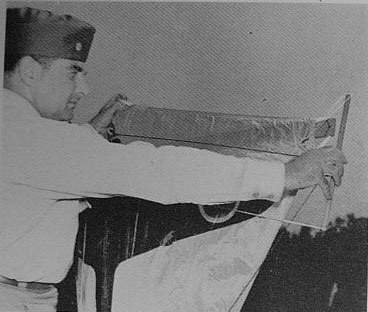
When the kite is well aloft, about 150 yards out, check the lines carefully for equal length and then try out the simplest maneuver--lateral swings. These are made by pulling in the end of the spreader bar corresponding to the direction desired. The movement of the bar should be gradual, not jerky, and the bar should remain parallel to the ground. Note the photographs of the right and wrong methods. Some students have a tendency to lift up the ends of the bar, thinking that thereby they can lift tip that end of the kite. Such " rocking has no effect; it is only by a horizontal pivoting of the bar that the flying lines can be properly operated to control the kite.
 WRONG METHOD
OF USING REEL
Do not rock the bar-- |
 RIGHT METHOD OF
USING REEL
Pivot the bar horizontally |
Without the rudder the control is not so positive, and maneuvers should be limited to swings and arcs.
When reeling in the kite, the same care is necessary to maintain the lines even as when it was being let out. As it gets close to the earth it may be advisable to have an assistant "walk down" the lines and catch the kite.
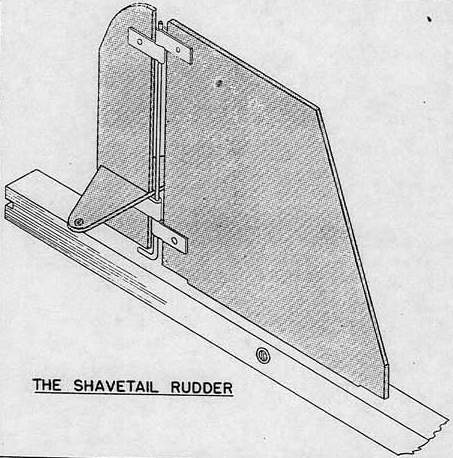
For this next step cut the rudder in half, chordwise; attach it to the fin with the pintle, and hook on the control cords. Its reduced area will make the kite less sensitive than with the whole rudder, and thereby easier for the student to launch, the take-off and initial climb being the most critical operation for the beginner.
Again use an extended length of lines for the launching distance, and in checking them for evenness be sure that the rudder is in line with the fin before you give the signal to release the kite. Watch the kite carefully as it rises, and if it begins to veer off one way, steer it back to the vertical by a corrective pull on the side of the bar opposite to the kite's turning movement. Don't hold the spreader bar too rigidly; have a feeling of suppleness in the elbows and hips so that the proper corrections to the kite can be made smoothly and yet with a promptness which will prevent its movements from becoming too wide and wild. Remember to check the evenness of the lines as you let them out.
When the kite has reached a safe altitude for maneuvering-about four hundred feet-try the lateral swings again. Notice how much more positively it responds to the movements of the spreader bar. You will appreciate the power of the rudder not only to put the kite into the attitudes for swings and arcing dives, but also its utility in recovering from positions which would have been awkward for the less controllable kite as rigged for the first lesson.
Don't overcontrol; keep the movements of the spreader bar within the amount required to steer the kite. If too much movement is used, an excessive recovery action is needed to bring the kite back and it appears erratic, whereas it is really the operator who is creating these wide oscillations by his own excessive movements. Proper movements of the bar keep the kite under control, but too much movement gets it out of control.
Do not attempt any of the more intricate maneuvers with the "shavetail" rudder. Loops are dangerous with this small steering area because it may not be able to bring the kite out of the bottom turn. Practice the swings and shallow dives only, but learn to move the kite unwaveringly and to make prompt, smooth recoveries.
Remember that the kite still has its basic inherent stability. Sometimes, when it may be oscillating stubbornly due to inexperience of the operator, it will recover itself if the bar is held squarely toward the kite. The rudder will then center itself and the kite will probably come out of its floundering with little or no assistance.
After a satisfactory period with the shavetail rudder, reel in the kite, evening the lines as necessary to keep it in control. From the spares kit or from one of the kites which was sacrificed in an early crack-up take a full-chord rudder and attach it. Check the kite for its adjustment by the eight items and launch it again. If the primary and intermediate lessons were well mastered, there should be no difficulty now in getting it aloft and maintaining it there, and we can proceed to the lessons in maneuvers, utilizing the complete control.
Begin all aerobatics from high center. The chart details the various maneuvers and the manner in which the reel is pivoted to accomplish them. It is essential that the kite be kept under command of the operator and not allowed to get away from the planned course. It will follow the direction dictated by the taut line; for instance, if the left line is tightened by pulling in on the left arm of the spreader bar, the kite will lean in that direction, or, if the line is pulled "hard around" the kite will nose over and begin to rotate. It is essential to learn how far to pivot the bar in order to accomplish a swing or to make a full turn. This comes with practice, but it is better to under-control rather than over-do it.
It is also important never to let the kite recover from a maneuver on a slack line. In other words, one line is pulled taut to start the maneuver, but at the same time the other line is necessarily slackened. However, if the bar is swung too far over, the loosening line will become so slack that when the kite is brought about there will be extra sag in the line which will permit the kite to backlash and perhaps even nose over in the other direction and start diving in. Keeping these facts in mind, refer to the drawings, for which the following are supplementary suggestions.
With the kite well centered high in the sky, pivot the bar slowly and smoothly to the right. The kite will lean in that direction and move across the sky 10 to 15 degrees. Keep its head up. It moves fastest when its mast is horizontal, but a slight dip further would nose it over. Now bring the bar back to neutral and the kite will come back to center. Try the same maneuver to the left and return. Continue to practice, trying for smoothness, straight horizontals, and increasing the width of are. It is interesting to pick out some object at the extremity of a swing, such as a cloud or a tree on the ground below, then swing the kite to the other extremity and line it up with another marker. Estimate the angle between them and try to increase it on the next try. Do not proceed to another maneuver until you feel confident of each step.
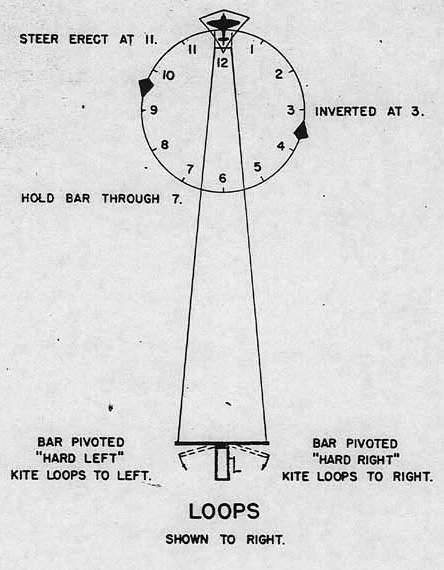
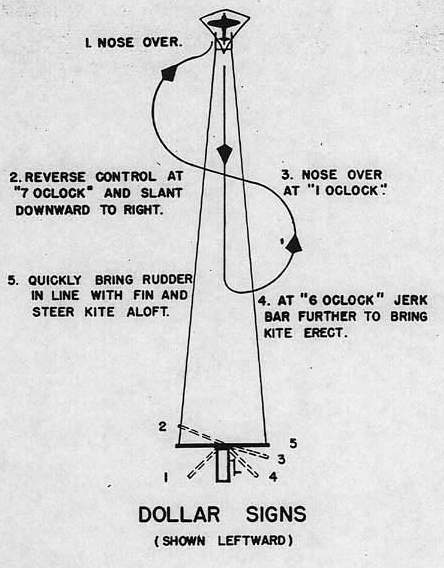
Imagine a clock face in the sky with its "12" at the kite's high center and its "6" midway toward the earth. Make a mental registration of the positions of the other numbers on the dial; they will be useful in plotting the various steps in maneuvers. The drawing indicates how the kite is pulled smoothly over until at 3 it is nosed down; passing 4 and 5 it swings through 6 where it is headed left; upon reaching 9 it is again upright, but should come out of the loop at 11 so that it is brought erect at 12. Most beginners have trouble at 7 and 11. Keep those numbers in mind (as in "shooting crap"). There is often a tendency to release the hold on the bar at 7, thus bringing the kite into a dive, or to fail to bring the kite out at 11, whereupon it starts another loop. The corresponding critical spots for a left-hand loop are 5 and 1. Practice looping in both directions and try for round full circles.
After the follow through at 7 or 5 is mastered and the come-out at 11 or 1 can be smoothly done, try making loops of larger diameters, keeping the circles round and the kite's movements steady.
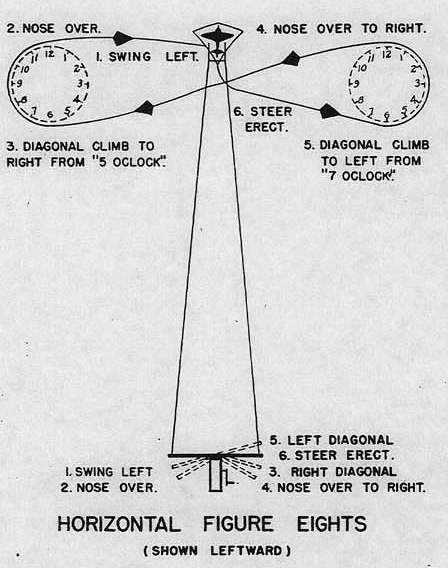
The purpose of these maneuvers is to develop the ability to reverse the direction of the kite and to keep it under control over a wider area of sky. Again the imaginary clock face, one for each half of the figure-eight, will be a useful mental guide. Of the two, the horizontal is more difficult, but it is to be learned first because it keeps the kite in a safer area of sky. First try it to the left. Swing the kite over to the left-hand clock face and nose over as in starting a loop, but come out of the circle at 5 o'clock and slant upward diagonally. Points 2, 3, and 4 on the drawing are not performed as separate jerks of the bar, but as a smooth reversal of control so that the kite arcs upward to the top of the right-hand clock face and noses over on that dial around to 7 o'clock. Here the bar is swung back slowly to incline the kite upward to the crossing. Just beyond the cross the bar is swung slightly right to straighten the kite up, then again to neutral to hold it while it climbs back to its ceiling. It is in figure-eights particularly that the precaution of not permitting the kite to recover on a slack line must be borne in mind. As with a spirited horse, keep the reins tight, because a loose line on the pull-out side will let the head swing too far over.
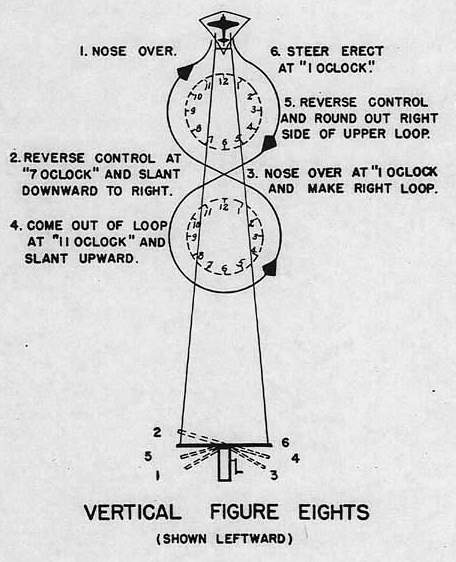 In vertical figure-eights the kite is maneuvering
under greater speed, and, because of its more
central position in its area of action, it has more
uniform wind pressure. These are, therefore, easier;
but care must be taken when going into the lower
loop that the kite is brought around before it has
gone too low.
In vertical figure-eights the kite is maneuvering
under greater speed, and, because of its more
central position in its area of action, it has more
uniform wind pressure. These are, therefore, easier;
but care must be taken when going into the lower
loop that the kite is brought around before it has
gone too low.
These serve as a continuation to the vertical figure-eight in accustoming the operator to steering the kite in a downward path, but have the additional requirement that he learn control in a straight upward line. The skill acquired will be of benefit when in the next maneuver he tries to dive it straight down. Acquire the ability to make an instant correction for any deviation from a straight line. The rate of climb can be accelerated by winding in several turns of line.
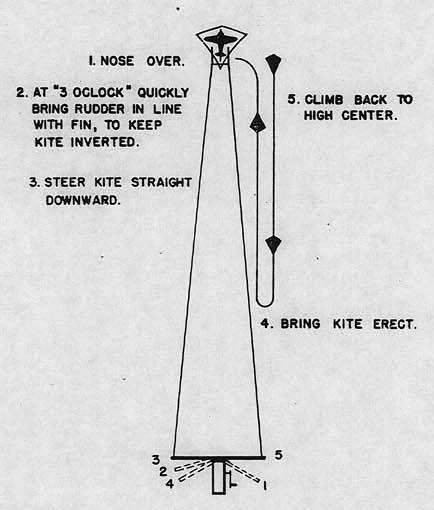
This is the kite's most spectacular maneuver and requires constant attention by the operator to make it straight and true, as well as to avoid disaster. The pull on the line increases as the kite approaches the earth and the speed is much faster than in any other maneuver. The pull-out at the bottom must be made quickly and gauged within the ability of the kite to recover. There is more to it.than merely upsetting the kite and letting it come down by itself. Unless immediate correction is made to prevent swerving,. the kite may slant off to either side, or even turn around and upward under the impulse of its inherent stability. Practice, therefore, to make a sharp nose-over, and with the kite inverted keep a taut line to either side, correcting any slanting tendency. The lines will arch up as the kite pulls them downward, and require all the more care, but the speed of the kite also increases its responsiveness so that the pull of the control bar at the right moment will bring the kite out safely. Do not snap the bar around too sharply. The kite is under severe stress and should not be over-strained.
The direction in which the first pull-outs are made is not important, but after a few dives it will be seen that the proper course of recovery to prevent twists in the line is in a direction opposite to that in which the kite entered the dive.
In climbing aloft after a dive the course may be
vertical or slanting, so as to vary the tracking by
the gunners.
The kite should be reeled in, making adjustment of the winding drums as necessary to keep the lines even. When it is close to earth, one method of final landing is to lower the kite to the waiting hands of an assistant. This is always necessary at sea where the eddies of the wind close to the deck make the kite swerve rather badly in its final lowering.
Ashore, a skilled operator will bring the kite to within ten or fifteen feet of the ground and steer it to one side and lay it down. At the final moment, let go of the reel handle so that the kite is relieved of the wind pressure and falls backward. Under the best of conditions the kite can be reeled all the way in and grasped out of the air by the operator's left hand.
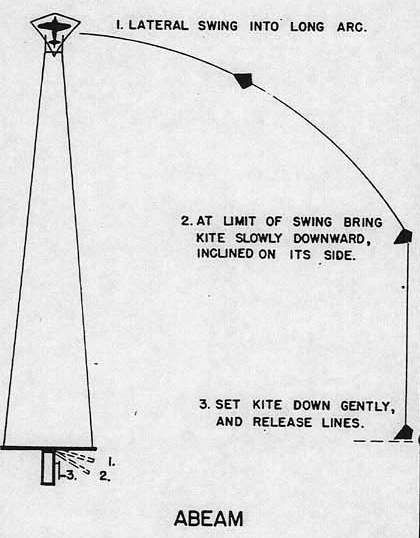

The maneuver of setting the kite down at an extended length of line becomes useful when a minor adjustment is to be made, or to lower the kite so that hits by the gunners can be observed. It is most easily done to one side: that is, after swinging the kite laterally to its limit. It then reaches a point where its ability to yaw is balanced by the wind's force. By keeping a dexterous touch on the taut lines to prevent the kite from either nosing over or darting backward, the kite can be held almost stationary. This maneuver is defined as "hovering." Then, by a slight added pull, the kite can be brought slowly to earth and landed.
A forced landing ahead of the operator can be made by diving the kite and recovering close to earth, swing off laterally, then back toward center, where, when close to earth, dead spots in the air are often encountered. At this moment let go of the reel handle to spill the wind from the kite and let it fall backward. Providing the kite has not been injured, it can be given a check-up and relaunched from its extended position.
In the course of making a number of loops in the same direction the lines will get twisted. Six or eight twists make little difference in the ease of control, but more may tend to jam the lines. Keep a mental count of the number of twists in one direction, and unwind them by the same number of opposite loops. If count is lost, wig-wag the rudder quickly back and forth to feel the friction in the lines, then loop in either direction and wig-wag again. If the friction has decreased, keep rotating until the lines are free; if increased, make the required number of reverse loops.
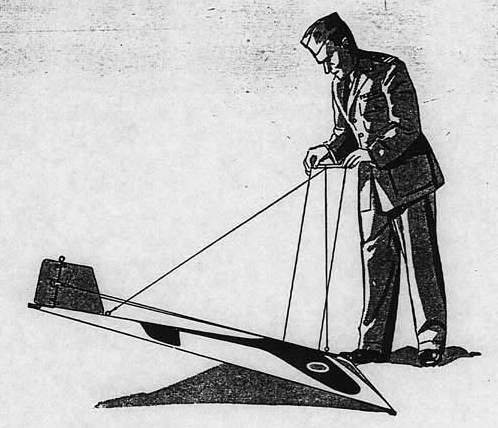
If he has mastered the foregoing maneuvers, the operator has now reached a degree of skill which will enable him to try another useful operation, getting the kite launched without the help of an assistant. This is useful during gunnery exercises, where extra kites and reels should be connected ready for use, with the kites leaning against a post or butt. When the kite serving as target has been fatally hit, the operator can unhook his gear, take another reel, pull the kite aloft and have another target in the air without calling the assistants from their work of repairing kites.
The kite is laid on its side with the wind pressure
holding it. The operator backs off about fifty feet,
evens the lines, then, with a backward step or two
he pulls the kite away and into the air. In a
moment it is steered to high center and the line can be
let out aloft.
In describing the foregoing maneuvers, emphasis has been laid on making them well-performed figures; but remember that all operations are to be considered in their relationship to gunnery. Other movements, therefore, such as arcing dives, arcing climbs, undulating swings, renversements, and combinations will be useful in giving the gunners a realistic and evasive mark. One of the most useful operations for self-instruction is that, of writing your name in the sky. Another is that of having a kite-fight, in which two operators, standing about a hundred feet apart, fly their kites at about the same length of lines and chase each other about the sky.
Concerning crack-ups: When handling the wreck try to prevent the splintered sticks from tearing the cover. Unhook the flying line snaps from the bridle stick, then close them so that as they are drawn back across the ground they will be less liable to catch twigs and other obstructions. Try to put some tension on the lines as they wind on the drums; if wound loosely they require more adjustment when reeling out.
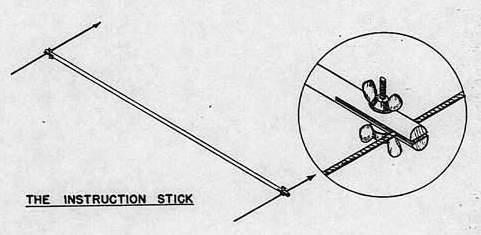 The smooth and proper performance of a kite
crew requires that several should be able to operate
the kites. Three steps are used: the instruction
stick, the flying bar, and tandem teaching.
The smooth and proper performance of a kite
crew requires that several should be able to operate
the kites. Three steps are used: the instruction
stick, the flying bar, and tandem teaching.
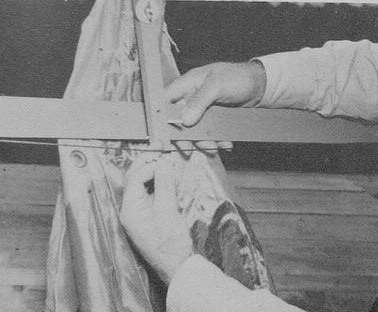
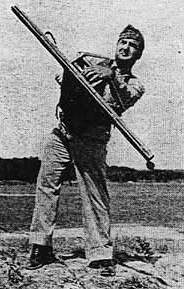
After the instructor has adjusted the lines evenly and centered the kite high in the sky, the instruction stick is inserted close to and parallel with the spreader bar of the reel. Fit the line well beyond the screws so that the threads do not chafe the line. Unwind about thirty feet and let the student step under the lines to rest his hands lightly on the stick while the instructor operates the kite, showing him its maneuvers and the stick-movements required. Then let the student maneuver the kite. If it is put into a dangerous attitude, the instructor should immediately take over and rescue the kite, after which he should analyze and explain the student's faulty moves. The progress of teaching is to follow the routine of maneuvers listed, and the student should continue each one until the instructor feels that it has been mastered.
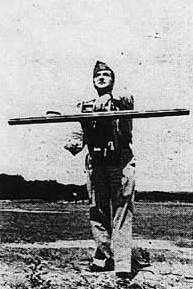
The flying bar is illustrated in Chapter III. Having completed the instruction stick course, the student is taught how to launch a kite with the drum type of bar. After a short period of observation by the instructor, the pupil can practice maneuevers solo, while the instructor starts the next student with the stick.
After a half-hour or so with the flying-bar, the student puts on the harness and is given the reel attached to a flying kite. While the instructor stands behind him ready to reach around and correct any serious error, the pupil maneuvers the kite, getting the feel of the reel equipment. The adjustment of the two drums in evening the lines is explained while the student reels in the kite; then when it has come down to a distance of about a hundred feet he lets it out, becoming familiar with the use of the brake as well as having more practice in line adjustments. The final lesson is launching.
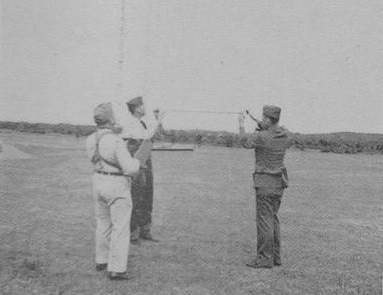 ATTACHING THE INSTRUCTION STICK
|
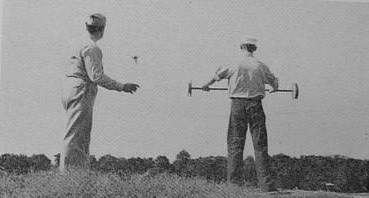 STUDENT WITH FLYING BAR
|
The most important objective governing the use of this kite as a target is to give good service to the gunners. This requires efficient functioning of the kite crew, adequate equipment, and proper conditions. Use at gunnery stations ashore will be considered first, followed by a section on its use at sea.
An officer and six men comprise a good working group. At least three of the men should be skilled operators; the others should understand assembly, adjustment, assistance in launching, and repair.
Duties of the kite officer shall be: to insure the safety of his men, that none venture into the area of fire; to direct their smooth operation as a team, having supervised their training and selected the best as operators; to give the gunners speedy service in maintaining a target aloft with others in reserve; to maintain contact by phone or signal with the firing line; and to keep equipment in readiness. He should see that salvaging and repairs are made in preparation for each day's firing, that gear is properly stowed, and more ordered as needed. The kite crew should have frequent opportunities to fire at the kites so they can get the gunner's aspect of the kite's operation.
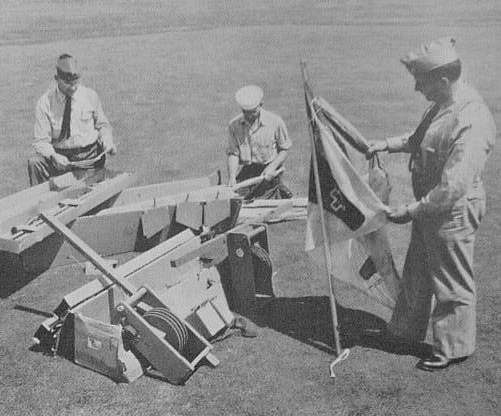
 THE REPAIR CREW |
 KITES NESTED, FOLDED and ROLLED |
Each kite should be assembled and adjusted at the armory and readied for carrying to the range. If the distance is not great or if a truck is available they may be nested; that is, piled in groups of five with the head of one kite laid under the bowing line of the one below it, their rudders alternating to either side. A more compact method is achieved by loosening the bowing line and boltrope, hanging the bridle stick by one of its screweyes to the top snap, removing the cover from the spar-ends, and lifting the grommets off the screweyes, then swinging the spar around as far as it will go and wrapping the cover around the sticks, tying with tape. This permits rapid reassembly. The most compact stowage includes the above operations plus the removal of the cross-axis machine screw, with one of the control lines taken from its screweye in the spar, so that the spar can be placed with the mast.
Provide a box in which spare hardware and a few tools can be carried. A pair of pliers, a 3/16-inch reamer, and a screwdriver will prove useful. Some spare line should be ordered in advance (see specifications in Chapter III) to replace that which becomes frayed or shot away.
THE REPAIR CREW
KITES NESTED, FOLDED, AND ROLLED
The extra sticks in the spares kit are not sufficient for extended operations. One spar and mast should be taken to the carpentry shop as patterns for duplicates. Chapter VI gives suggestions for making spares and repairs.
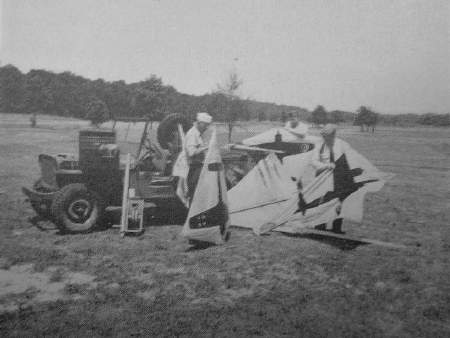
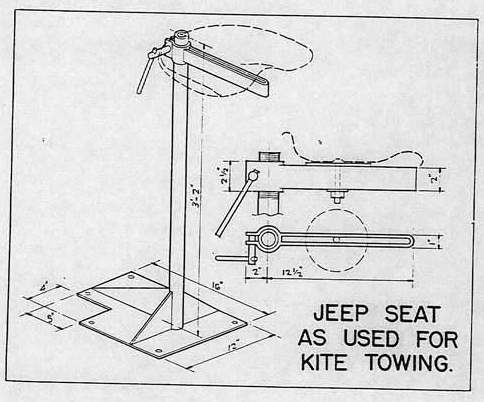
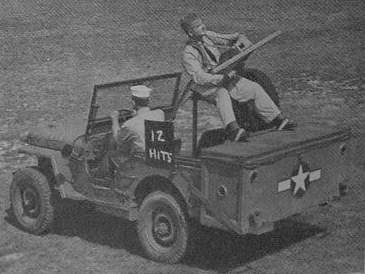
A jeep is useful for carrying crew and equipment back and forth between the armory and the range and is recommended for towing kites when the wind is light. The one shown has a box with inside dimensions of 62" long, 22" high, and 18" wide attached across the back for kite gear. It also has a towing seat mounted amidships.
A red flag for "Cease firing" signals is also needed.
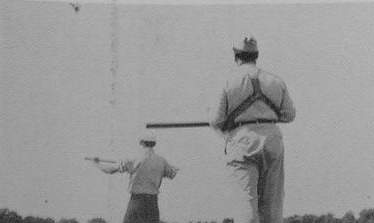
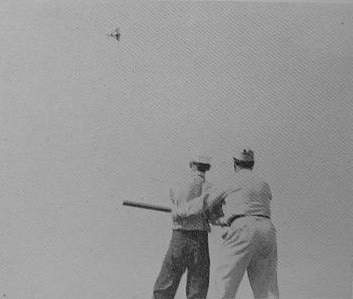
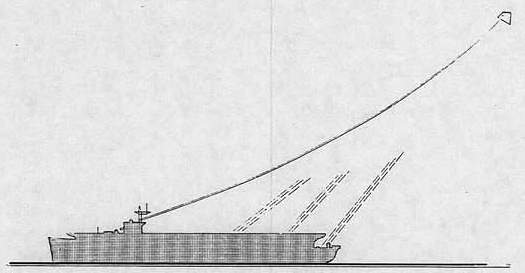
The direction of the wind determines the layout of the range. First consideration must be given to the possible effect of shots, because, with the high elevations required for tracking the kite, bullets may fall as far away as eight miles. Stops on gun mounts to limit their movement may be required. The illustration shows a typical range layout. (The distances are foreshortened.) The actual distance from the gunners to the kites will depend on terrain and the ranges desired. Note that it is always desirable to have the kite operator some distance from the gunners, to avoid shooting up the lines. The kite is usually flown at a line-length of about 200 yards. Longer lengths introduce difficulties of line sag and stretch which affect control. The airplane silhouette on the kite being about oneninth that of the real airplane, the simulated distance becomes nine times the actual range. If longer ranges are desired, the kite operator is stationed farther from the firing line. For positions ahead of the gunners, earth butts should be thrown up or pits dug for protection. These should be about seventy-five feet long and at least twelve feet high, remembering that a .50 calibre bullet can bore through a lot of sand.
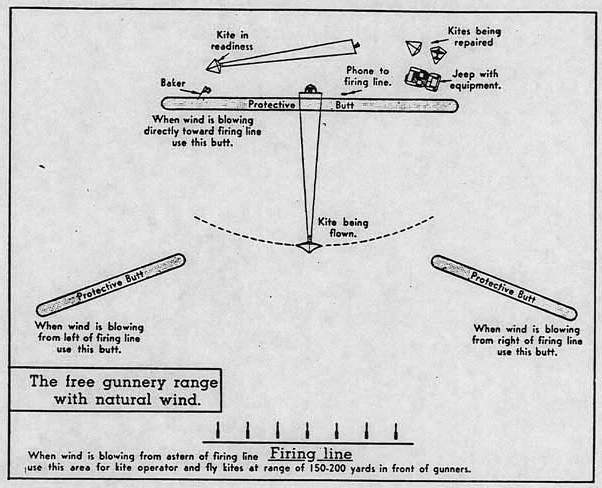
Flying the kite from the vicinity of the firing line with the wind astern of the gunners provides the best cooperation between operators and gunners, but has most likelihood of shooting the lines. Abeam positions used when the wind is from either side have the advantage of presenting the kite as an approaching and receding target, simulating airplane attacks. The far-ahead location used when the wind is toward the gunners is the best for providing a wide latitude of swing with least line vulnerability.
Coastal ranges, with the prevailing winds moving along the shore, require that the guns be located several hundred yards inland, while the kites are flown from behind the dunes on the beach. The shuttle system, described in a later section of this chapter, is also applicable to this situation.
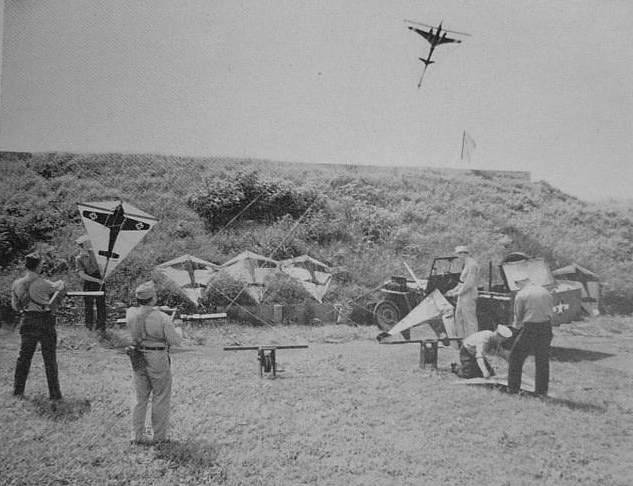
As soon as the kite crew arrives at the location of operations, kites are assembled (a half-day's firing requires about ten kites), spares are placed in readiness, and kites are attached to lines of all available reels. These ready kites are laid against their back rests, and the attached reels extended about fifty feet to windward in a spot protected by the butt and away from the area used for assembly and repairs. The crew divides into pairs, designated as "Target," "Ready" and "Reserve."
The Target pair launch their kite and let it out to range distance; the Ready pair are alert to launch theirs as soon as the target is shot down, and the Reserve pair busy themselves with repairs until, with the shooting down of the target, they move up to the Ready position. The Target pair become the Reserve as soon as their kite is downed, and quickly prepare spare equipment or repair their own, if it can be recovered without exposing themselves beyond the area of safety.
As soon as the kite officer is assured that the target aloft is flying satisfactorily, he phones or signals the range officer to that effect and has the assistant of the Target pair run up the Baker (red) flag.
In a few seconds, the guns start, their crackling giving the entire kite crew an alert sense of duty and inciting the operator to outwit the gunners by his dexterity and airplane-like simulation. The Ready pair look aloft, wondering how much longer the kite can evade the marksmen; of a sudden they think it has been hit, but with a chuckle the operator steers it aloft after a particularly low dive, which fooled the gunners. He tops off the climb with an impertinent loop. The guns begin again. Hits can sometimes be felt as they puncture the cover or glance on a line. Perhaps at this moment a piece of spar is smashed out by a vital hit. the lines sag, the kite crumples and starts down in an inert wreck. Immediately the Ready pair launch their kite as target, and with a minimum delay the guns open up again.
Operations continue as long as spare reels and kites are available, but when the kite officer has only one unit left, he informs the range officer to command "Cease firing" when the target is shot down. With the Baker lowered and the guns secured, the kite crew recover downed kites, disconnect the lines, bring in the wrecks, then, behind the butt, reel in the lines, examining them for frayed spots. With this work in hand the kite officer launches his one remaining complete kite, and informs the range officer to resume firing, with the expectation that as soon as it has been shot down one of the other assemblies will have been readied.
This procedure will undoubtedly be varied to suit local conditions, bearing in mind that efficient and prompt service to the gunners is all important.
It is important to decide with the gunnery officer upon a method of scoring to grade the gunners and increase interest in the use of the target. An individual gunner may be limited to a hundred rounds, after which the kite is lowered and hits counted. Several gunners can be scored on one kite if colored bullets are used. It is interesting to total the number of shots fired to bring down a kite, then count the holes and figure the ratio between shots and hits. It is often desirable to log gunners' scores over a period of time so that improvement may be shown.
Hits on the kite in flight can be made visible by attaching to the cross-axis small bottles containing titanium tetrachloride, which emits dense white smoke when exposed to air. Talcum powder or flour may be used in the same way. When the bottles are smashed the chemical or powder gives a realistic evidence of good marksmanship; but the most spectacular evidence is a hit which brings the kite smashing down.
Any gunnery device which is regularly employed in a curriculum should function at all times regardless of weather. When the wind falls very much below ten knots it is impractical to use the standard Mark 1 kite, but three alternatives can be employed: lightening the Mark 1, using the Mark 2, and towing the Mark 1.
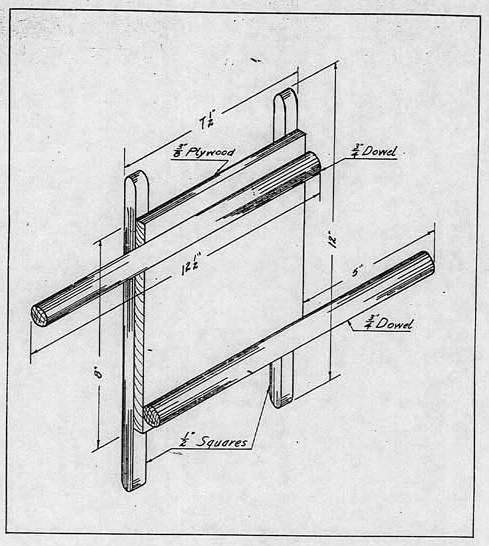
The sticks of the Mark I are the heaviest items in its structure, weighing about ten ounces each. For light winds the mast can be planed down 1/8" on the face and each side; the spar can have 1/4" cut from each edge and 1/16" inch from the face and tapered from 1-1/4" at the center to 3/4" at the ends. The bridle stick can be made from a 3/8" dowel, the fin and rudder may be cut from 1/16" plywood, or have a lightening hole cut from the center of each, then covered with paper. These changes reduce the weight about five ounces and enable the kite to fly in an eight-knot wind. The Mark 2 kite, described in Chapter VIII, has flown in a six-knot wind.
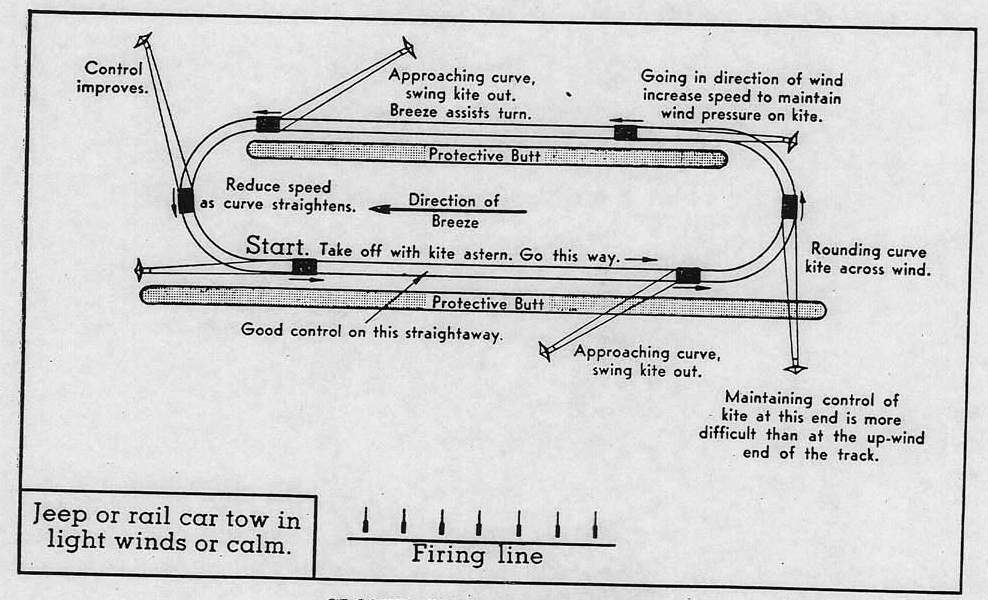
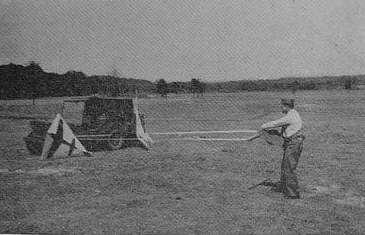
Towing the kite with a jeep or rail car provides adequate wind pressure against it. The closed course gives continuity of performance, variation in range and difference in speed as the kite goes up-wind or down-wind. Some range officers prefer this method to that of flying from a fixed position. At the down-wind corner the kite moves fastest where it swings around to get behind the car for the up-wind run. If the gunners are stationed there, the kite's speed requires them to track it with an appreciable lead.
The course should be about 400 yards long with turns of about fifty yards radius. It can be laid out in the direction of the prevailing wind in accordance with features of the terrain. The rail courses used on many gunnery stations are suitable, if of sufficient length. Although the kite is flown at a line-length of about 150 yards and is thus both behind and above the car, it is advisable to erect protective butts or use limiting stops on the guns for protection of the operator and driver in the car.
Equipment: Towing car or jeep should be equipped with a seat for the operator, facing aft, with safety straps extending from his belt to each side and stirrup-straps for his feet. The reel or flying bar may be used. Spare equipment should be spaced about the course so that complete gear can be readily picked up when the target has been shot down. A red Baker flag should be carried for signaling the firing line and several yellow flags should be planted around the course to indicate to the operator that he is approaching turns or areas where the gunners should be given maximum target maneuvers.
Crew should be spaced about the course to assist in take-offs and in clearing wrecked kites from the track. Two of them should be near the up-wind end because this is the more difficult of the two bends to negotiate.
Operations: Several practice runs should be made to learn the feel of the kite under these conditions. Take-offs should be made up-wind until the operator is experienced. The driver should start with a steady surge of speed; the assistant should release the kite smoothly as he runs a few steps forward to prevent a jerk on the lines. Once aloft, the kite should be quickly let out to a range of about two. hundred yards if the reel is being used. If the slotted flying bar is employed the lines will be of fixed lengths. The kite is climbed to high center and then maneuvered. As a yellow flag marker indicates the approaching turn, the kite must be swung high and wide so that, even though control may falter while the wind pressure on the kite is relaxed as the car rounds a turn, the kite can be faced about while still in the air and pulled aloft again. At the down-wind end, maneuvering is much easier because the prevailing wind assists turning. The operator can call to the driver for the changes in speed required to maintain adequate pressure on the kite; the driver will note the speedometer so that he can give the corresponding speeds for the subsequent runs. If the kite is shot down, steer it free of the tracks while the driver slows down to a stop. If the kite comes to earth before the car stops, let go of the reel handle to free the lines; don't drag the kite. If using the flying bar, throw it overboard free of the tracks as soon as the kite is steered free. Abandon that assembly to the care of the crew, drive quickly to the location of the next unit, and launch another target.
At the up-wind turn, where the kite invariably loses altitude, firing should be prevented because the kite's lowering may cause overzealous gunners to be aiming close to the car. Stops can be installed on the gun mounts to prevent this.
If, in the course of these operations, wind should increase to the extent that up-wind turns cannot be made, there should then be enough wind for operations from a fixed position.
On roads or beaches where the towing course cannot be laid out wide enough to permit end-turns with the kite in the air, a back-and-forth method may be used.
Equipment comprises the jeep; at least five target kite units, each consisting of a kite, 150-yard range of lines, and a flying bar (three units being in use and the others as extras); three Baker flags; four yellow course-marking flags; a small blackboard which will hang from either side of the jeep; chalk; and spares. The guns should have stops to limit low and extreme-end firing.
The crew: The kite officer as operator, one assistant as driver, two assistants at each end of the course, and the sixth midway. His duty shall be to gather in any kites and lines which are shot down in the central area.
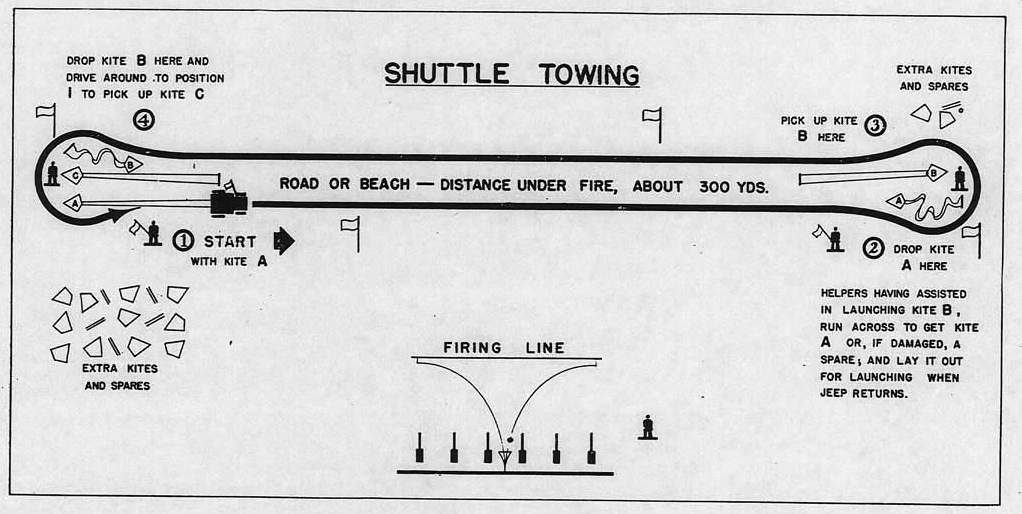
Operations: Kite units are laid out at each end. Yellow flags are placed along the main course, to mark the area where the kites should be given maximum maneuvers, and also at each extreme end. One red flag is left with an assistant at each end and the other mounted on the jeep so that it can be easily taken from its socket. For each run the blackboard is hung on the side of the jeep towards the gunners. One assistant hands the operator a flying bar; the other holds the kite and releases it for the take-off. As the operator sees the first yellow marker, he swings the kite outward and gives it the best target simulation. On reaching the next yellow flag he brings the kite up to high center. As he comes to the end of the gunnery area, the assistant there waves his Baker to indicate "Cease firing" to the gunners, and the jeep drives on to the far end where the assistant catches the flying bar and steers the kite to earth. The jeep drives back to the other assistant, who hands up another flying bar, and the attached kite rises for the second run. Meanwhile those assistants reverse the layout of the received kite (if it is suitable for another run) and count the hits. If the kite is shot down midway, the operator throws his flying bar overboard, waves his Baker to stop the gunners, and goes on to the end to pick up another kite. For each succeeding run the score for that end's previous kite is numbered on the blackboard for the information of the range officer. The blackboard can also be used for such messages as "Five minutes for repairs" or "Last kite."
A variation which calls for extreme alertness by the kite crew and gives very good practice to the gunners is the "double shuttle" system, in which two jeeps are used, starting from opposite ends, the operators using the mid-course markers to indicate the area in which they are to maneuver their kites so as to avoid entangling with each other.
Where a range is equipped with target cars which run unmanned on a track, they can be used to tow the kites back and forth along the straightaway. The control system is to be removed so that the kite will fly with a single line. The rigging for this is shown. Units consisting of a kite, a hundred yards of line and a reel are laid out at each end of the course. To launch the kite the reel is hung to the rear of the car, an assistant holds the kite at the far end of the taut line, the car is started, and the kite takes off to be towed past the gunners. Arrived at the far end of the course, the reel is unhooked and the kite reeled down by hand. If still usable it is laid out for another run, but in the meanwhile one of the units in readiness at that end is hooked on for the return flight.
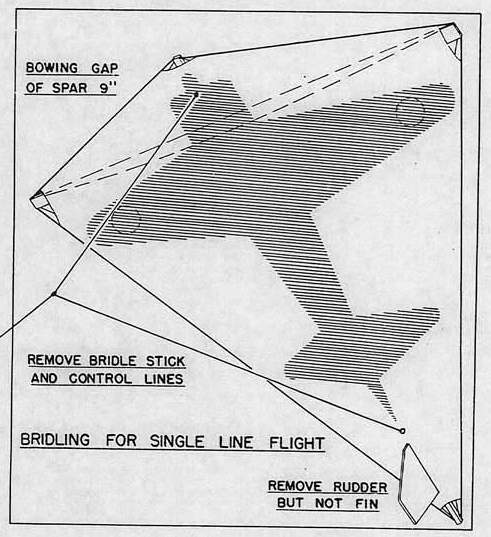
This kite adapts itself well for flight with a single line. Removal of the two-line control assembly takes away its maneuverability, but for unmanned towing, range estimation or for a fixed aerial mark, the single line is useful.
The kite must be balanced both mechanically and aerodynamically, because taking off the control assembly makes it impossible to offset any basic inequalities by rudder action. Remove the spar and balance it at the center over a knifeedge. If one side is heavy, shave it down, but do not weaken it so much that when bowed it will be asymmetrical. If necessary, select another spar which is more suitable. After replacing the spar, be sure that it is at right angles to the mast and is not warped. When the boltrope is pulled taut, the fabric must not be crimped at any point.
Attach the flying line to the same point on the
bridle line as was used for the bridle stick. Check
this by laying the bridle against the cover with
both ends pulled taut and have the attachment
point two inches below the end of the spar. This
kite flies without a tail. If, after launching, it tends
to fall off to either side, it will be due to lack of
balance or adjustment and can be corrected by a
careful checking of the measurements and weights, to
be sure both are symmetrical, each side of center.
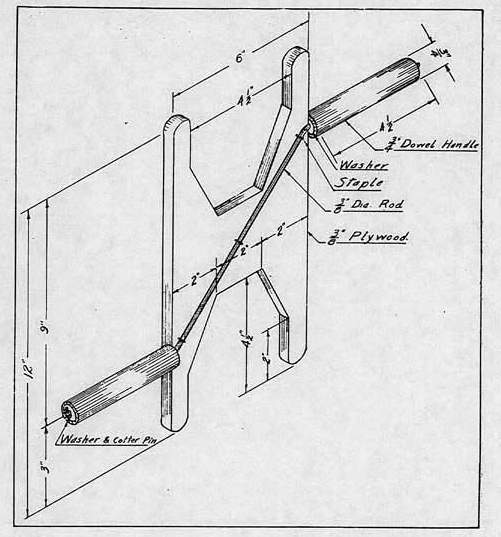
For handling the flying cord of this single-line
kite, a reel made from a small plywood board, two
pieces of dowel, and two side sticks is shown. A
more rugged construction uses a bent rod for the
handles.
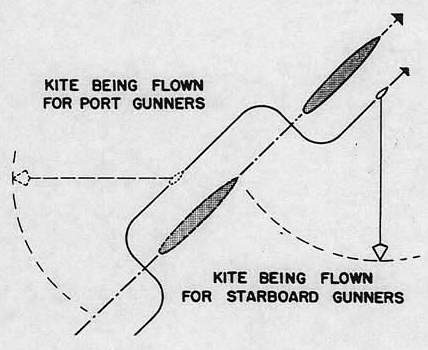
The maneuverable target kite is particularly adaptable for use at sea. Winds over water are usually of adequate velocity, but if not, sufficient pressure is often created against the kite by the ship's movement. When steering a zig-zag path the kite can be flown on alternate quarters to give practice to the port and starboard gunners. Except when traveling in close convoys, there are usually no restrictions on the range of the bullets. Practice at greater ranges than the kite's normal line-length can be provided by flying the kite from one ship while firing from another. If the prevailing wind is a following one, nullified by the ship's speed, when it is impractical to lay-to or change course for firing practice, another vessel can tow kites past the others.
Equipment: The standard reel and the Mark 1 kite, are used, except in combat waters, when the Mark 1, Mod. 1 kite is-preferred (see Chapter VII). An extra supply of line is required to replace that which becomes shot away. The regular spares kit should be augmented by extra masts and spars, to replace those damaged in bad launchings.
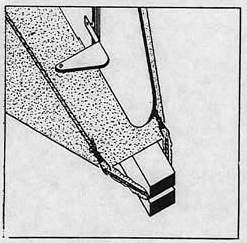
Precautions: The place for launchings should be as far as possible from fittings, gear and overhead rigging, which might obstruct the take-off. The launching assistant should be located at least thirty feet leeward so that the initial rise of the kite can be well aloft. Unusual wind swirls and eddies exist close to the ship, and there are awkward down-currents on the lee side. If a kite falls into them it becomes lifeless and hard to rescue. It is best to avoid them by a quick, vertical upsweep, then let the kite out into smoother air. The closer the operator is to the gunners, the greater the vulnerability of the flying lines; therefore, make this distance as much as possible. When the kite aloft becomes disabled by a well-aimed hit, every effort should be made to reel it back aboard so as to salvage parts and so that hits can be counted. If it falls into the water with the ship under way, retrieving may be impossible due to the greatly increased drag of the kite in the water.
When firing from a moving ship and loss of kites is expected, try most of all to salvage the lines. To make this more possible use weaker snaps for connecting the flying lines to the bridle stick. Whereas the usual No. 6 snaps supplied on the flying lines and bridle require about 87 pounds to break them, the No. 4 snaps on the tiller cords will open at 47 pounds, which is less than the breaking strength of the flying lines and increases the chance of saving this most critical part of the unit. There are extra No. 4 snaps in the spares kit, or they can be taken from the tiller cords and the No. 6's substituted. If a launch is overside the kites can be salvaged separately.
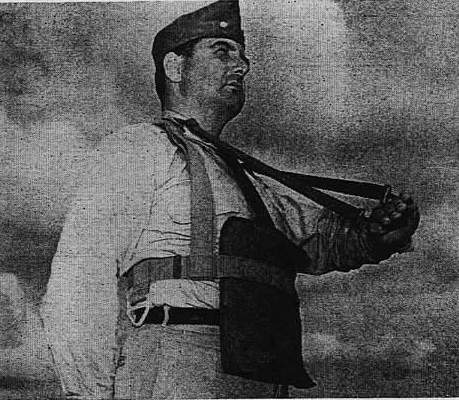
In small ships particularly, the roll and pitch, together with the pull of the kite, require that the operator be secured to the deck with safety straps. These are hooked to his belt and attached to deck fittings at a backward angle on each side so that he will feel their security as he leans forward and can devote his attention to the kite instead of having to worry about his own footing.
Instructions: It is assumed that the operator has learned to fly the kite in one of the several schools established ashore, where conditions are much more adaptable to easier take-offs and salvaging of crashes than at sea. One who has learned to fly the kite, however, can instruct others at sea, using the instruction stick or the tandem-teaching methods described in Chapter IV. The take-off and reeling out of the first hundred feet of line require the most emphasis on the part of the instructor.
Operations: The maneuvering of the kite, organization of the kite crew, firing and scoring will be similar to corresponding actions ashore, with innovations and improvements in accord with the type of ship and intentions of the gunnery officer.
Use at Sea: Towing with a Launch
If a speedy ship's launch is available and if the sea is not too rough, the closed course method illustrated on page 32 can be adopted, with the oval course extending around the ship as it lays to, or modified as illustrated herewith if the ship is under way. The drum flying bar is handy for this 'method; it is tossed overboard as soon as the kite is fatally hit and serves as a floating buoy to mark the kite for recovery. Painting the flying bars yellow facilitates finding them.
After firing is over for the day and the wet gear
has been brought aboard, it is a good idea to have
some recreational kite flying to dry out the lines,
which if stored wet are liable to mildew and lose
strength.
COUNTING HITS
The previous edition of this manual had specifications, drawings and detailed directions for making the kite, in the belief that some units would build their own; but the production of complete kites is now so well in hand that they may be readily obtained on order. Because the life of the original issue of kites can be extended through salvage and repair, some descriptions of their structure, in addition to that obtainable by observation of the kite itself, will be helpful.
Production has been by several manufacturers; their methods and some details have varied accordingly owing to differences in available material or processes, but the essential characteristics and performance of the kites remain the same.
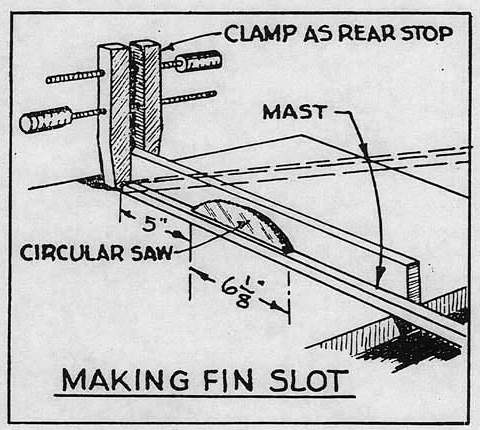
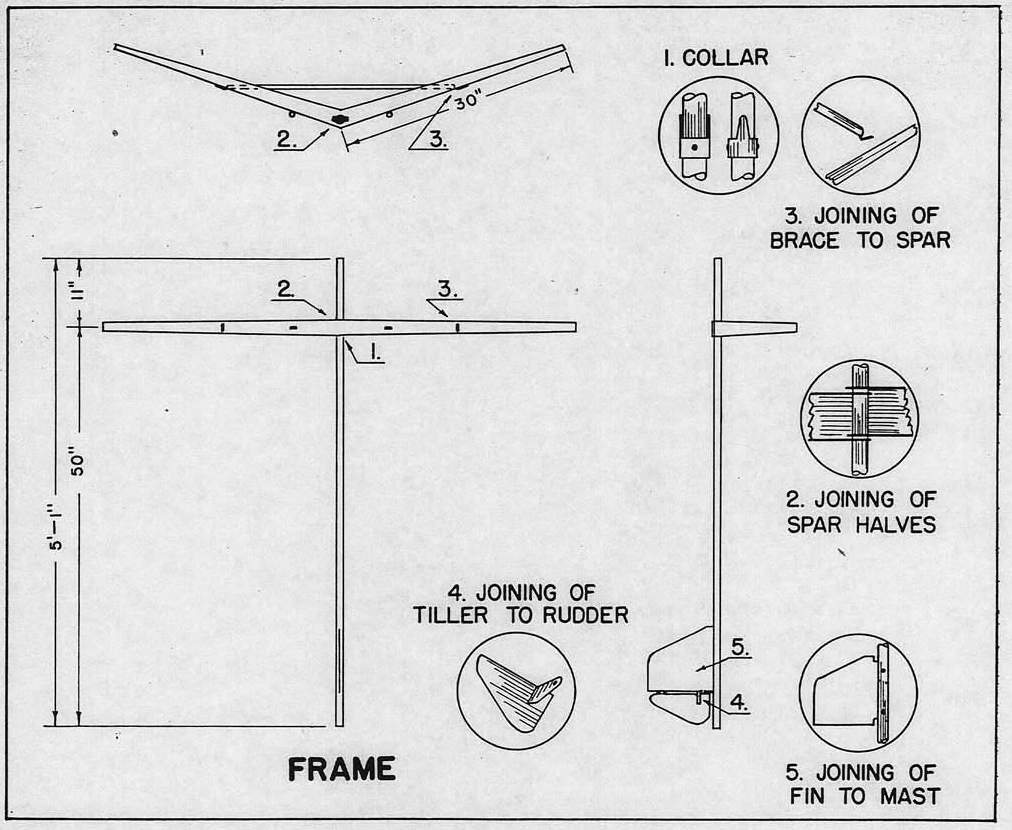
When making spare sticks, give the carpenter samples from the spares kit to copy. The wood should be light, straight and clear, and should be pre-tested to be sure it will take the stresses imposed by assembly and flight. The drawing shows the method of making the fin-lug slot in the mast; the end slots can be made by passing the wood over a low-set circular saw with the fence correctly spaced, but it is advisable to have a piece of flat wood run part way into the saw and pass the wood across that, to prevent the danger of running the stick into the table slot.
 For the Mark 1 kite, two forms of fin and three
types of rudder have been produced. Some of the
earlier rectangular rudders had strap hinges which
occasionally caught on the fin's edge. A slight
cutting-away at the point of contact will correct this.
The paper-covered fins require more careful
handling than the solid ones, but have the advantage of
being lighter. The tillers of the flat type which slot
into the rounded rudders should make a secure fit;
but if they become loose the slot should be shimmed
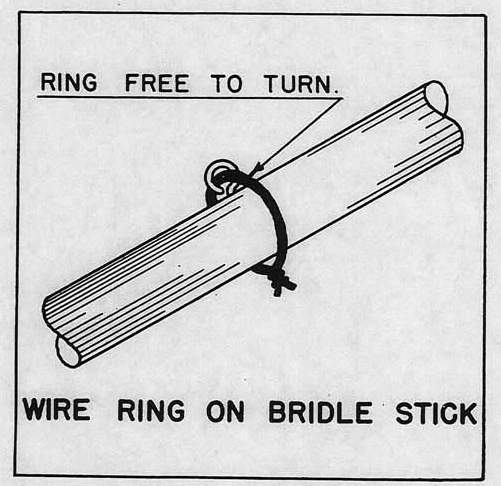
with a thickness of paper. In making spare bridle
sticks it is necessary to pre-drill the holes for the
screweyes to prevent splitting. Note that the
wooden type of bridle stick is not interchangeable
with the metal type supplied with kites using wire
bridles, unless a ring of wire, about #16, is put
through its central screweye and around the stick.
(Illustration on page 42.) The wire snaps are
hooked this ring; the small screweye alone will
not stand the pull. The screweyes in the ends of
the bridle stick are #212, the one at the center is
#215½, and those in the ends of the dowel form of
tiller are #215. The bridle line and bowing line are
90-pound test. The tiller cords are #18 cotton
seine twine, 35-pound test. The wood of the bridle
stick is birch or maple. The thread for the machine
screws, eyebolts and wing nuts is 10-24. The
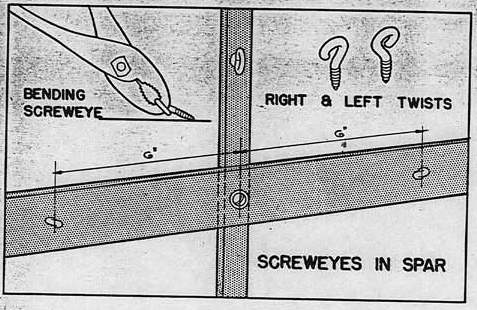
screweyes in the spar are #211½ (the "half" referring to
the shortened shank) and are easily twisted to
shape with pliers by holding the eye in the jaws by
the open end and pressing down on a wood block.
Note that they are twisted oppositely for use on
the right or left side.
For the Mark 1 kite, two forms of fin and three
types of rudder have been produced. Some of the
earlier rectangular rudders had strap hinges which
occasionally caught on the fin's edge. A slight
cutting-away at the point of contact will correct this.
The paper-covered fins require more careful
handling than the solid ones, but have the advantage of
being lighter. The tillers of the flat type which slot
into the rounded rudders should make a secure fit;
but if they become loose the slot should be shimmed
with a thickness of paper. In making spare bridle
sticks it is necessary to pre-drill the holes for the
screweyes to prevent splitting. Note that the
wooden type of bridle stick is not interchangeable
with the metal type supplied with kites using wire
bridles, unless a ring of wire, about #16, is put
through its central screweye and around the stick.
(Illustration on page 42.) The wire snaps are
hooked this ring; the small screweye alone will
not stand the pull. The screweyes in the ends of
the bridle stick are #212, the one at the center is
#215½, and those in the ends of the dowel form of
tiller are #215. The bridle line and bowing line are
90-pound test. The tiller cords are #18 cotton
seine twine, 35-pound test. The wood of the bridle
stick is birch or maple. The thread for the machine
screws, eyebolts and wing nuts is 10-24. The
screweyes in the spar are #211½ (the "half" referring to
the shortened shank) and are easily twisted to
shape with pliers by holding the eye in the jaws by
the open end and pressing down on a wood block.
Note that they are twisted oppositely for use on
the right or left side.
The cloth is rayon, impregnated with vinylchloride to be more wind-tight. The cringle tapes prevent the cover from creeping inward when under extreme wind pressures; they are of double herringbone tape, Navy specification 27-T-788. The boltrope is #36 cotton seine twine (in some issues a smaller size was used).
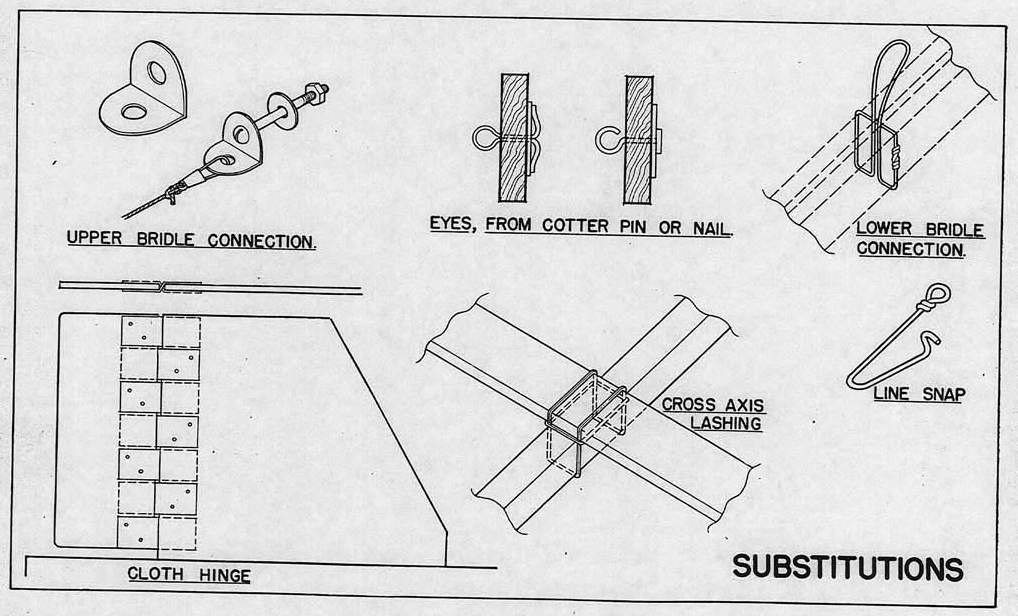
If, after using up the extra parts in the spares kit, duplicates cannot be readily procured, substitutions can be devised. They should provide adequate strength and function properly.
Ordinary nuts can be used instead of wing nuts, but are not so handy. Eyebolts may be replaced by 3/16" diameter cotter pins, squarely spread over a washer on the rear side; in fact, one manufacturer uses this method in regular production. Another substitution can be made by forming an angle of sheet metal with a machine screw through the hold in one leaf and the snap connected to the other. The lower bridle connection can be made from a piece of wire twisted around the mast and brought through the slot. Cloth strips can be substituted for metal hinges and the cross-axis screw can be replaced by a firm lashing.
It is remarkable how much damage the kites will withstand. Although the most vulnerable point is at the cross-axis and a hit there will bring the kite down in a crumpled mass, bullets striking other parts of the frame may leave only a clean hole or a nick. If a shot tears out a piece of hardware, the kite may lose part of its maneuverability, but will probably continue to fly. Hits which cut the boltrope make the kite sluggish. A severed lower bridle line will let the kite float flatly; if the upper bridle is cut the kite leans backward and spins down. A broken bridle stick often causes a tight spin.
Spot repairs are those by means of which the kite is quickly put back into service. Split sticks can sometimes be held securely with a wrapping of scotch tape, perhaps reinforced with a splint. When knotting broken lines, use a fisherman's knot for bridle, bowing and flying lines; square knots for joining broken tiller lines; and larksheads to attach the bridle stick and the flying line snaps. Keep in mind that a knot restores only a portion of the line's original strength, and a poorly-made knot invites trouble. A severed boltrope needs to be pulled out of the hem from each side of the break, tied, and threaded back through the hem to the top with the bodkin. In some spares kits a long cotter pin has been substituted for the bodkin, and it serves as well as the blunt needle to guide the line through. To reduce the size of the knot passing through the hem, separate its three strands, knot them individually, and trim the ends. Wetting the knot enables it to be pulled more snugly. When replacing a broken bridle stick, it is better to untie the knots in the tiller cord buttons than to risk splitting the wood by twisting the screweyes open. The larkshead for the bridle stick can be most easily formed after unhooking the bridle lines from the mast. If the bullet holes in the cover are small and few, they will not affect the flying appreciably; but to distinguish them from later hits they can be marked with a piece of hose inked on a pad and stamped over the hole. After any repairs, check the kite over by the eight adjustment items before relaunching it.
Armory repairs: Some cover-patching is done on the spot, but most will be after the day's shooting is finished. Some strips of fabric are included in the spares kit. A piece the size of a stamp is sufficient for clean holes; airplane dope is used for adhesive. If the kite is hit while flying at a profile to the gunners, the bullet may make a long slash. This must first be sewn, using a baseball stitch, and then covered with a doped patch. In making up new sticks add all the hardware and put bowing lines on the spars so that assembly in the field will be quicker. Add the lines to the bridle sticks so they can be replaced as a unit. Always check the boltrope of a repaired cover; sometimes a severed or weak part will escape detection until the kite is in the air. Spare rudders can be cut from broken fins. Do not throw any irreparable part away without salvaging its hardware.
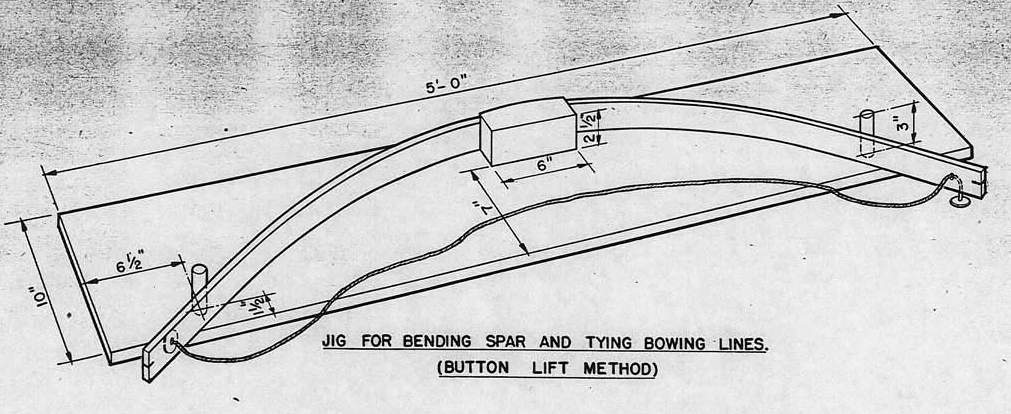
The kite crew will find it helpful not only to arrange a place in which to do their work and keep their gear, but also to make up jigs with which the repairs can be more easily accomplished.
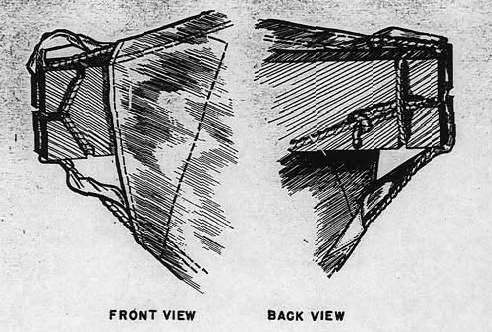
The basic design is the same as for the wooden-framed kites, but the difference in weight distribution required a lowering of the cross-axis point, a change in bridling, and an alteration of the cover. The performance and method of handling remain unchanged.
The material of the frame is aluminum alloy. The mast is of tubing; the spar is of tapered channel section formed from sheet stock in two interchangeable halves. Instead of a bowing line, a brace is used, imparting a fixed angle of dihedral. The fin and rudder are of sheet stock. The bridle stick is of tubing and the bridle is wire, but the control cords are of line.
The kites are packed in cartons of 25, rolled up, with fins and rudders separate, the masts and spar parts being at the center of the roll and the bridle and control assembly wrapped at the front of the cover.
1.Unroll the cover.
2. Form the spar-truss. It is shaped like an "A" with the spar-halves forming the sides and the brace as the cross-piece. The tongues on the ends of the brace fit into slots in the spar-halves. At the apex of the truss the four holes are lined up, with the longitudinal centers of the spar-halves overlapping.
3. Put the spar on the mast. Fit the four holes over the tube and slide them down to the collar to fit firmly over the ears.
4. Attach the cover. The cringles and boltrope loops are inserted in the slots in the ends of the mast and spar. The spar slots are formed by folding in the ends; the mast slots are cut into plugs. Be sure these are firmly seated.
5. Insert the upper eyebolt into its hole in the mast. Put the two washers and wing nut on the back but do not tighten until after the next step.
6. Tighten the boltrope. Pull the ends tight across the top slot, fit them together between the two washers on the eyebolt, and secure with the wing -nut. The tension of the boltrope keeps the spar-truss in place.
7. Attach the tiller. Fit it into the slot in the rudder; work the ridge down over the lower edge of the slot and bring the tiller forward so that the little slit in the front edge will fit over the front of the slot. Note that the painted end of the tiller fits into the side of the rudder having a corresponding paint mark. This insures that the central ridge will fit more easily over the bent-out side of the slot.
8. Attach the fin and rudder. Push the fin-lug into its slot, shove forward to hook on the machine screws, and tighten the wing nuts.
9. Attach the bridle. The shorter wire connects the bridle stick to the eyebolt above the spar; the longer one reaches down to the eyelet in the leading edge of the fin. Note that the apex of the bridling angle is three (3) inches under the end of the spar, when the bridle is held to the cover for checking as in photograph on page 10, item 6.
10. Attach the control cords, and put the mid-sections of the cords into the eyes on the spar.
1. Spar-truss seated. Be sure the keyways fit over the collar ears.
2. Boltrope taut and secured. While checking this be sure the spar ends are symmetrically located, and not distorted out of square by an uneven division of the boltrope, and that the cover is not crimped at any point.
3. Connections secure. Check the wing nuts on the eyebolt and fin-lug screws, the snaps, and insertion of the control cords in the spar eyes.
4. Control cord tension. The bridling point is fixed by the lengths of the bridle wires at its proper point, but the kite should be inverted face up, the bridle tube pulled up taut, and then held horizontal while the buttons on the cords are slid either way to bring the rudder in line with the fin, the tension in the cords being relaxed so that the rudder action is free when the bridle tube is rocked. (See illustration at top of page 11.)
The handling of this kite is similar to that of the wooden-framed Mark 1. Remember the precaution that the launching assistant should see that all lines are free and clear at the take-off.
In form and proportions Mark 2 is similar to the five-foot kite, but whereas that has 12½ square feet of surface for a weight of two pounds, the Mark 2 has 24½ square feet and weighs two and three-quarters pounds. Thus for nearly 100% increase in area it weighs but 40% more. Mark I carries about 1/6 pound per square foot; this one carries 1/9 and can therefore fly with less wind pressure--about 6 knots minimum. It is not intended for use in winds over 15 knots where it would be difficult to hold, and the lines or the structure would break.
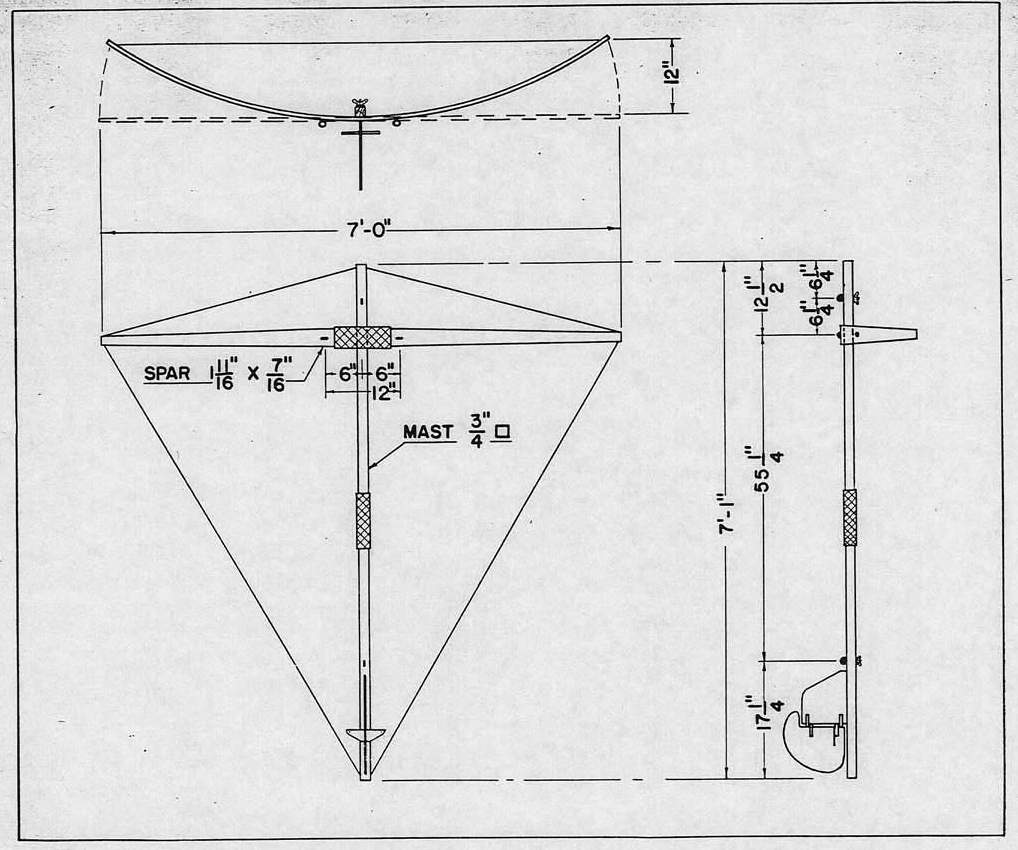
To facilitate packing and repair, the sticks are made in interchangeable half-lengths and joined by sleeves. The rudder is necessarily larger. The fin, hardware and structure are similar to those on Mark 1.
Ten kites and a set of spare parts are packed in a carton. All parts for one kite are wrapped within its cover.
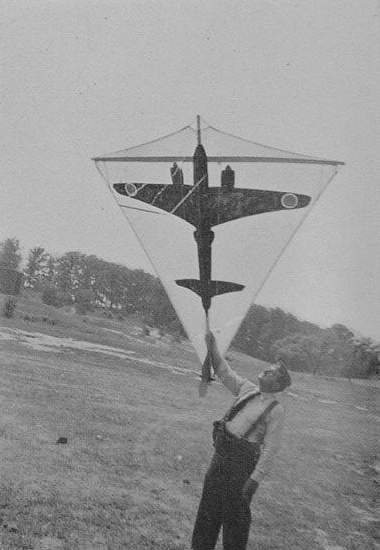
There are nine steps, and although not directly the same as those for the five-foot kite, the illustraions in Chapter II are equally helpful in undertanding how this one goes together--although one who is familiar with the Mark 1 kite will have no difficulty.
1. Unfold the package, laying the cover open.
2. Join the mast-halves. Use the sleeve which is packed in the envelope, and fit it first over the long-slotted end of the mast-half to which the spar sleeve is attached. Next, push in the opposite end of the other mast-half. Be sure to butt each completely to the center of the sleeve.
3. Join the spar-halves. The sleeve for them is attached to the upper portion of the mast. Turn it at right angles, but do not tighten its wing nut until the two pieces are firmly butted at its center.
4. Bow the spar. Use the bowing wire which has the two anchor-fittings at its ends, fitting each into its end-slot.
5. Attach the cover. Put both the cringle tapes and the boltrope loops into the crosswise end-slots of the mast and spar.
6. Tighten the boltrope. These sticks are more flexible than those of Mark 1, and care must be taken that they are not bent out of line by pulling the boltrope too tightly. A bent mast influences the steerability of the kite.
7. Attach the bridle. The bridle-tube, wires and control cords will be found in the envelope with the fin. When undoing them do not tangle the lines nor kink the wires. One end of each bridle wire is attached to the center of the tube; the other end of the shorter one fastens to the upper eyebolt, the longer to the lower.
8. Assemble the control unit. Fit the tiller bar into its slot in the rudder; connect the rudder gudgeons to those of the fin with the pintle; put the fin-lug into its slot in the mast and secure with the machine screw.
9. Attach the control cords. Be sure that the bridle wires are not twisted and that the control cords lie free at each side of the kite; hook each one to its end of the tiller, and put the mid-section into the screweyes in the spar.
These are similar to those for the Mark 1 kite but the bowing gap is 12 inches and the bridle apex located 5 inches below the spar.
The same reel and lines are used for Mark 2 as for the Mark 1 kite. With the lengths of the bridle tube and tiller the same as on Mark 1, the "feel" of flying it is similar, although its response is slower and its maneuvers require more space. Because it is not as rapid in its movements as Mark 1, some prefer it for training in kite target operations. The silhouette of a Japanese "Betty" on its cover carries out the relationship between a bomber and the fighter shown on the Mark 1 kite.
Since the publication of the first edition of this manual, the kite has been demonstrated and adopted at various gunnery stations and aboard ships. This has resulted not only in its improvement and adaptability to various conditions, but also in its comparison with other types of targets. A number of valuable opinions have been received and some criticisms offered. This chapter is a consolidation of those reactions and is intended for the gunnery officer who is considering adding the target kite to his program.
In comparing this kite with other targets it is interesting to list the qualities of an ideal target and to collate each type of target for each characteristic. The following targets are considered in this annotation:
The fixed paper target, which has been a basic mark since time immemorial and serves a useful purpose in any gunnery course for teaching the elements of aim, for lining up sights, and for learning the operation of a gun.
The clay pigeon, usually operated on a standard skeet range with a high house and a low house at the ends of a "W"-shaped course,--excellent for teaching alertness and lead.
Small moving targets, usually developed by local ingenuity and comprising belt or pulley mechanisms for moving airplane silhouettes along various paths,--they provide elementary training in aiming at a moving mark.
Balloons are similar to those used for meteorological soundings,--their speed depends on wind and buoyancy, and is usually slow.
Shell bursts are timed to explode at various heights and ranges; they merely provide a point of aim.
Gliders are of various types; small ones with spans of two or three feet are usually catapulted from the ground; those of ten or twelve feet span are carried aloft and released. Their utility increases in proportion to their size and speed.
Rail car targets may carry sails, banners, flags or sleeves, and are gasoline or electric-powered, operated around tracks of various shapes to give different approach angles and ranges. Speeds are rather slow, but their operation is usually reliable. Their principal fault is their limitation to a horizontal plane.
Airplane-towed sleeves provide a moving target in the air, and, with the cooperation of an understanding pilot, can give good practice at various ranges, elevations and angles. The speed and maneuverability are necessarily slower than those of an unfettered airplane. They are expensive to operate. At some locations they are difficult to provide.
Rockets, about six feet long, with large fins, operated from a trough like a Fourth of July firework, provide a fast-moving mark, but little if any satisfaction of a hit.
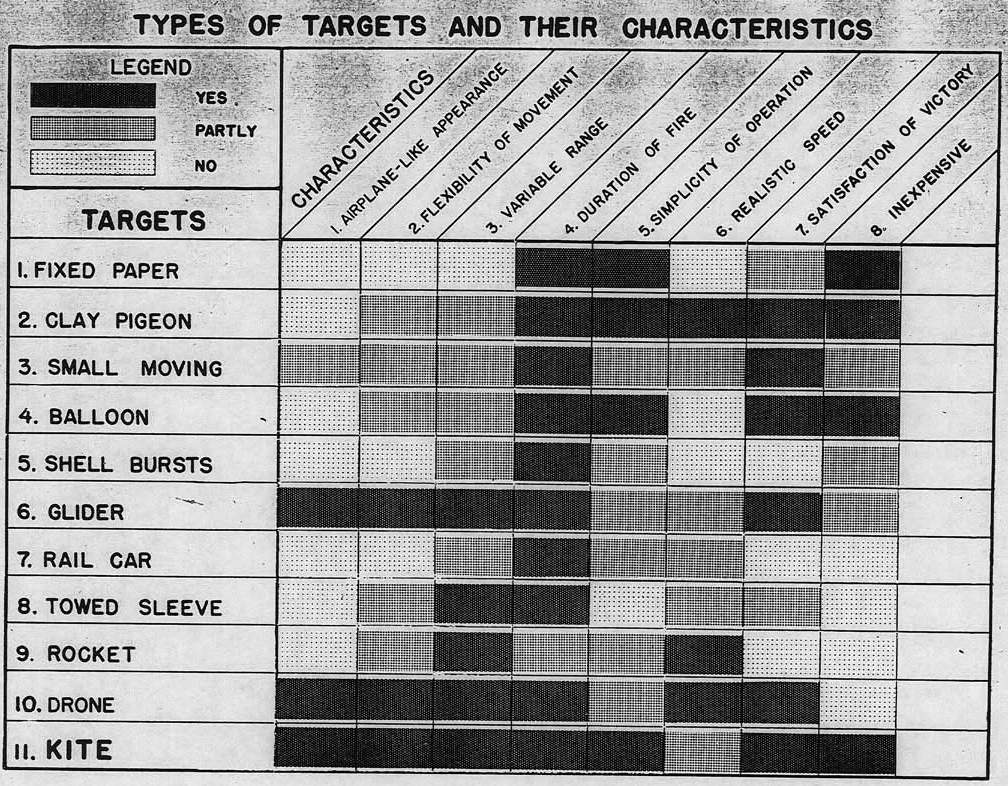
As a result of discussing these targets, certain desirable factors become apparent. It is interesting to condense the foregoing evaluation into a chart and to judge the target kite by the same standards.
1. It should resemble an airplane in appearance. In the air, particularly against a blue sky, the black airplane silhouette on the kite stands out much more prominently than the outline of the cloth. Moreover, as the kite maneuvers it is always "head first" as an airplane would be.
2. It should require flexibility of aim. The target kite has universal movement in its area of action. To track it the gunner must not only develop coordination between the horizontal and vertical controls of his swivel-mount or turret, but also must exert definite physical efforts to operate his piece. Targets which are slow and move in a single line do not necessitate much physical exertion on the gunner's part, but modern air combat does, and he must be trained to withstand it.
3. The range should be variable. This factor does not imply that the target be placed at different distances, but that it embody within itself the ability to move back and forth, away or toward the gunners. The lines of the target kite cannot only be reeled in or out to various lengths, but when flown from abeam of the gunners it can approach them and recede rapidly.
4. It should have a useful duration of firing. Under conditions which are fair for the kite--that is, good wind, intelligent operation, and adequate range--it averages more than a minute of target service per launching. Ratio of shots to hits is about 50 to 1; average hits on a downed kite about 15. When compared to a towed sleeve, the kite gave longer duration of fire than a fly-past of the sleeve, and a fresh kite could be launched less time than the airplane required to circle for another passage.
5.It should not require extensive apparatus, large personnel, nor complex training to operate. The target kite in a natural wind requires merely the reel and an operator. It can serve as a splendid target while other types of target ranges are being prepared. Operation in a calm utilizes equipment which is readily available. Training requires no special adaptability, but only intelligent coordination and understanding. The fact that it is fun to fly stimulates the interest.
6. Its speed of movement should be realistic with that of an actual airplane. The extreme speeds of military airplanes, the range of their weapons, and their ability to function at great altitudes require a gunner to develop extreme skill in range estimation and aim. The one-ninth size silhouette on the kite produces an impression of realistic distance; 200 actual yards appear to be 1800, and the true speed seems relative to that of an actual airplane at the simulated distance. The lateral movements of the kite are at about twice the speed of the prevailing wind, with the vertical dives even faster.
7. It should provide the satisfaction of a victory. The kite presents a constant invitation to be shot down; its cavortings impart to the gunner a vindictive lust to end its life; hits leave their mark; when it is hit in a vital spot it folds up and crashes down most realistically. This psychological satisfaction is an important item in training.
Every type of target has its individual advantages and limitations. Modern air gunnery is extremely complex and requires numerous devices to cover its many phases. When compared with other targets, the kite has merits which seem to justify its inclusion in the training program.
8. It should not be too expensive. Targets are used in large numbers, and if too expensive, require funds which might be better invested in more vital material. In some instances the cost of apparatus required to operate a target is many times that of the target itself, and when considered in relationship to the service provided makes the operation very uneconomical. The individual Mark 1 kite costs less than five dollars originally; its life is prolonged by repair and salvage. The reel costs about twenty dollars and lasts indefinitely.
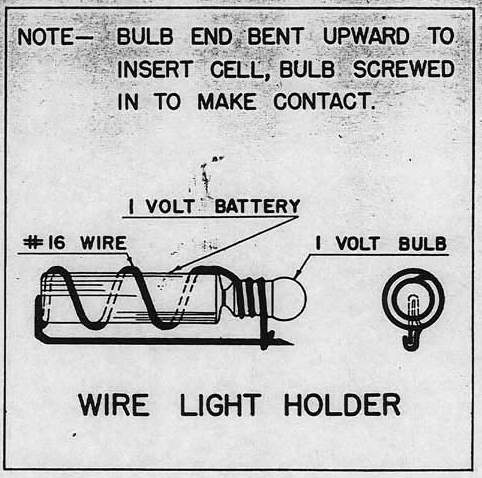
Range estimation: Rigged for flight with a single line, and with marks made on the line at fixed distances, the kite has been flown at various heights known to the instructor, who required the students to estimate the simulated height represented by the one-ninth silhouette.
Niqht firinq: A wire fitting has been developed which holds a flashlight cell and bulb and pins to the kite cover. Three of these, one at each sparend and one at the bottom, make a triangular light pattern which illuminates the airplane silhouette and provides an excellent target for night firing operations. The kite operator readily learns to detect and control the attitude of the kite by its triangular light pattern.
Signalinq: Messages have been sent by using the kite to indicate Morse code characters--a right arce for a dot, left for a dash. A prearranged code can be based on the kite's maneuvers.
Delivering written messaqes: When a nearby ship saw the kite being flown and asked for information about it, a copy of the manual was tied to a kite, flown over that ship and dived to its deck, where the manual was removed, the kite examined, relaunched and reeled back. This suggests that other messages might be similarly conveyed.
Various types of kites have been developed for use in forming air obstacle protection barrages, for elevating radio antennae, and as a guiding mark for men lost at sea. This target kite can be similarly employed.
The Special Services Division will appreciate receiving any further criticisms or suggestions relative to this target kite, will provide demonstrations of it, and will instruct kite officers in its use.
Discussion of the kite's merits and limitations has stimulated its improvement; in fact, many of the developments herein listed were brought about as a result of efforts to overcome adverse criticism, of which the following are typical examples:
"The kite as demonstrated would be a very useful addition to our training, but it is dependent on wind and our devices have to work at all times regardless of weather. The students are here for a limited period and can't postpone any phase of it by waiting for special conditions." This led to development of towing by the closed-course method and to lightening of the Mark 1 kite and designing of the Mark 2. As a result the kites can be available in a calm, and in light winds, as well as in their natural element of 10 knots or more.
"After one kite is shot down, it seems to take quite awhile to get another one up, and meanwhile the gunners are inactive." This criticism was made when the demonstrator was using a single kite and reel. It taught him always to carry duplicate equipment, to lay it out in readiness before firing started, and to train assistants who could launch another kite as soon as the first one was hit. If the descriptions of range operation in Chapter V are followed, no lags will occur.
"As a boy I could fly kites with single lines, but this one of yours appears difficult to handle." It is admitted that the target kite requires some skill for proper :control, but the methods of instruction described in Chapter IV have produced competent operators in half a day's instruction. Kites of many types were devised and tested before this one was decided upon; its abilities and advantages justify the study required to master it. Moreover, it can be modified for operation with a single line, thus requiring less skill--but also removing its principal military value, its manueverability.
"Modern air gunnery requires a fast target in order to teach the method of leading a mark. Does this kite require lead?" The boltrope was incorporated in the design of this kite so that its surface could be made taut and therefore would manuever with less resistance and greater speed. In high winds, the kite's speed does require a lead of several diameters; in closed course towing at the downwind circling, its speed can be as great as 70 miles an hour--that approaches its physical strength, limit. The simulation of distance imparted by the scale of the airplane silhouette makes the speed seem even greater.
"The kite isn't adaptable to our seashore range because the wind always blows coastwise and our guns are right on the beach." For such conditions the shuttle system of towing was developed; at one similar location the guns and gunners were mounted on trucks so they could be moved inland and located to the best advantage regardless of wind direction. At another station the kites were flown from boats anchored several hundred yards offshore.
"On our range we fire into a hill about half a mile away. We can't adopt the kite target because the elevation of our guns would cause the bullets to fall into inhabited country." This situation was. encountered at an inland Florida range, but even, so the demonstrator "sold" them some kites for use in tracking, and with which to instruct their personnel in kite handling. Those students left soon after for a Pacific island base where they reported that kites were not only fired it from aboard ship on the way over, but with them they were enabled to start range practice immediately upon landing without having to wait for the building of a course or taking airplanes from more important duties to towing sleeves. Recently, at another limited range, experiments were being made with a tracer shotgun shell which carries no more than a half-mile, even when aimed diagonally aloft. These can be used with kites; the slower speed of the bullet accentuates the requirements for lead.
The target kites and associated devices are maintained in stock at the Navy's principal warehouses and are readily available upon written request.
The basic issue of 25 kites, 2 reels, a harness, a set of spare parts, and a manual was apportioned to include the necessary kites and equipment required for the average period of evaluation.
The intensity of gunnery operations varies at different stations and each gunnery officer can best decide how much kite equipment he requires. In ordering or reordering he should not request multiples of complete issues unless he needs extra reels as well as kites. Either can be ordered separately. The device number for the issue is 3-C-29. If kites are ordered separately they are designated as 3-C-29-a, and are available in cartons of 25 or 10. Reels, 3-C-29-b, are packed two to a carton. The manual is identified as 3-C-29-c, the set of spare parts as 3-C-29-d. The spares are packed with the complete issue and are apportioned to replace first breakages and supply the parts usually damaged by gunnery in the average evaluating period, but inasmuch as sticks can be sawn out on the station and most of the hardware is standard, it is more practical to use local sources than to order extra sets of spares.
The harness is a recent addition and one is packed within each carton of reels. They may be ordered separately--3-C-29-e. The manual is intended primarily for the use of the kite officer, but should be available to the others of the kite crew. Extra copies may be ordered. The strip film, 3-C-29-f, is a condensation of the manual and is for classroom instruction of the kite crew by the kite officer. A text applying to each view is issued with it. The film can be used in the type of projector which shows each frame separately.
The metal-framed modification of the five-foot kite, 3-C-29-g, is packed in lots of twenty-five. If reels are desired with them, it should be so noted in the letter of request; otherwise, it will be considered that the kites alone are desired as replacements. The Mark 2 kites, 3-C-38, are usually not required in the same quantities as the standard and are therefore packed in lots of ten, with an assortment of spare parts in the same carton.
Requests for synthetic training devices reach the Special Devices Division, Bureau of Aeronautics, in many forms. Activities should route all requests through proper channels including the Chief of the Command. In this manner, such requests will come to the attention of the Staff Synthetic Training Officer, who can correlate and consolidate all individual requests originating within the Command and send one all-inclusive list from his Chief to the Chief of the Bureau of Aeronautics. To expedite handling of requests and delivery of devices a suggested form is given on following page.
The Army's Office of the Chief of Ordnance, Ground Forces, and Anti-Aircraft units have adopted the target kites. The Army designation for a complete issue of the Mark 1 kites is "M-9."
Letters of request should follow the plan of the form given here but should be forwarded through channels of the army command.
The Liaison Section of the Navy's Bureau of Aeronautics' Special Devices Division is available to handle requests from the Army or Allied Nations, for any types of target kites or accessories as well as other synthetic training devices developed by this Division.
                                                                          Date _____________________

From: (Insert here the title of Commanding Officer and name of requesting activity.)

To: Chief of the Bureau of Aeronautics, Washington, D. C.

Via: (Appropriate channels through which correspondence is normally routed.)

Subj:  Target Kite Equipment, request for.

Ref: (Insert here appropriate reference, if any.)

1. The following Special Devices are requested for the use of (insert name of activity for which desired.)

        Number of units
   requested       Device number         Device name

       1              3-C-29        Complete issue of Target Kites,
(Sample               including reels
entries)     10              3-C-29-a      Target Kites, Mark 1
       1              3-C-29-e      Target Kite Harness
              1              3-C-29-f      Target Kite Strip Film
             10              3-C-38        Target Kites, Mark 2

2. It is requested that the above material be shipped to:

           Commanding officer(add name of activity and address and the officer
           for whom they should be marked).

3. The devices requested are needed for (insert brief reason and refer where possible to special
justifications, particularly for large orders).


                                                                          (Signature and rank)