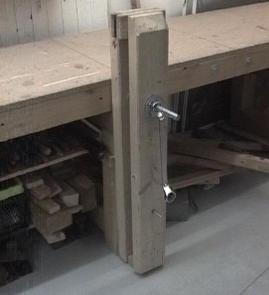


The above image focuses upon the large clamp I made for my workbench. That one is really nice: it can secure a door blade if need be! Attached to the clamp is a string with small bits of wood and aluminum. I often need these bits to clamp small parts. The string eliminates the need of picking them up every time they fall down when I open the clamp. The wooden brackets are good on aluminum surfaces. No additional protection needed.
Oh yes... end of 2001 I have moved from a 12 foot high 30'x20' workspace with four rows of lights and three large double windows facing west into a basement 20'x12', what a change, the workbench alone occupies the room now. It is a nineteen feet bench; the longitutinals of 4"x4" construction wood, full length. Loved it. But just way too large and obstructed the exit door, no way to get the baidarka in and out except clearing up the whole bench and lifting the kayak over it... so I had to decide to go and cut that bench.
What a SAD DAY
I just hate to cut the wood that was a hassle to transport into the first workspace (in the second floor!) and then into this basement... anyway it had to be done. I ripped the thing apart, trimmed the plate and beams and put one half of it back together.
And then, LIGHTBULB went on: I could just fetch some big metric construction screws, rearrange the parts and the third now useless support frame and bolt the stuff back together. Now it is a matter of minutes to get that third frame out under the bench. It is screwed to the rest by the screws you see on the right of the image. The table plate is supported by new assembly (no heavy loads admitted without support though, but what is heavy for 4x4s), and I can roll the kayak out under the bench; for the purpose I now have made a kayak storage jig with wheels under it!
So in the end that bench is as strong as ever and can be disassembled when the exit doorway is needed. If you are interested, take a look at http://dragonflycanoe.com/stephens/tools_and_materials.html the book is what I have used as a plan. I just took thicker beams, so bulky when seated on the edge they just don't tip over.
Here is the sketch I used as a guide:
Contributors to this page: Thomas Yost (TDY), Patrick Poirier (PPR), Gerald Maroske (GUM) and Hendrik Maroske (HHM)