PVC Skin (GUM/HHM)


I keep receiving questions about making PVC skins and thus have re-edited my comments about it into a single file that is a little easier to read. Now you see a mix of four years old comments with very recent ones.
Questions and comments by others are printed in blue.
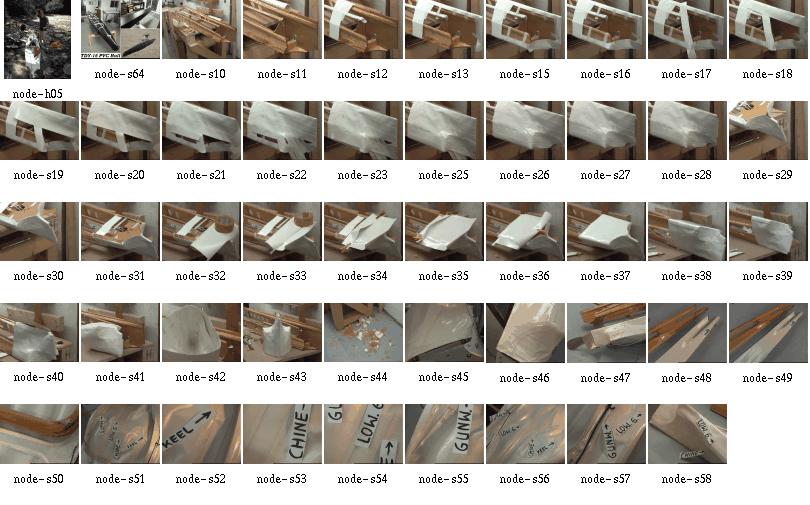
The images are clickable and lead to the full-size (original) pages.
[ Skin Material ]
[ Welding ]
[ Skinning Sequence ]
[ About Tape on a Final Skin ]
[ About Temporary Skins ]
[ Lacing Skins ]
[ George Dyson's Hypalon Skins ]
[ Thomas Yost's Hypalon Skins ]
[ Epilogue ]
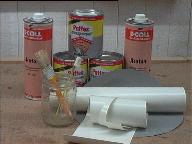
In short, the idea about glueing PVC is to use lots of thinner (Acetone). I had to test the mixture several days and came out with that it is right when the thinned glue begins to run off the brush by itself. Then apply it minimal two times to both surfaces. After letting the glue get nearly dry, combine the two PVC parts and press them well for some minutes.
 For the first prototype I sewed two strips of PVC onto a zipper
and glued these zipper strips at the middle of the deck piece. This feature
was as strange as convenient;
it eased assembly and loading of the boat.
For the first prototype I sewed two strips of PVC onto a zipper
and glued these zipper strips at the middle of the deck piece. This feature
was as strange as convenient;
it eased assembly and loading of the boat.
With some grief I dropped this idea and the actual design now has hatches
instead of the zipper. These hatches serve the same purpose except that
it is a lot more difficult to assemble the boat. Also I do not have these
sponsons any more that had to stretch the skin.
Anyway, the www site of STAMOID is http://www.stamoid.com/stamoid or http://www.forbo.com and they have some property sheets about that specific skin material.
The skin comes in doublesided or singlesided PVC covering on a polyester fabric. singlesided weighs 280grams/square meter, doublesided is 430g/m2, tensile strength is better than 1200N over 5cm width.
The singlesided stuff is covered with a dirt protecting finish, which makes glueing and welding impossible and thus has to be removed in the contact area.
Paul Raymond wrote: I stopped at a canvas store today, and he sold me 17 feet of double sided Stamoid for $100, which I think is a good price. Since this is for an aluminum folder, and Hendrik Maroske used it with success, hopefully I will too. I'll find another use for the pack cloth.
Stamoid is what I have used, it comes in both protected and unprotected versions. I suggest to get the thinnest material available, that is, I got the 0.6mm stuff and found it too heavy when glued together, so I talked my supplier into buying 0.5mm stuff for me. There even seems to be 0.4mm material out there, and a way to get material with defects (holes) in it (lots cheaper). This material is so thin compared to my Klepper, how does it hold up on your boats compared to commercial boats? Do you still prefer Stamoid to any other material available?
My most recent Baidarka still is the one from the 1999 Toronto trip. The Baidarka skin was finished late summer 1998 and I must confess I did not use the boat very much since Toronto. I have moved the workshop since, and with it the boat, and since that move the lake is a little more difficult to get to (without car).
Anyway, the pics on this website with several closeups of that particular skin have been made during Christmas holidays January 2002, so you have a guess at how good the skin actually is. It still looks "new enough", is tough as ever and still waterproof. No seams broke.
The skin is nearly four years old, the "unprotected" Stamoid, and ready to go on any trip. I'm satisfied with it. Always cleaned stains before they could wear in (with water only), because without the protection I am afraid to use chemicals to clean the skin.
I see that Tom Yost used polyester material, and then coated with hypalon, which worked well for him, but I wanted to avoid having to use toxic coatings, and the pvc material seemed quicker to skin.
To each one his way looks as the best afterwards. But I would still do it again. It took some time to learn to use a good balance of techniques, stitching, glueing, welding. Basically, my experience with Stamoid and Pattex and Acetone is that if the glue doesn't hold within the first five minutes, it never will. Throw away the pieces that you can and restart. If it holds, it always will. And by "holds" I mean you rip the pieces apart and not the glue fails, but the Stamoid goes apart.
Practice good bonds before doing the skin.
And even more basically the only advice I can give is to really do a few practice runs on the stem and stern pieces with the intention to keep them as samples. This will pay out in the end. Use double sided tape for the first practice run to have a good chance to rearrange things and if you don't want to wait for the glue to settle.
And, talking about abrasion, I cut Stamoid in strips and these were formed with a heat gun to match the curving of the hull before glueing them on over the stringers and where the skin pieces meet.
Generally the heat gun helps a lot to smooth out the results. Afterwards, the warm material is perfectly dry for glueing. It seems that there is some amount of (water or other) thinner in the skin that works against a good bond. Seems to be the stuff that makes the PVC soft.
There's different stuff available for glueing non-rubber zodiacs. 2-Komponent and stays flexible, although quite expensive
Welding is used only in professional applications for truck and tent awnings. I got caught by approximately 3mm material shink per meter as I welded the 5 seams in my hull. Makes funny waves in each section. Took me some time with my heatgun to shrink the whole skin, to take the worst away. :-(
Amateur tools for welding soft PVC without glue, just fabric on fabric, are air guns or the like. Their actual use and temperature operation range seem to fit. Use a rubber wheel on a stick to press the layers together. When it becomes black it's too hot... The professional heatgun that I used only melted the pvc surface without allowing for sticking. Something obviously wrong in my procedure. Welding was Gerald's idea, and for him it worked. My (Hendriks) heat gun did cause some degree of sticking, but not enough to really call this welding. It depends very much on the quality of the skin. If there is anything like "abrasive protection" or "dirt protection" put on it, forget about welding. What becomes black ?? PVC does not seem to change any colour. Is it the glue?? I guess that Gerald was joking. My white PVC just got darker and started fuming. Then it's time to rapidly stop heating. Final question not yet answered: do you stitch only for keeping the pieces together ? In other words, does the skin in its final version rely only on glue lines or is it glued and sewn. I could not really get this out of your description in previous postings.
In my case, stitching was used until the glue bonded permanently. After that time (some 15 minutes), the seams were removed where possible.
All your help is precious: I have just bought wallpaper and a range of water based markers to start the skinning job.
I got the wallpaper trick from Gerald, and it's worth it. You'll easily see how it will be with the PVC, since PVC doesn't have much more stretch than the wallpaper.
One thing about heat gunning:
I never was able to really shrink the skin. It's more like
rearranging it to stress, so that folds and waves remove
themselves. If you would really _stretch_ it with heat,
it will cool off and then be over-stressed and floppy.
So, I used the heat gun only for aesthetic corrections,
not for shrinkage.
Paul Raymond wrote:
Has anyone else had any luck using pack cloth, which comes coated one
side and dyed, and adding additional polyurethane?
Michael Daly wrote:
I have never tried, but wouldn't bother. Coated pack cloth, in addition
to having a urethane coating on one side, has a durable water repellent
coating on the fabric as well. The purpose of the latter is to prevent water
absorbsion into the thread and so enhance its waterproof properties.
I'm willing to bet this coating is what prevents a good bond with the
subsequent polyurethane coatings you apply. You need an uncoated fabric to begin
with, or at least one that has only a "coating-friendly" treatment applied.
Preventing any good bond, exactly. I had oversensitized my right thumb from rubbing the material with Acetone to remove the protection from the glue areas. Definitely NOT the way to go. Although the coating really is good, waterproof and repelling dirt.
Stefano Moretti wrote:
I need much help from more experienced skinners. This will be my first
attempt. I've finished the frame od the foldable with much satisfaction. It is
not wobbly as when I first started.
Congratulations! Now proceed to game level 2 :-)
1) Make hull and sides from one single piece, cutting "V" shaped slots in bow and stern. Seen this picture in FOLBOT virtual company tour.
No way. I also tried this. It is better to do it right, from the start on. Buy a roll of wallpaper and make cutting patterns. Cut the patterns in stripes following the chines, guns and keel.
2) Overlap hull and deck skin over the gunwale chine by more than one inch
Again, its better to go right through it: begin with a large overlap for sewing and then cut it small before glueing. The skin is not easily folded with such thick glue strips.
From my experience, I consider everything too thick that is overlapping more than 3/4 inch or has more than two parts overlapping at the same area
3) cutting deck from mid cockpit to bow, and from mid cockipt to stern, so to reduce the wrinkles and dragging all error towards the cockpit area where the big hole would accomodate much wrinkling. Done this with 3 mm plywood in clc kayaks, should work.
The less glue strips (rsp. easier folding), the better. If you go without deck ridge, there's no need to go with the deck seam. Always proceed to the ends rather than towards the cockpit. Otherwise, you end up having a slack skin at the cockpit.
4) for all unexpected problems and some extra stiffness (still very much debated I know) I would add two small section sponsons just below gunwale.
In my case, both designs worked well. Especially with cold, wet skin, sponsons give you the chance to re-stretch it.
How do you cut and glue around the Aleut stern.
Making these end pieces helps a lot in acquiring the skills to work with PVC. Throw away a piece if you are not satisfied. The next one will come together a lot quicker.
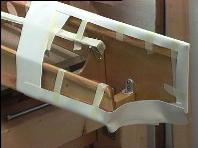
Having made a pair of useful end pieces, the large skin panels are glued over the end pieces, and when all the skin is done I add a nice looking finishing layer over the end pieces, smooting out the curvature and hiding all the seams, glued patches and the rugged connection between skin and end piece.
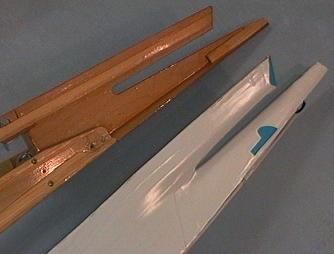
After having made the skin, I rip out the innermost PVC layer of the end pieces, thereby ensuring that the stem and stern will always slide into them without too much trouble. So, the very first PVC layer for these pieces is attached only very temporarily, with double sided tape or masking tape.
Do your PVC skins have a seperate panel for each Keel to chine, Chine to gunwale, and gunwale to deckridge, or are you able to cover greater areas at once?
Greater areas simplify nothing. They make things more complicated, and if something goes wrong, you'll have to throw away more skin. My boats have fairly high gunwales, more like 'planks'. The sequence is like this ( I began inside-out, here's a sketch, but that is not absolutely necessary):
What weight PVC would you recommend ?
The thinnest/lightest you can get. I have used .6mm thick stuff and next time will definitely use .4mm instead. Because every seam doubles the thickness, and together with the glue it really gets stiff. If you expect trouble somewhere, use the thinnest stuff you can get and apply strips wherever needed. The procedure for the stem/stern I described yields very stiff results.
From now on I assume that you have made a set of good end pieces and are ready to skin. PLEASE, use wallpaper for making cutting templates. Cut strips aligning to chines, guns and keel. (in my case, 6 strips + 1 deck strip). By any means make strips the whole length of the boat. Leave out cockpit rim.
On the inverted hull, sew together the two strips that meet at the keel and go up to the chine stringer.
Sew strips loosely together using 1 inch spacing between seam stitches. Sew only where PVC is cut away anyway. This routine worked best for my Greenland Baidarka with only one chine stringer and the gunwales having an upper and a lower stringer.
I used a twohole punch to make a row of holes at a long side of a large piece of PVC and temporarily sewed it directly onto the frame prior to glueing it to other pieces. This way I could reduce the count of folds in the skin.
Sew the two strips that go from guns to chine to the ones you just sewed together, leaving off the stripe between lower gunwale and chine and thus using large seams over the hole (stitches 5-7cm apart).
Loosely attach the previous mentioned strips to the guns (stapling them on wood frames, using tape on aluminum) and rotate the hull
Sew on the deck strips with a rough seam, stiches some 3cm apart
Use heat gun to remove wrinkles everywhere. Rotate hull.
Use heat gun to stick (weld) the remaining two strips to their place between the lower guns and chine stringer.
Remove the large seams under the two newly attached strips. Use heat gun to partially lift off those strips and reattach them without wrinkles.
Lift one yard of each strip, clean contact area thoroughly, apply "hendrix mixture" and glue them together. Make sure glue line is only 1.5 - 2cm wide. Glueing procedure described later. Work towards the ends of the hull, cleaning and glueing.
Let the glue dry. Cut excess skin at the newly made joints.
Use heat gun to remove wrinkles. Do not generate excessive heat at the glue strips!
Redo the keel seam (the butt type, not overlapping!). Now space the stitches 1cm apart. Cut excess skin. Now the borders of the two skin strips just touch each other.
Use heat gun to remove wrinkles at keel area. Cut keel strip (3cm wide) and lay it over the keel. Use heat gun to smooth it over the keel's curvature.
Remove keel strip, clean keel line, 1.5cm in each side (=3cm wide total).
Remove keel seam for two foot length, glue the keel strip where the seam was, to make it watertight.
Redo gunwale seam. Proceed as with keel.
Glue small horizontal skin strips over the bow and stern to generate the Baidarka's extremities. For Greenland Kayaks, much less work since larger patches usable.
Cut and seal the cockpit area.
Don't forget to make sure there is no "protective impregnation" of some sort over the PVC. Otherwise, you get lots of additional work to clean the glueing areas.
Be meticulous at the cleaning operations.
Always make test specimens and rip them apart to see whether the glue mixture and/or cleaning operation was successful.
Well, "hendrix mixture" goes like this:
- thin the glue until it quickly runs off the brush by itself.
- thoroughly mix
- apply three times, let dry after each application
- contact the parts
My glue is the German "Pattex Transparent", thinned with Acetone. You might want to ask my brother Gerald, who is a chemistry professional, what the american equivalent is.
I put a rub strip over every seam and have had good results.
In my first attempts, I also have put rub strips inside the skin; this is not so good, since skin folds less easy, is more heavy and tends to develop folds. Also I simply cannot glue well on the frame from the inside.
On my first foldable Baidarka, the double sided tape that had to closepart of the deck seam and seal it watertight, became an ugly black smeary, slimy thread after a two-week saltwater session. I'll never do this again...
Now, it seems that most of us just try with the expensive skin (me included), ignoring the possibilities of tape (although I tape virtually everything) and clear plastic. I just always had tried to avoid the additional work involved.
But that can be real fun; here is an account of what can be achieved, if you really want.
Tom writes:
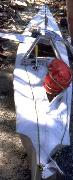
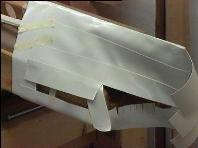
This temporary folding skin is made of PVC to test the
viability of the material as a one piece hull.
In this test, I've pulled the skin fairly tight using
squidding line but am careful not to
over stretch. There are still a few wrinkles in the
skin, but to this point no heat has
been applied. The "Real" skin will be made of higher
quality, thinner, Stamoid PVC.
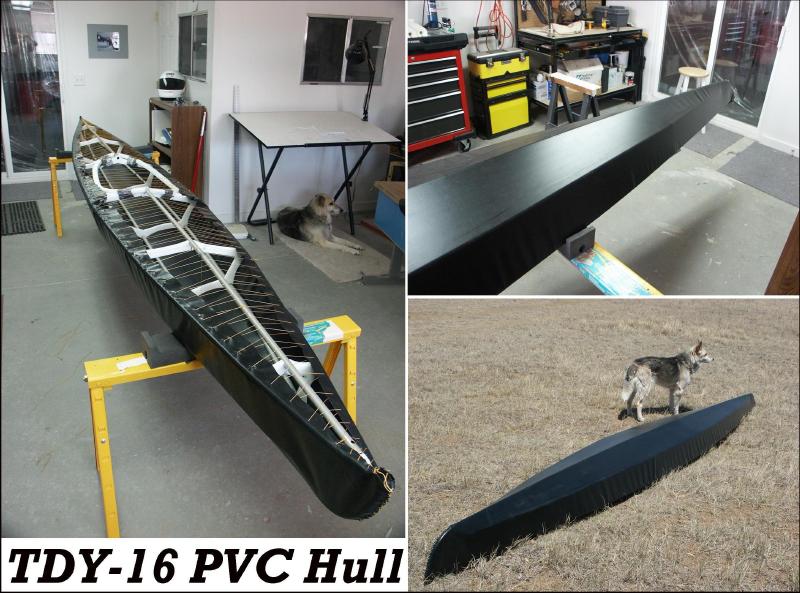
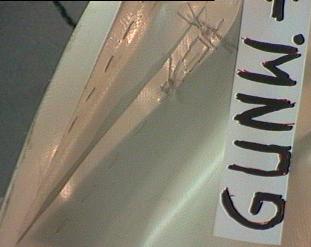
This is a good picture. I have seen this quite often with my own first PVC skins.
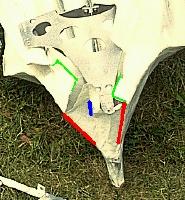
My own experience at working with very large PVC skin panels is that bulges develop at the few remaining seams which show that the skin doesn't fit closely. These bulges were quite sharp since in the other places the skin would fit very smooth. Afterwards it was impossible to remove these bulges.
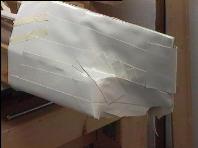
If you look closely, you will see the vertical folds in between the gunwales and stringers. This is exactly the problem zone, they tend to concentrate right before and after the cockpit. On the other hand, the keel area looks good... how about a single piece for both keel panels? Now, the keel needs a rub strip anyway, so there is also no real advantage in doing it in one piece. Doing it in two pieces yields much smoother stem and stern parts. You will find that narrow PVC panels are much easier to work into a pre defined shape.
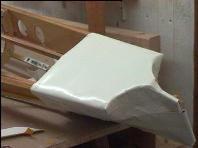
My own conclusion is that a one-piece skin is perfect for testing the frame before doing the final skin. This one took less than three hours to make. Very motivating.
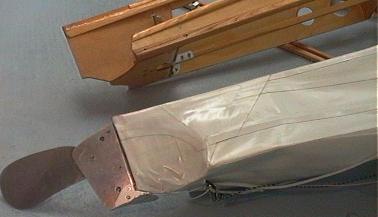
Tom writes:
The Stamoid has unidirectional fibers which would only conform
in one direction, so it wouldn't take the shape of the hull
without getting all wrinkled at the stringers. In addition, and
the thing that bothered me the most, was the fact that the Stamoid was easy to tear when I
pulled on the stitching that I used to stretch the skin. This
happened in only one direction , parallel to the fibers.
I've never had a skin material
tear before, so it really caused me concern.
I still feel that a one piece PVC hull is workable, as it has been
done by others. The problem I had was trying to do it with Stamoid.
The black PVC had
multidirectional cloth , the same that I use on my sewn skins, so it had
the ability to conform to the stringers. I didn't have enough of it for
the entire boat so I
purchased Stamoid thinking it was made the same way. It wasn't.
About the Stamoid tearing easily when sewn; that is a good point. If I recall correctly, the thicker 0.6mm variant would not tear as easy as the 0.4mm one. Anyway, I had no other comparison and was satisfied with the 0.6mm stuff. Although I have never seen a skin tear on my boats, even on tar or stone beaches. And back then I simply took it as normal, but shame on me, I have used only a small amount of really thin Stamoid, mostly using the 0.6mm material. I stand corrected in having said the thinner material is better. Maybe the thicker material has a stronger cross weave respectively more cross weave?
Here is what I found today, 28OCT2002 when measuring the tearing resistance with a thin line that I would use for sewing the skin (25kg test Dacron). I punched the "sewing" holes an inch from the border and an inch apart:
Direction crosswise to roll length (in roll axis):
20kg,18kg22kg (average=20kg)
Direction following roll length, that is, the fibers,
if fabric were of unidirectional fibers:
12kg,14kg,20kg (average=15kg)
To me the difference doesn't look so alarming, but yes the Stamoid actually is not at all multi/bi directional.
During my boat building runs I noted a rather large variation in quality even in a single roll. Also, the material sample I just have tested is 0.55mm thick instead of the supposed 0.6mm. The resistance to tearing with a strong line also varied a lot and was kept at bay in using a small distance between stitches. In the end I glued everything anyway. Also I used to use a thinner, weaker 10kg line that would rupture before the skin would tear and would not interfere with glueing.
I never could achieve anything with "lots" of heat shrinking on Stamoid. Only with narrow strips that were formed with the heat gun. Heat only re-aligned the weave within the PVC very lightly.
I also have heard of several people trying a one-piece skin, but my own results were frustrating (see above). See here for Patrick Poirier's results.
I know several people who have used hypalon on folding skins and I haven't heard complaints. Of course, commercial folding kayaks and most inflatable boats also use hypalon coatings, but those are impregnated under pressure and thus bonded more completely. But it is a good sign that the river rafting industry has stuck with hypalon for at least 20 years.
I should have all kinds of free time since I finished my new book, but I still haven't found time to revive the BHS. Fortunately, the skin boat revival has a life of its own, and is doing fine.
There's an excerpt of my new book, with discussion, at:
best wishes,
George B. Dyson
 Click here for a
view of a Thomas Yost's design for a folding Hypalon skin.
Click here for a
view of a very easy method of lacing the skin to the frame.
Click here for a
view of a Thomas Yost's design for a folding Hypalon skin.
Click here for a
view of a very easy method of lacing the skin to the frame.
"what's that"
I answered "my boat".
"a boat?"
"yes. It's a Baidarka." Having said that I thought he'll ask something about what a Baidarka is. Especially some question about that bow. Instead came
"why'd you wrap your boat in plastic?"
Click here for
Thomas Yost's design with a folding
hypalon skin.
Click here for a
view of a very easy method of lacing the skin to the frame.
Contributors to this page: Thomas Yost (TDY), Patrick Poirier (PPR), Gerald Maroske (GUM) and Hendrik Maroske (HHM)